|
|
 Author Author |
 where to look for rust. (currently 495 views) where to look for rust. (currently 495 views) |
| loufred |
| Posted on: Friday, January 18th, 2008, 1:12:08pm |
  |
|
|
| now im going to repair the car fixing all the rust and everything but i cant do that for about a month and wanted to look around the car for signs of rust. I have looked in the arches front suspension area yet unsure where else to check. a thing which is very suspicious is that no matter what my passenger side floor keeps getting wet but i think this is coming from under the carpet |
|
 Logged Logged |
|
|
|
|
| Andy |
| Posted on: Friday, January 18th, 2008, 1:25:16pm |
|
|
Official C.O.C Contributor


Gender:  Male Male
Posts: 23604
Posts Per Day: 3.47 |
|
To be sure you will need to strip out the interior (seats and carpet not dash!). The floor pan and back panel are prone to rust through.
A good look underneath is essential too especially around the points where the suspension/rear subframe joins to the chassis.
There are some pics of my silver one on here somewhere which shows these places perfectly. I just need to find them now!


 |
Drop me a PM if you would like to be added to the ClubCappo Member Map. More details can be found here.
We now have an official Facebook group as well as a page! See here |
Last modified Saturday, January 19th, 2008, 11:54:05am by Andy |
|
| Logged |
|
|
  |
Reply: 1 - 26 |
|
|
| Barry |
| Posted on: Friday, January 18th, 2008, 1:56:49pm |
|
|
|
Wot Andy said  . .
Certainly with the carpets and seats out, you want to study the join between the outer floor edge, and the sill. Follow this join right around the floors, especially at the rear (where the back of the seats are normally). This is the bit that Andy mentions, and forms the join between the rear bulkhead, floor and suspension mountings. There're three layers here, all of which trap moisture.
Also the base of the sill itself, and, with the sill blanking plugs out, have a look at the bottom of the sill stucture. There is a centre (usually hidden) sill that the plug-removal allows you to check, again particularly at the base.
From the underneath, poke all along that sill to floor join, plus the base of the outer sill.
I believe some have gone on the front inner wings, and certainly rear inner and outer wings often fail.
Overall, the thing to remember, is that more than any other car I have worked on, these cars rust from the inside out. The interior is very prone to collecting, and then trapping moisture. Because of the design of the seams, this gets drawn into the various joins and sits there doing damage.
Underneath there are more un-sealed joins, that sufer the same fate.
When any work has been done, make sure the whole car is Waxolyed (or similar), and that this open seams are either seam-sealed with a high-quality sealer, or regularly have wax, oil or WD40 injected into them. I also filled the interior with Waxoyl: contrary to fears, I've never smelt it, it hasn't come through the carpet, and it's nice to know that any moisture on the inside (rare in my one's case as it happens), is less likely to do any harm.
Good luck with your search, and hoprefully you'll come back saying it's a big fuss over nothing, and you couldn't find any rust at all  . . |
Last modified Friday, January 18th, 2008, 1:59:06pm by Barry |
|
| Logged |
|
|
|
Reply: 2 - 26 |
|
|
| steve |
| Posted on: Friday, January 18th, 2008, 4:14:14pm |
|
|
|
| Its also worth removing the front and rear bumpers. The fixing points for the bumpers are only thin steel and if the bumpers have been knocked at all they deform the paint cracks and rust sets in. Check around the ends of the headlight land panels(front bumper off ). Check fixing points under the rear lights and number plate light bracket also check the air relief vents rear of the back wheel these rot like mad and also check the rubber flaps on the vents because some times they perish and fall off letting more water in. Remove the front lower wing panels thse fill up with muck and i mean fill up it sits in their wet and rots the front of the sill out . open the doors look at the bottom windsceen corner their is a plastic trim held in place with one srew (normly rusted in) so be very carful the braket behind is thin this spot fills muck. Hope this helps |
|
| Logged |
|
|
|
Reply: 3 - 26 |
|
|
| Barry |
| Posted on: Friday, January 18th, 2008, 7:10:10pm |
|
|
|
On the bright side, the glovebox lid rarely rusts  . . |
|
| Logged |
|
|
|
Reply: 4 - 26 |
|
|
| crisp |
| Posted on: Friday, January 18th, 2008, 7:41:44pm |
|
|
|
How do you get the danged seats out?
|
|
| Logged |
|
|
|
Reply: 5 - 26 |
|
|
| Andy |
| Posted on: Friday, January 18th, 2008, 7:43:01pm |
|
|
Official C.O.C Contributor
Gender: Male
Posts: 23604
Posts Per Day: 3.47 |
|
| Only four bolts. Undo two front ones first, slide seat all the way forwards and undo the back two. |
Drop me a PM if you would like to be added to the ClubCappo Member Map. More details can be found here.
We now have an official Facebook group as well as a page! See here |
|
| Logged |
|
|
| |
Reply: 6 - 26 |
|
|
| crisp |
| Posted on: Friday, January 18th, 2008, 7:44:35pm |
|
|
|
|
| Logged |
|
|
|
Reply: 7 - 26 |
|
|
| Andy |
| Posted on: Saturday, January 19th, 2008, 11:54:55am |
|
|
Official C.O.C Contributor
Gender: Male
Posts: 23604
Posts Per Day: 3.47 |
|
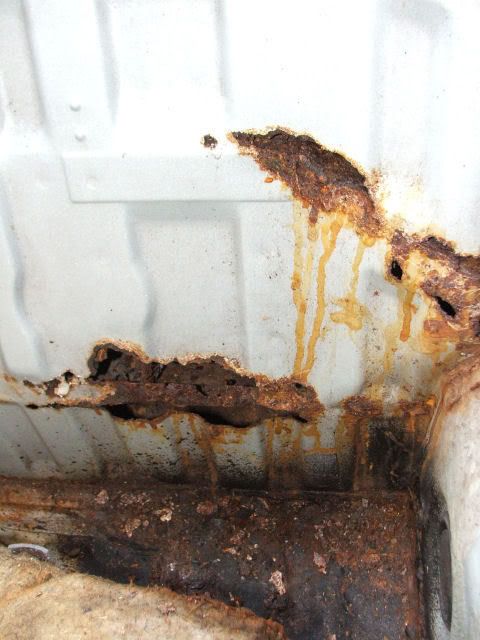
| Added a few pics above to show some of the areas mentioned. |
Drop me a PM if you would like to be added to the ClubCappo Member Map. More details can be found here.
We now have an official Facebook group as well as a page! See here |
|
| Logged |
|
|
| |
Reply: 8 - 26 |
|
|
| loufred |
| Posted on: Saturday, January 19th, 2008, 1:27:18pm |
|
|
|
| oh my.. i pray to the car god my car isnt as ba das the pics you uploaded |
|
| Logged |
|
|
|
Reply: 9 - 26 |
|
|
| Andy |
| Posted on: Saturday, January 19th, 2008, 2:00:44pm |
|
|
Official C.O.C Contributor
Gender: Male
Posts: 23604
Posts Per Day: 3.47 |
|
Hard to believe that car had a very recent MOT when I bought it is it
The holes were all patched up with fibre glass. The guy I bought it off was very lucky - especially when you consider he crashed it into the M1 crash barrier at full speed! |
Drop me a PM if you would like to be added to the ClubCappo Member Map. More details can be found here.
We now have an official Facebook group as well as a page! See here |
|
| Logged |
|
|
| |
Reply: 10 - 26 |
|
|
| capgun |
| Posted on: Saturday, January 19th, 2008, 2:07:21pm |
|
|
|
Smashie is living proof that you can drive a cappo into a house and still be ok afterwards  |
|
| Logged |
|
|
|
Reply: 11 - 26 |
|
|
| Andy |
| Posted on: Saturday, January 19th, 2008, 2:12:49pm |
|
|
Official C.O.C Contributor
Gender: Male
Posts: 23604
Posts Per Day: 3.47 |
|
| Yep, amazingly strong cars - even when full of tin worm! |
Drop me a PM if you would like to be added to the ClubCappo Member Map. More details can be found here.
We now have an official Facebook group as well as a page! See here |
|
| Logged |
|
|
| |
Reply: 12 - 26 |
|
|
| crisp |
| Posted on: Sunday, January 20th, 2008, 6:16:51pm |
|
|
|
“ |
Quoted from loufred, posted Saturday, January 19th, 2008, 1:27:18pm at here |
” |
oh my.. i pray to the car god my car isnt as ba das the pics you uploaded
|
|
me 4 mine tooo!
|
Last modified Sunday, January 20th, 2008, 6:17:10pm by crisp |
|
| Logged |
|
|
|
Reply: 13 - 26 |
|
|
| capgun |
| Posted on: Sunday, January 20th, 2008, 10:50:01pm |
|
|
|
| Yours should be fine crisp - I remember seeing photos when of it was being repaired |
|
| Logged |
|
|
|
Reply: 14 - 26 |
|
|
| crisp |
| Posted on: Monday, January 21st, 2008, 9:11:35pm |
|
|
|
Oh, yes that would be those nicely repaired arches that are already bubbling again wouldn't it?
|
|
| Logged |
|
|
|
Reply: 15 - 26 |
|
|
| loufred |
| Posted on: Wednesday, January 30th, 2008, 2:58:37pm |
|
|
|
had a look around while fitting the spacers and saw some rust in which is in the same place as the pictures above. not as bad yet. i could see water dripping from the same area on both sides so i could see why it rusts so easily. cant see where all the water is coming from tho :S

this is a picture of the back right side just in front of the wheel |
Last modified Wednesday, January 30th, 2008, 3:01:27pm by loufred |
|
| Logged |
|
|
|
Reply: 16 - 26 |
|
|
| Andy |
| Posted on: Wednesday, January 30th, 2008, 3:26:27pm |
|
|
Official C.O.C Contributor
Gender: Male
Posts: 23604
Posts Per Day: 3.47 |
|
There are drain holes in this section so water coming out isn't a problem as such it's the water that doesn't come out that you need to worry about
You might want to whip the carpets out sooner rather than later as it could well be the floorpan rusting from the inside out. |
Drop me a PM if you would like to be added to the ClubCappo Member Map. More details can be found here.
We now have an official Facebook group as well as a page! See here |
|
| Logged |
|
|
| |
Reply: 17 - 26 |
|
|
| Andy |
| Posted on: Friday, February 1st, 2008, 4:53:37pm |
|
|
Official C.O.C Contributor
Gender: Male
Posts: 23604
Posts Per Day: 3.47 |
|
| Buy which bit? |
Drop me a PM if you would like to be added to the ClubCappo Member Map. More details can be found here.
We now have an official Facebook group as well as a page! See here |
|
| Logged |
|
|
| |
Reply: 18 - 26 |
|
|
| loufred |
| Posted on: Friday, February 1st, 2008, 8:12:28pm |
|
|
|
| oh sorry the little drain plugs. is this where the water was coming from? i dont think it is that bad the rust. but really needs sorting. i promis you, this will be one of the best cars on the site when im done with it |
|
| Logged |
|
|
|
Reply: 19 - 26 |
|
|
| Dean_Shields |
| Posted on: Friday, February 1st, 2008, 8:32:53pm |
|
|
|
| Just took my carprts out last night and there was rust at the back to but it only just began it's only just running along the seam some bits at the back but rub them back to bare metal all ok just got to reseam it so your not the only one Loufred |
|
| Logged |
|
|
|
Reply: 20 - 26 |
|
|
| Barry |
| Posted on: Friday, February 1st, 2008, 9:33:34pm |
|
|
|
I would reiterate the need for internal waxing (Waxoyl) under the carpets of our cars.
There are so many ways that water can get in, and then be trapped by the acoustic insulation on the bottom of the carpet.
I've always thought that by far the biggest risk posed to our cars structurally is internal moisture, rather than the more usual external sources.
As for welding in general: the overiding principle has to be to undo each panel one by one, so that each individual layer is repaired properly, re-welding these layers as you go. The end result should then be exactly the same as the original.
It is very, very wrong to put any patch over the top of weak metal. It simply traps moisture and quickly looses strength (not that I'm suggesting anyone here is intending this of course).
A final point: if DIY welding these cars, you'll need a very smooth MIG welder that is excellent at very low power settings. Even good Cappo metal is very thin indeed, and a bit of a challenge to weld, particulary inverted. |
|
| Logged |
|
|
|
Reply: 21 - 26 |
|
|
| Barry |
| Posted on: Saturday, February 2nd, 2008, 12:12:18am |
|
|
|
Yes, it's a major problem: not so bad with well-sealed or dry stored cars, but wih ours (if kept outside) it's a lethal combination of thin metal, poor rust-proofing, and damp.
As for the welder, keep us upto date on your course, and when you're ready to buy, let me know, and I'll run through the options.
I run twice-yearly Basic sheet Metalwork and Welding courses, and restore early Porsche 911's for a living (currently taking bookings for May 2009  ), so have some experience and always happy to talk through any repairs you are considering, whether it be the welding or the forming of panels . ), so have some experience and always happy to talk through any repairs you are considering, whether it be the welding or the forming of panels . |
|
| Logged |
|
|
|
Reply: 22 - 26 |
|
|
| Barry |
| Posted on: Wednesday, May 28th, 2008, 3:48:06pm |
|
|
|
Well, first things first, and that's where to start.
Make sure battery, alternator and ECU are all disconnected.
After that, simply start at the simplest, most independant repair. I.e. if there's somewhere that basically needs a flat self-contained patch letting in, that's where to start. As ever, the best repairs are where you make your patch, place it over the parent metal, scribe around it, cut and file to your line, until the patch fits perfectly.
Once you've done that, tack a piece of scrap onto the patch to give yourself a little handle to hold on to. Tack the patch into place, using a stanley knife blade or similar to lever it level with the surrounding metal. Tack it every inch, then weld between the tacks, or halfway between if you are tending to blow through. Grind off, weld up any holes, grind again, and job done! 1st patch done.
One thing, just be careful when welding and grinding that sparks can't find their way near any glass. They will burn into the glass, leaving marks at best, and chunks of weld/grind spatter at worst. |
|
| Logged |
|
|
|
Reply: 23 - 26 |
|
|
| bob_g |
| Posted on: Wednesday, May 28th, 2008, 9:10:06pm |
|
|
|
We usually use galvanised sheet for repairs like that (when they're not planned to be visible on the finished bodywork), which prevents the main part of the sheet from rusting - I would try and get access to the rear side (drill a hole in the hollow section if you have to) and waxoyl the back.
Not 100% sure which drain plugs you mean, but I wouldn't consider welding them up - that would just keep the water in the space behind, and make it rust from the other side.
|
|
| Logged |
|
|
|
Reply: 24 - 26 |
|
|
| Andy |
| Posted on: Wednesday, May 28th, 2008, 10:11:21pm |
|
|
Official C.O.C Contributor
Gender: Male
Posts: 23604
Posts Per Day: 3.47 |
|
| No need to apologise. I fully intend to update the 'what to look out for' thread with pics and a lot of yours are pretty much identical to my silver one although mine is much worse lol. |
Drop me a PM if you would like to be added to the ClubCappo Member Map. More details can be found here.
We now have an official Facebook group as well as a page! See here |
|
| Logged |
|
|
| |
Reply: 25 - 26 |
|
|
| crisp |
| Posted on: Wednesday, May 28th, 2008, 11:23:59pm |
|
|
|
Some are certainly silver car rust specials, just like mine, only mine hopefully (although undeniably bad) ain't quite that far gone, yet, thank God.
Round the edge of the floor pan, and around the seat belt mounts.
Excellant photos, btw 
You can see really clearly just where it was being discussed the other week about behind the seats where the three(?) sections join at the bottom and so many think now the seam sealer fails and it gets in there and the rust blows the whole thing wide open 
|
|
| Logged |
|
|
|
Reply: 26 - 26 |
|
|
|
 Cappuccino Owners Club › General Discussion Boards › Cappuccino In General › where to look for rust. (Moderators: )


 Locked Board