|
|
 Author Author |
 electric window switch refurb (currently 700 views) electric window switch refurb (currently 700 views) |
| olliedel |
| Posted on: Friday, January 6th, 2012, 7:08:52pm |
  |
|
Big Member

Posts: 467
Posts Per Day: 0.27 |
|
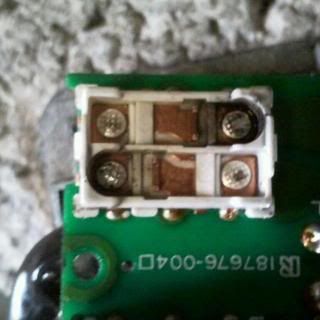
I just took apart my electric window switch to find that the only reason they had become inconsistent in working ie would go up but not down etc was that the connections right at the heart of the switch had a build up of a carbon like substance from I would imagine a tiny spark every time the switch was flicked caused this.
Anyway it was an easy fix.
1. Remove switch from car
2. Remove 3 screws from back of switch and take it out of casing.
3. Gently with a small pointed tool unhinge the switches from their pivoting points.
4. Gently remove the green circuit board and the switches will come through with it.
5. Again separate what is left of the switches here you will see the internals of the switch. Clean the switch contacts with sand paper or sharp object.
6. Spray with WD40 and put it back together.
Below are a few before cleaning and after cleaning pictures of the switch internals.

Switch internals after cleaning
|
Last modified Saturday, June 2nd, 2012, 1:03:37am by olliedel |
|
 Logged Logged |
|
|
|
|
| Avar |
| Posted on: Saturday, January 7th, 2012, 1:42:50pm |
|
|
|
Nice job but i dont think WD40 was a good thing to use, did you spray it on the actual contacts?
Some say that using it could actually allow dust to stick easier, which is a possibility but i generally hate it as i've heard to just breaks down to water after a while and thats something you'd defo not want in switch gear.
A friend of mine used WD to cure an intermittent spark on his EVO once, suffice to say the fualt didn't happen for about a month afterwards. The car didn't start for a month though 8-) |
|
| Logged |
|
|
 |
Reply: 1 - 13 |
|
|
| DickW |
| Posted on: Saturday, January 7th, 2012, 2:52:41pm |
|
|
|
| Better off with proper contact cleaner. |
|
| Logged |
|
|
|
Reply: 2 - 13 |
|
|
| olliedel |
| Posted on: Saturday, January 7th, 2012, 3:24:25pm |
|
|
Big Member
Posts: 467
Posts Per Day: 0.27 |
|
I used the wd40 as it was all I had at the time. Hopefully it will hold up. I dabbed it dry with a cloth after spraying anyway.
Has anyone on here fixed these switches before? If so have they encountered any other problems other than the build up on the contacts? It would be nice to know is this type of bad connection the main cause of the faulty switch. |
|
| Logged |
|
|
 |
Reply: 3 - 13 |
|
|
| Badger |
| Posted on: Sunday, April 29th, 2012, 3:13:08am |
|
|
|
So, having cleaned these, did it do the job...???  coz I just removed my spare one and it looks pretty much the same. coz I just removed my spare one and it looks pretty much the same. |
Last modified Sunday, April 29th, 2012, 3:13:56am by Badger |
|
| Logged |
|
|
|
Reply: 4 - 13 |
|
|
| olliedel |
| Posted on: Friday, May 4th, 2012, 11:09:26pm |
|
|
Big Member
Posts: 467
Posts Per Day: 0.27 |
|
Yes it worked perfectly for me anyway. Give it a try its not a very big task anyway. Let me know if it works for you too.
Thanks |
|
| Logged |
|
|
| |
Reply: 5 - 13 |
|
|
| Badger |
| Posted on: Saturday, May 5th, 2012, 4:29:54am |
|
|
|
| LOL.....Forgot, Cleaned and working perfectly, cheers mate. |
|
| Logged |
|
|
|
Reply: 6 - 13 |
|
|
| humbles |
| Posted on: Saturday, May 5th, 2012, 9:17:31am |
|
|
Big Member
Posts: 185
Posts Per Day: 0.11 |
|
Just like to say .
Well done, Olliedel.
This is a good thread . I certainly give you a big thumbs up.
A nice handy hint from a member of Cub Cappo . |
|
| Logged |
|
|
| |
Reply: 7 - 13 |
|
|
| grant4561 |
| Posted on: Saturday, May 5th, 2012, 9:38:20am |
|
|
Maximum Member

Posts: 1719
Posts Per Day: 0.98 |
|
| Agreed, this is the sort of "tip" we need. |
|
| Logged |
|
|
| |
Reply: 8 - 13 |
|
|
| olliedel |
| Posted on: Sunday, May 6th, 2012, 7:27:30pm |
|
|
Big Member
Posts: 467
Posts Per Day: 0.27 |
|
| Thanks for the comments. Glad it helped. |
|
| Logged |
|
|
| |
Reply: 9 - 13 |
|
|
| vhpete |
| Posted on: Thursday, April 4th, 2013, 8:55:46am |
|
|
|
going to attempt this later on and fixes my problem 
will keep you posted  |
|
| Logged |
|
|
|
Reply: 10 - 13 |
|
|
| Gemmaswansea |
| Posted on: Friday, February 20th, 2015, 7:55:20pm |
|
|
|
A-maze-ing! I just did this today much better, but I'm still having problems with the driver side window, perhaps I need to adjust the window frame rubber?  |
|
| Logged |
|
|
|
Reply: 11 - 13 |
|
|
| olliedel |
| Posted on: Wednesday, May 20th, 2015, 1:32:32am |
|
|
Big Member
Posts: 467
Posts Per Day: 0.27 |
|
| Try spraying the rubber with some lubricant. Glad it worked for you. |
|
| Logged |
|
|
| |
Reply: 12 - 13 |
|
|
| Melbourne_Cappa |
| Posted on: Sunday, December 9th, 2018, 11:26:26am |
|
|
|
Once again, Club Cappo saves the day.
On my last drive - My drivers side window went down, but then not up. GREAT. I don't have secure parking. Needing a fix quickly, I followed the above instruction, and with a few little lessons along the way (that I thought I'd share below) the windows not work perfectly again.
Here's what I learnt:
1. To remove the unit from the centre console, you need to unscrew the console. There are 2 screws on each side up front, 2 in the hatch of the consol itself (under the rubber mat, if you have one in there) and two that you'll need to reach with the seats tipped forward - on each side, right up top.
2. With these screws out, lift the console up and reach underneath the power window unit. There are two pinch points that you squeeze to push the power window switch unit up and out.
3. Then you unplug the switch, as you'd expect, using the white connector
4. Unscrewing the unit to disassemble it is easy. Lifting the switches from the circuit board without breaking something is NOT easy (this plastic is 25 years old remember!). I used a flat head screw-driver to get the outer side of the switch up and clear. The other side was fiddly, but after a poke and gentle pry, the switches came loose. Be careful!! I swear I came VERY close to snapping the switches.
5. To clean, I just scratched away all the brown stuff that had accumulated with a screwdriver. Nothing fancy.
Easy enough job. Took 30 mins all up. |
|
| Logged |
|
|
|
Reply: 13 - 13 |
|
|
|
 Cappuccino Owners Club › FAQ › How to... › electric window switch refurb (Moderators: )


 Locked Board