|
|
 Author Author |
 Modifying Headlights (currently 1248 views) Modifying Headlights (currently 1248 views) |
| mitogeri |
| Posted on: Tuesday, February 7th, 2012, 12:34:01pm |
  |
|
Big Member

Posts: 192
Posts Per Day: 0.12 |
|
I had to modify my headlights for the Hungarian registration,as we are driving on the other side of the road.I took some pictures while working.
I used a heatgun to separate the headlight,,if you do this,,be careful and apply the heat evenly,take your time,its easier than you might think.
I took the projectors out,,as its easier to work on them if you have them in your hands. taking it apart is easy,you only have to undo 4 bolts,but be careful when you are taking the lens out,as its quite heavy and fragile.


 |
Last modified Thursday, July 7th, 2016, 9:12:15pm by mitogeri |
|
 Logged Logged |
|
|
|
|
| harwoodr |
| Posted on: Tuesday, February 7th, 2012, 5:14:35pm |
|
|
|
| So now that you have them apart, what are you doing in the way of modification? |
|
| Logged |
|
|
 |
Reply: 1 - 30 |
|
|
| mitogeri |
| Posted on: Wednesday, February 8th, 2012, 5:45:02pm |
|
|
Big Member
Posts: 192
Posts Per Day: 0.12 |
|
First of all,you have to do a few measuerements,and draw guidelines on the projector housing before you start your job.I measured the difference between the lower and higher lines in the housing,it was 2milimetres as far as I remember.
You have to mark the middle of the housing(its like a mirroring point,thats the middle vertical blue line) and copy one side to the other.
on the left,you have to grind down 2milimetres of the housing,down to the red line shown in the picture.
on the right,you will need a metal plate bolted on from the back of the projector(just like the blue rectangle shows on the picture),so that it will be the same height as the left side originally was.
You have to do the grinding very precisely to have good results(especially where the red line is in an angle..)-Try to have the same angle as what you originally had on the other side(yellow guide lines were helping me).I hope this picture with the guidelines will help.
One more important note: the metal plate has to be bolted on from the back of the projector(so from the side that is closer to the bulb) otherwise the top lines of your beam will be blurish(hope you know what I mean).
WHen re-assembling the headlight,I haven't used any extra adhesive,I only reheated the adhesive with a heatgun,and pressed the glass back where it was.
 |
Last modified Wednesday, February 8th, 2012, 5:48:03pm by mitogeri |
|
| Logged |
|
|
 |
Reply: 2 - 30 |
|
|
| redgaijin |
| Posted on: Thursday, February 9th, 2012, 12:15:55am |
|
|
|
| What do you hope to achieve by all this? |
|
| Logged |
|
|
|
Reply: 3 - 30 |
|
|
| mitogeri |
| Posted on: Thursday, February 9th, 2012, 10:02:27am |
|
|
Big Member
Posts: 192
Posts Per Day: 0.12 |
|
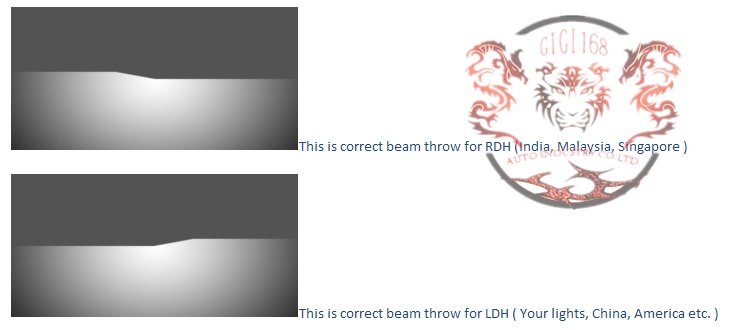
As you can see from the picture, Rhd and Lhd cars have different light beam.
As we are driving on the right hand side of the road in Hungary,I had to modify my projectors to have the same beam as LDH beam in the picture, to pass local MOT. |
|
| Logged |
|
|
| |
Reply: 4 - 30 |
|
|
| Hans |
| Posted on: Saturday, February 11th, 2012, 8:48:37am |
|
|
Minimum Member

Posts: 46
Posts Per Day: 0.03 |
|
Hi mitogeri,
thanks a lot for this. Some Cappuccino buyers here in Germany asked for a guide to modify headlights. I think this will be very helpful in Belgium, Netherlands, France, Germany, ... to meet the local regulations.
|
|
| Logged |
|
|
| |
Reply: 5 - 30 |
|
|
| elberto |
| Posted on: Thursday, March 15th, 2012, 4:15:14pm |
|
|
Medium Member

Posts: 67
Posts Per Day: 0.04 |
|
I've have a plan to build a piece to modify the beam. It was made by a lacappuccinoenfrance forum's member.
I'll post them when I'll be on my computer at home. |
|
| Logged |
|
|
| |
Reply: 6 - 30 |
|
|
| elberto |
Posted on: Friday, March 16th, 2012, 11:52:41am
 Attachment: inverseur_phare.pdf - 17.09 KB (52 downloads) Attachment: inverseur_phare.pdf - 17.09 KB (52 downloads) |
|
|
Medium Member
Posts: 67
Posts Per Day: 0.04 |
|
| Join the plan in PDF and Catia. |
|
| Logged |
|
|
| |
Reply: 7 - 30 |
|
|
| elberto |
Posted on: Friday, March 16th, 2012, 11:53:45am
Attachment: 111.dwg - 73.59 KB (55 downloads) |
|
|
Medium Member
Posts: 67
Posts Per Day: 0.04 |
|
|
| Logged |
|
|
| |
Reply: 8 - 30 |
|
|
| eldobbo |
| Posted on: Monday, March 26th, 2012, 9:33:27am |
|
|
|
| Many thanks for that, I will have to get cracking and get our headlights done so we can get our Cappo French registered. |
|
| Logged |
|
|
|
Reply: 9 - 30 |
|
|
| pzooo |
| Posted on: Friday, April 6th, 2012, 2:21:00pm |
|
|
|

I did the same, bought a Japanese one and converted it myself. First light is a b*tch to disassemble, second went easy. I used a few knives to create gaps and gasonline to dissolve the glue. |
|
| Logged |
|
|
|
Reply: 10 - 30 |
|
|
| mitogeri |
| Posted on: Monday, April 30th, 2012, 12:32:32pm |
|
|
Big Member
Posts: 192
Posts Per Day: 0.12 |
|
| thats very helpful elberto,thanks for that! |
|
| Logged |
|
|
| |
Reply: 11 - 30 |
|
|
| ck-spec |
| Posted on: Tuesday, May 1st, 2012, 12:27:04pm |
|
|
|
Thanks a lot, it saves me 1000 Euro for a set of new ones!
but i have a question,.. is it 100% safe that it wil work and the TÜV/LaReg in Austria will give me there OK,..
anyone Informations?
Thanks |
|
| Logged |
|
|
|
Reply: 12 - 30 |
|
|
| ycming |
| Posted on: Tuesday, May 1st, 2012, 5:46:57pm |
|
|
|
See once you take the lens out, what sort of glue do you put it back on with ?
Thanks
Ming |
|
| Logged |
|
|
|
Reply: 13 - 30 |
|
|
| mitogeri |
| Posted on: Tuesday, May 1st, 2012, 8:38:18pm |
|
|
Big Member
Posts: 192
Posts Per Day: 0.12 |
|
I used the same glue that kept the headlight together originally,as if you think of it,,you are not removing the glue,you just heat it up.
Ck-spec: As long as you do the job properly,and your beam looks as it should(you can get it checked in any Tuv centre) AND you have the E-sign in the headlight glass,you should be ok. |
|
| Logged |
|
|
| |
Reply: 14 - 30 |
|
|
| ck-spec |
| Posted on: Saturday, July 7th, 2012, 8:07:07pm |
|
|
|
Thanks,.. i done mine a few weeks ago and its OK!
Light is perfect and nobody is intressted HOW its made, because,.. its OK!

So,.. There is NO problem with this MOD in Austria!
|
|
| Logged |
|
|
|
Reply: 15 - 30 |
|
|
| mitogeri |
| Posted on: Sunday, July 8th, 2012, 1:42:33am |
|
|
Big Member
Posts: 192
Posts Per Day: 0.12 |
|
I'm glad it all went Ok for you |
|
| Logged |
|
|
| |
Reply: 16 - 30 |
|
|
| MiKa_type_R |
| Posted on: Monday, July 15th, 2013, 9:23:10pm |
|
|
|
|
| Logged |
|
|
|
Reply: 17 - 30 |
|
|
| ateszWRC |
| Posted on: Wednesday, July 17th, 2013, 6:54:57pm |
|
|
Minimum Member
Posts: 41
Posts Per Day: 0.02 |
|
| Hey guys, thanks for the description. I just have one question to you, especially to MiKa type R, how did you get out the headlights without removing the front bumper? Or did you actually take it, then put it back for the photo? |
|
| Logged |
|
|
| |
Reply: 18 - 30 |
|
|
| MiKa_type_R |
| Posted on: Wednesday, July 17th, 2013, 9:52:02pm |
|
|
|
You don't need removing the bumper  There are 4 screws that hold the headlight. 2 screws in the engine bay, the other 2 are behind the mudguard There are 4 screws that hold the headlight. 2 screws in the engine bay, the other 2 are behind the mudguard |
|
| Logged |
|
|
|
Reply: 19 - 30 |
|
|
| ateszWRC |
| Posted on: Thursday, July 18th, 2013, 5:31:26pm |
|
|
Minimum Member
Posts: 41
Posts Per Day: 0.02 |
|
| Damn, then I missed a trick because I found all 4 screws but I wasn't able to pull out the headlights. Can you give me a little hint? |
|
| Logged |
|
|
| |
Reply: 20 - 30 |
|
|
| MiKa_type_R |
| Posted on: Saturday, July 20th, 2013, 3:13:43pm |
|
|
|
| You have disconnected the wire? |
|
| Logged |
|
|
|
Reply: 21 - 30 |
|
|
| ateszWRC |
| Posted on: Sunday, July 21st, 2013, 12:11:31pm |
|
|
Minimum Member
Posts: 41
Posts Per Day: 0.02 |
|
| Yes I did. After a few try I finally managed to get them out. Apparently I had problems with the screws, they did not want to come out from their holes but I pushed them with my hand from the mudguard side. Next time I will read first and act afterwards. Thank you for your help anyway |
|
| Logged |
|
|
| |
Reply: 22 - 30 |
|
|
| mitogeri |
| Posted on: Sunday, July 21st, 2013, 10:37:28pm |
|
|
Big Member
Posts: 192
Posts Per Day: 0.12 |
|
Szia Atesz,sok szerencset a kis cappuccinoval,remelem hasznos volt a leiras a lampahoz
|
|
| Logged |
|
|
| |
Reply: 23 - 30 |
|
|
| ateszWRC |
| Posted on: Monday, July 22nd, 2013, 8:19:44pm |
|
|
Minimum Member
Posts: 41
Posts Per Day: 0.02 |
|
Szia Geri, köszi, nagyon jól jött a leírás, már darabokban van a lámpa, ha megvagyok, megy műszakira a gép
Guys, sorry for the "encrypted text", but it is quite funny to find a fellow hungarian cappo lover/owner here |
|
| Logged |
|
|
| |
Reply: 24 - 30 |
|
|
| Andy |
| Posted on: Monday, July 22nd, 2013, 11:19:21pm |
|
|
Official C.O.C Contributor


Gender:  Male Male
Posts: 23604
Posts Per Day: 3.48 |
|
| S'ok Google translate works quite well |
Drop me a PM if you would like to be added to the ClubCappo Member Map. More details can be found here.
We now have an official Facebook group as well as a page! See here |
|
| Logged |
|
|
| |
Reply: 25 - 30 |
|
|
| Rall3r |
| Posted on: Friday, June 3rd, 2016, 1:52:12pm |
|
|
Minimum Member
Posts: 20
Posts Per Day: 0.01 |
|
| can the pictures from mitogeri be uploaded again please? |
|
| Logged |
|
|
| |
Reply: 26 - 30 |
|
|
| Andy |
| Posted on: Friday, June 3rd, 2016, 3:22:01pm |
|
|
Official C.O.C Contributor
Gender: Male
Posts: 23604
Posts Per Day: 3.48 |
|
Hopefully he still has them as they were hosted somewhere else...
|
Drop me a PM if you would like to be added to the ClubCappo Member Map. More details can be found here.
We now have an official Facebook group as well as a page! See here |
|
| Logged |
|
|
| |
Reply: 27 - 30 |
|
|
| mitogeri |
| Posted on: Thursday, July 7th, 2016, 8:18:34pm |
|
|
Big Member
Posts: 192
Posts Per Day: 0.12 |
|
First post fixed
|
Last modified Thursday, July 7th, 2016, 9:12:38pm by mitogeri |
|
| Logged |
|
|
| |
Reply: 28 - 30 |
|
|
| Ricou |
| Posted on: Wednesday, July 13th, 2016, 6:32:20pm |
|
|
Maximum Member
Posts: 1110
Posts Per Day: 0.65 |
|
Not working, the website you host the pics on doesn't allow hotlinking pics.
They show on your side because your browser has them in cache.
If you want them to work, you'll have to host them somewhere else |
Last modified Wednesday, July 13th, 2016, 6:34:29pm by Ricou |
|
| Logged |
|
|
| |
Reply: 29 - 30 |
|
|
| mitogeri |
| Posted on: Friday, July 15th, 2016, 1:12:05am |
|
|
Big Member
Posts: 192
Posts Per Day: 0.12 |
|
| Thanks Ricou,I will upload them elswhere then |
|
| Logged |
|
|
| |
Reply: 30 - 30 |
|
|
|
 Cappuccino Owners Club › FAQ › How to... › Modifying Headlights (Moderators: )


 Locked Board