|
|
 Author Author |
 Six sixty track day car (currently 3068 views) Six sixty track day car (currently 3068 views) |
| steve |
| Posted on: Wednesday, January 8th, 2014, 6:22:01pm |
  |
|
|
“ |
Quoted from mattjohns, posted Wednesday, January 8th, 2014, 5:24:14am at here |
” |
When you get around to making the 'spit', I'd be interested to know where the axis of rotation is for a Cappuccino shell.
|
|
Will do. The bare shells amazingly light so at a guess it will be near the top of the transmission tunnel. |
|
 Logged Logged |
|
|
 |
Reply: 40 - 92 |
|
|
| steve |
Posted on: Wednesday, January 8th, 2014, 6:29:06pm
 Attachment: dsc04904_small.jpg - 52.25 KB (848 views) Attachment: dsc04904_small.jpg - 52.25 KB (848 views) |
|
|
|
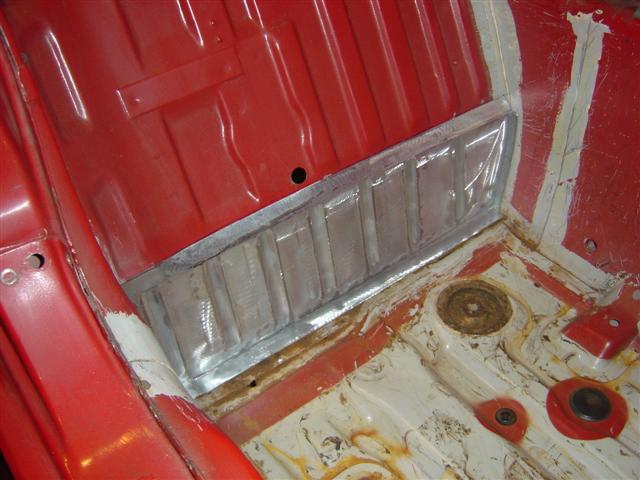
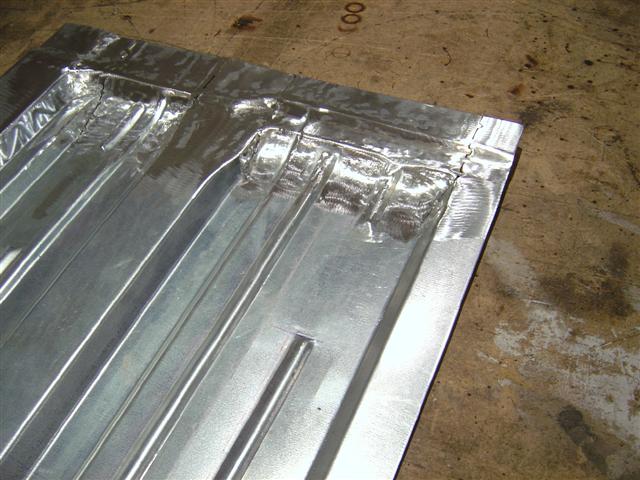
| Trial repair panel. I made it a couple of millimetres small on the width so i could try fit it over the original panel. It needs to go down and back a little but that will happen when the originals cut away. |
 |
|
| Logged |
|
|
|
Reply: 41 - 92 |
|
|
| Avar |
| Posted on: Wednesday, January 8th, 2014, 7:06:56pm |
|
|
|
|
| Logged |
|
|
|
Reply: 42 - 92 |
|
|
| fuzz573 |
| Posted on: Wednesday, January 8th, 2014, 7:15:28pm |
|
|
|
Looks very original Steve, well done  |
|
| Logged |
|
|
|
Reply: 43 - 92 |
|
|
| steve |
| Posted on: Wednesday, January 8th, 2014, 8:28:11pm |
|
|
|
Thanks. Its one place cappos always rot and its a lot easier to fit a full panel than to patch up and try welding to rust. At one point i almost bought a rear bulkhead panel to repair the rot. I then found out how much Suzuki charge for them  |
|
| Logged |
|
|
|
Reply: 44 - 92 |
|
|
| lord |
| Posted on: Wednesday, January 8th, 2014, 11:27:24pm |
|
|
|
How much??
Mate even the japanese would be proud of this work!!!!
That looks f**king good steve!!! |
|
| Logged |
|
|
|
Reply: 45 - 92 |
|
|
| steve |
| Posted on: Thursday, January 9th, 2014, 12:41:14am |
|
|
|
| Not suzuki prices thats for sure. Ill have a better idea when i make a proper pair. |
Last modified Thursday, January 9th, 2014, 10:19:28am by steve |
|
| Logged |
|
|
|
Reply: 46 - 92 |
|
|
| steve |
Posted on: Thursday, January 9th, 2014, 1:59:41pm
Attachment: top_veiw_fitted.jpg - 42.04 KB (797 views) |
|
|
|
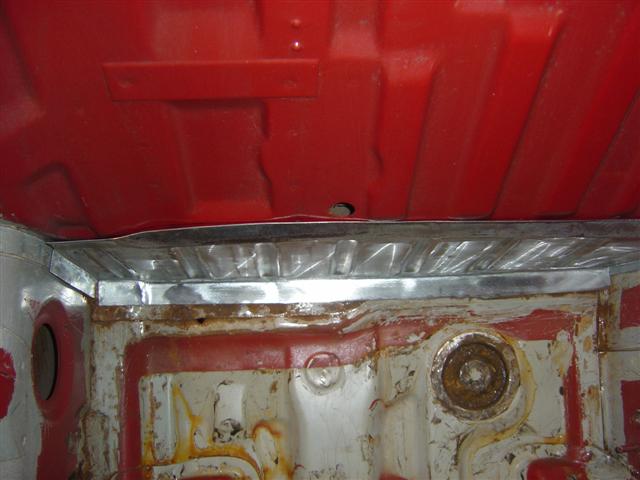
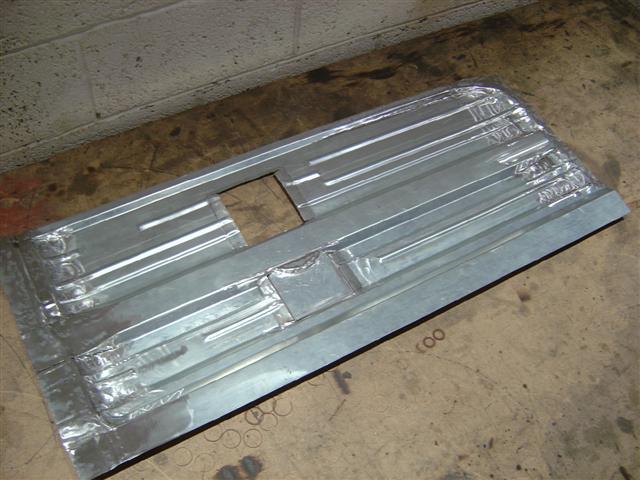
| Top view. Better perspective of the shape. Not exactly a flat plate with a few stiffening swages in it. |
 |
|
| Logged |
|
|
|
Reply: 47 - 92 |
|
|
| steve |
Posted on: Thursday, January 9th, 2014, 2:03:30pm
Attachment: back_2.jpg - 56.07 KB (798 views) |
|
|
|
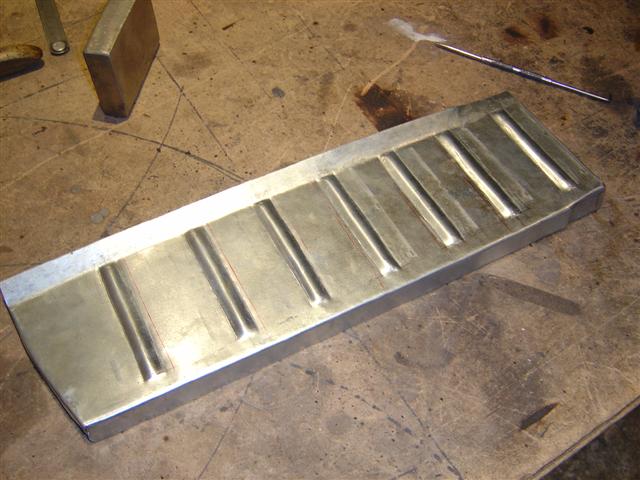
| Out of the car back view. |
 |
|
| Logged |
|
|
|
Reply: 48 - 92 |
|
|
| lord |
| Posted on: Thursday, January 9th, 2014, 3:11:01pm |
|
|
|
| Keep up the good work Ste! |
|
| Logged |
|
|
|
Reply: 49 - 92 |
|
|
| steve |
| Posted on: Thursday, January 9th, 2014, 3:48:43pm |
|
|
|
| Thanks. When time allows i will .... |
|
| Logged |
|
|
|
Reply: 50 - 92 |
|
|
| lord |
| Posted on: Thursday, January 9th, 2014, 4:14:40pm |
|
|
|
So tell me.. was that hard to make the panel? How much tweeking will it take? Im looking at mass production here lol. just seeing how many panels you're going to make? lol
I've got a small panel for you to have. hold on. |
|
| Logged |
|
|
|
Reply: 51 - 92 |
|
|
| steve |
| Posted on: Thursday, January 9th, 2014, 4:48:58pm |
|
|
|
| Mass production panels are pressed and tooling and the press itself are tens of thousands of pounds. So getting cappo panels done this way will never happen it would be financial suicide. the ones i make are old school hand crafted and time consuming. I could make small sections of cappo to repair rust i've done this sort of thing on many other cars in the past. |
|
| Logged |
|
|
|
Reply: 52 - 92 |
|
|
| lord |
| Posted on: Thursday, January 9th, 2014, 9:01:37pm |
|
|
|
Ive got the rear bulk head panel that fits on the corner? If you look from the back of the car underneath it holds the exhaust rubber. It's a small corner piece. You could copy this as it's original.
 |
Last modified Thursday, January 9th, 2014, 9:12:13pm by lord |
|
| Logged |
|
|
|
Reply: 53 - 92 |
|
|
| steve |
| Posted on: Thursday, January 9th, 2014, 10:30:16pm |
|
|
|
| Have you got the panel that sits at the side of it too? |
|
| Logged |
|
|
|
Reply: 54 - 92 |
|
|
| lord |
| Posted on: Friday, January 10th, 2014, 12:36:31am |
|
|
|
| I don't think so. But would this be useful to you? |
|
| Logged |
|
|
|
Reply: 55 - 92 |
|
|
| steve |
| Posted on: Friday, January 10th, 2014, 12:56:37am |
|
|
|
Those panels are ok on both my cars but if anyone wants them copying im more than willing to copy them. Top tip, inject all the cavities with FE-123 and when dry dinitrol cavity wax  |
|
| Logged |
|
|
|
Reply: 56 - 92 |
|
|
| lord |
| Posted on: Sunday, January 12th, 2014, 9:31:18am |
|
|
|
| any updates on this Steve |
|
| Logged |
|
|
|
Reply: 57 - 92 |
|
|
| steve |
| Posted on: Sunday, January 12th, 2014, 12:39:57pm |
|
|
|
| I should have the first floor pan done this next coming week. Then ill crack on and make the spit. Ive just got myself a pressure blaster so i can remove rust and then i'm going to soda blast the top of the shell. http://www.blastclean.info/?txtPage=gb25m |
|
| Logged |
|
|
|
Reply: 58 - 92 |
|
|
| lord |
| Posted on: Sunday, January 12th, 2014, 2:26:57pm |
|
|
|
How lond do you reckon it would take you to blast the car?
Or would you do it in stages?
Underneath first...
Remove panels and soda blast inside panels paint and replace panels over top...
Then do the top half?
Good investment Ste |
|
| Logged |
|
|
|
Reply: 59 - 92 |
|
|
| steve |
| Posted on: Sunday, January 12th, 2014, 7:12:54pm |
|
|
|
| The underside and wheel arches areas first with aluminium oxide media. It needs to be etch primed within a couple of hours of blasting. Im going to fully restore another shell to sell on when my car comes off the spit. I may as well i've accumulated the the equipment to do it. |
Last modified Monday, January 13th, 2014, 11:29:29am by steve |
|
| Logged |
|
|
|
Reply: 60 - 92 |
|
|
| lord |
| Posted on: Sunday, January 12th, 2014, 8:41:22pm |
|
|
|
you doing all the welding??
What if I added mine to the list? lol I can pay you ste |
|
| Logged |
|
|
|
Reply: 61 - 92 |
|
|
| steve |
| Posted on: Sunday, January 12th, 2014, 9:22:08pm |
|
|
|
| Yes i would do all the welding. All new panels would be spot welded where i can get the spot welder in to so it would look original. I don't mind doing bare shells and i mean completely bare because its the only way to do them right. You could have it back in primer or i could send it up to the paint shop and have it painted for you. It would be effectively brand new with zero rust. All i can say is watch this space and see what you think ... |
Last modified Monday, January 13th, 2014, 11:33:58am by steve |
|
| Logged |
|
|
|
Reply: 62 - 92 |
|
|
| steve |
Posted on: Monday, January 13th, 2014, 11:40:26pm
Attachment: dsc04928_small.jpg - 61.38 KB (637 views) |
|
|
|
| Back of the floor pan lifted. Just tacked on the joints its only test panel. |
 |
|
| Logged |
|
|
|
Reply: 63 - 92 |
|
|
| lord |
| Posted on: Tuesday, January 14th, 2014, 1:43:19am |
|
|
|
|
| Logged |
|
|
|
Reply: 64 - 92 |
|
|
| steve |
| Posted on: Tuesday, January 14th, 2014, 2:03:38am |
|
|
|
| This ones in 20swg galvanised not ideal but i've got loads of it. The proper ones will be in 20swg zintec it welds nice with a little cleaning off and is slightly softer to work with. |
|
| Logged |
|
|
|
Reply: 65 - 92 |
|
|
| Avar |
| Posted on: Tuesday, January 14th, 2014, 7:09:30am |
|
|
|
| Looks good steve, how do you prevent overstretching of the metal though, it looks like its gone through quite a lot of manipulation, specially at the end. |
|
| Logged |
|
|
|
Reply: 66 - 92 |
|
|
| steve |
| Posted on: Tuesday, January 14th, 2014, 10:54:49am |
|
|
|
| The material needs to shrink a lot in some places. More than you could do with a shrinking hammer so its cut and over lapped till you get the shape you want. Then you cut the excess off on the over lap and butt weld the joint. Some areas are the other way you have to stretch the material and again it will only go so far. You then have to let in extra material. |
|
| Logged |
|
|
|
Reply: 67 - 92 |
|
|
| lord |
| Posted on: Thursday, January 16th, 2014, 10:37:59pm |
|
|
|
| So how you getting on with this Steve ? Dying to know |
|
| Logged |
|
|
|
Reply: 68 - 92 |
|
|
| Capposteve |
| Posted on: Thursday, January 16th, 2014, 11:30:32pm |
|
|
|
Steve I take it you have seen this spit iv been working on for the Cappo. It's Cappo specific and is being made this weekend hopefully.
 |
|
| Logged |
|
|
|
Reply: 69 - 92 |
|
|
| lord |
| Posted on: Friday, January 17th, 2014, 1:49:56am |
|
|
|
There was a guy on here who made a spit out of Old scaffold pieces and I watched him turn the cappo upside down and stuff in his garage. He was in milton keynes or something and I'm sure his name was Dan??
Can someone find him?? I bought my rear subframe off him that was pinched lol
He said he made his for 100 quid? |
|
| Logged |
|
|
|
Reply: 70 - 92 |
|
|
| Capposteve |
| Posted on: Friday, January 17th, 2014, 8:52:34am |
|
|
|
£100?? Sounds exspensive lol. The spit iv designed here uses 50x50 box and required nearly 25m worth. Costing me £88 for the steel tbh mine is a tad over kill but I don't want the thing falling apart when it's upside down. Although that's not saying you can't do it from scaffold tube. Iv seen it done many times with good results.
What ever way steve does his it will look bloody good |
|
| Logged |
|
|
|
Reply: 71 - 92 |
|
|
| lord |
| Posted on: Sunday, January 19th, 2014, 10:50:58pm |
|
|
|
|
| Logged |
|
|
|
Reply: 72 - 92 |
|
|
| steve |
Posted on: Monday, January 20th, 2014, 12:23:12am
Attachment: spit_1.jpg - 28.02 KB (514 views) |
|
|
|
Nothing done this last week. I've had to do the kitchen out at home  Its done now so im up on browne points Its done now so im up on browne points  . It does look a tad over engineered where it bolts to the car Steve. Is it something that flips the cappo with the subframes in place?. Mines going to be just like this but i can lose some of the adjustment and i don't need the hydraulics. The forks that go under the car will have angles welded on the side of them with holes that pick up where the subframe captive nuts are. Only adjustment i need will be height and axis so it will look more or less like this. . It does look a tad over engineered where it bolts to the car Steve. Is it something that flips the cappo with the subframes in place?. Mines going to be just like this but i can lose some of the adjustment and i don't need the hydraulics. The forks that go under the car will have angles welded on the side of them with holes that pick up where the subframe captive nuts are. Only adjustment i need will be height and axis so it will look more or less like this. |
 |
|
| Logged |
|
|
|
Reply: 73 - 92 |
|
|
| Capposteve |
| Posted on: Monday, January 20th, 2014, 6:41:16pm |
|
|
|
| Hey steve. It bolts up under neith where the chassis legs are. No subframe a either but tbh I'd rather there was nothing getting in the way and I'd rather over engineer it then under |
|
| Logged |
|
|
|
Reply: 74 - 92 |
|
|
| ea11r_tj |
| Posted on: Thursday, January 23rd, 2014, 10:19:58pm |
|
|
|
| some seriously cool/ good metal work! you guys at six sixty still producing strut braces? |
|
| Logged |
|
|
|
Reply: 75 - 92 |
|
|
| steve |
| Posted on: Thursday, January 23rd, 2014, 10:37:55pm |
|
|
|
| Thanks ive got rear braces in stock and hoping to produce a carbon fibre front brace in the not too distant future... |
|
| Logged |
|
|
|
Reply: 76 - 92 |
|
|
| lord |
| Posted on: Sunday, January 26th, 2014, 2:50:46pm |
|
|
|
| Been working on this over the weekend ste? |
|
| Logged |
|
|
|
Reply: 77 - 92 |
|
|
| steve |
Posted on: Sunday, January 26th, 2014, 8:51:16pm
Attachment: dsc04934_small.jpg - 57.06 KB (199 views) |
|
|
|
| Afraid not. Janets fancying a new car so we have been out tyre kicking A little more progress on the floor. |
 |
Last modified Sunday, January 26th, 2014, 8:52:28pm by steve |
|
| Logged |
|
|
|
Reply: 78 - 92 |
|
|
| lord |
| Posted on: Monday, January 27th, 2014, 11:09:36am |
|
|
|
looking ok to me...
how have you catered for the fuel lines?
This the drivers side? |
|
| Logged |
|
|
|
Reply: 79 - 92 |
|
|
|
 Cappuccino Owners Club › Traders › Six Sixty Engineering › Six sixty track day car (Moderators: , , )


