 |
Pages: « ... 10, 11, 12, 13, 14, 15, 16, 17, 18, 19, 20, 21, 22 ... » |
  |
|
 Author Author |
 Sneaza (currently 18126 views) Sneaza (currently 18126 views) |
| Badger |
Posted on: Tuesday, September 23rd, 2008, 12:44:04pm
 Attachment: 100_1472.jpg - 10.10 KB (569 views) Attachment: 100_1472.jpg - 10.10 KB (569 views) |
  |
|
|
Sanded and washed after 2 coats of Resin.....  |
 |
|
 Logged Logged |
|
|
 |
Reply: 600 - 1047 |
|
|
| Badger |
Posted on: Tuesday, September 23rd, 2008, 12:45:42pm
Attachment: 100_1473.jpg - 17.60 KB (570 views) |
|
|
|
| Decided that rather than use Fibreglass Matt or Tape, another Stocking would add to the thickness and strength.... |
 |
|
| Logged |
|
|
|
Reply: 601 - 1047 |
|
|
| Badger |
Posted on: Tuesday, September 23rd, 2008, 12:46:43pm
Attachment: 100_1474.jpg - 21.48 KB (564 views) |
|
|
|
| .....and save a whole lot of sanding.....2 more coats of Resin.... |
 |
|
| Logged |
|
|
|
Reply: 602 - 1047 |
|
|
| Badger |
Posted on: Tuesday, September 23rd, 2008, 12:48:20pm
Attachment: 100_1479.jpg - 14.02 KB (563 views) |
|
|
|
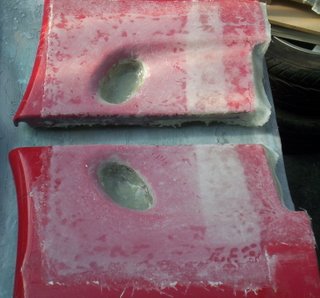
| Sanded smooth, Washed then 'Spray Putty' Final layer to cover/fill in the Sanding marks.... |
 |
|
| Logged |
|
|
|
Reply: 603 - 1047 |
|
|
| Badger |
Posted on: Tuesday, September 23rd, 2008, 12:49:38pm
Attachment: 100_1480.jpg - 19.25 KB (562 views) |
|
|
|
| Just need to 'Wet Sand' them now then add the Paint..... |
 |
|
| Logged |
|
|
|
Reply: 604 - 1047 |
|
|
| capgun |
| Posted on: Tuesday, September 23rd, 2008, 1:00:27pm |
|
|
|
Super smooth 
You will notice a difference as your stageheight appears halfway up the windscreen where it should be, it sounds a lot better there than on the dashboard |
|
| Logged |
|
|
|
Reply: 605 - 1047 |
|
|
| Badger |
| Posted on: Tuesday, September 23rd, 2008, 1:11:30pm |
|
|
|
| Yep.....Drove around a while with Tweeters Gaffa Taped in position on Pillars, as well as Windscreen ones and another Pair Behind me....Wires everywhere, like being in a Siders Web, but I got the result I needed....More to come......AFTER EVERYTHING ELSE....lol, I did these A while ago, but because of the 'How To' and Your Shelf, forgot about them until George did his Gauge Pods.......Happy so far. |
|
| Logged |
|
|
|
Reply: 606 - 1047 |
|
|
| crisp |
| Posted on: Tuesday, September 23rd, 2008, 7:59:36pm |
|
|
|
looking nice as always, Sneaza.
|
|
| Logged |
|
|
|
Reply: 607 - 1047 |
|
|
| Badger |
Posted on: Friday, October 3rd, 2008, 6:02:51am
Attachment: 100_1506.jpg - 14.11 KB (524 views) |
|
|
|
Cheers Crisp, just waiting for paint now all the holes are in place....
|
 |
|
| Logged |
|
|
|
Reply: 608 - 1047 |
|
|
| capgun |
| Posted on: Friday, October 3rd, 2008, 6:55:31am |
|
|
|
| Will they be the same paint as your gauges mount? |
|
| Logged |
|
|
|
Reply: 609 - 1047 |
|
|
| Badger |
| Posted on: Friday, October 3rd, 2008, 8:36:18am |
|
|
|
| Yep....had thought about Chrome, but for now the Paint will do. Maybe when I finish all the other bits that will be Chromed, I'll take them and the Gauge Pod as well. |
|
| Logged |
|
|
|
Reply: 610 - 1047 |
|
|
| Olyfan |
| Posted on: Friday, October 3rd, 2008, 11:26:30am |
|
|
|
|
| Logged |
|
|
|
Reply: 611 - 1047 |
|
|
| crisp |
| Posted on: Friday, October 3rd, 2008, 9:27:53pm |
|
|
|
| Could do with a set of them for the Pug-a-poo now the Capp is asleep. |
|
| Logged |
|
|
|
Reply: 612 - 1047 |
|
|
| Badger |
| Posted on: Saturday, October 4th, 2008, 9:19:20am |
|
|
|
| Well.........what's stopping you...??? You've seen how HARD it is....lol, seriously tho' easier than your other project.... |
|
| Logged |
|
|
|
Reply: 613 - 1047 |
|
|
| crisp |
| Posted on: Saturday, October 4th, 2008, 3:25:06pm |
|
|
|
Yes, well the "other project" is temporarily shelved for now.
As for the Pug I'm gonna start and see if the footwell Pioneers out the Capp will fit in the Pugs door speakers as they are really getting on my t##s.
The guy I got the Pug off replaced the parcel shelf speakers but they rattle and vibrate like terrible so they need "sorting" as well.
|
|
| Logged |
|
|
|
Reply: 614 - 1047 |
|
|
| Badger |
Posted on: Tuesday, October 7th, 2008, 11:27:38am
Attachment: 100_1512.jpg - 12.94 KB (483 views) |
|
|
|
| Paints on and 3 coats of clear..... |
 |
|
| Logged |
|
|
|
Reply: 615 - 1047 |
|
|
| Badger |
Posted on: Tuesday, October 7th, 2008, 11:29:38am
Attachment: 100_1513.jpg - 13.11 KB (482 views) |
|
|
|
| 3-4 more coats to go,cut and polish, then stuff 'em up when I try to install them.... ...all in all, very happy so far. |
 |
|
| Logged |
|
|
|
Reply: 616 - 1047 |
|
|
| Andy |
| Posted on: Tuesday, October 7th, 2008, 6:10:14pm |
|
|
Official C.O.C Contributor


Gender:  Male Male
Posts: 23604
Posts Per Day: 3.48 |
|
You could easily make a nice livng out of doing stuff like this full time  |
Drop me a PM if you would like to be added to the ClubCappo Member Map. More details can be found here.
We now have an official Facebook group as well as a page! See here |
|
| Logged |
|
|
 |
Reply: 617 - 1047 |
|
|
| capgun |
| Posted on: Wednesday, October 8th, 2008, 6:07:30am |
|
|
|
| Wow! |
|
| Logged |
|
|
|
Reply: 618 - 1047 |
|
|
| Olyfan |
| Posted on: Friday, October 10th, 2008, 9:17:06pm |
|
|
|
|
| Logged |
|
|
|
Reply: 619 - 1047 |
|
|
| mattjohns |
| Posted on: Saturday, October 11th, 2008, 10:09:07am |
|
|
Maximum Member
Posts: 1652
Posts Per Day: 0.94 |
|
“ |
Quoted from Andy, posted Tuesday, October 7th, 2008, 6:10:14pm at here |
” |
You could easily make a nice livng out of doing stuff like this full time
|
|
Yeah, 'cause these would be relatively easy to mould, reproduce and sell to me.  |
|
| Logged |
|
|
| |
Reply: 620 - 1047 |
|
|
| Olyfan |
| Posted on: Saturday, October 11th, 2008, 10:16:20am |
|
|
|
| pro quality look that's for sure |
|
| Logged |
|
|
|
Reply: 621 - 1047 |
|
|
| Andy |
| Posted on: Saturday, October 11th, 2008, 10:18:59am |
|
|
Official C.O.C Contributor
Gender: Male
Posts: 23604
Posts Per Day: 3.48 |
|
“ |
Quoted from mattjohns, posted Saturday, October 11th, 2008, 10:09:07am at here |
” |
Yeah, 'cause these would be relatively easy to mould, reproduce and sell to me.
|
|
And countless others  |
Drop me a PM if you would like to be added to the ClubCappo Member Map. More details can be found here.
We now have an official Facebook group as well as a page! See here |
|
| Logged |
|
|
| |
Reply: 622 - 1047 |
|
|
| Olyfan |
| Posted on: Saturday, October 11th, 2008, 10:21:48am |
|
|
|
| I still think you and CG should merge and set something up - you're both very talented at this auto magic stuff |
|
| Logged |
|
|
|
Reply: 623 - 1047 |
|
|
| capgun |
| Posted on: Saturday, October 11th, 2008, 11:35:44pm |
|
|
|
| lol, thanks Ken - me and Sneaza probably both wish that! |
|
| Logged |
|
|
|
Reply: 624 - 1047 |
|
|
| Badger |
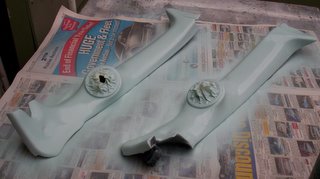
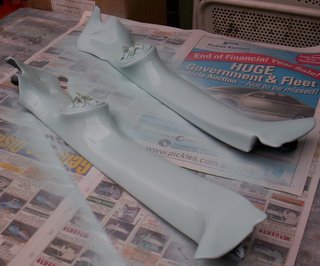
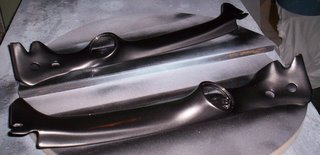
Posted on: Wednesday, October 15th, 2008, 9:13:42am
Attachment: 100_1532.jpg - 10.80 KB (410 views) |
|
|
|
Ha Ha, You could always move up here....
Forgot to add these.....Installed with a bit of messing about. Because of extra thickness, had to eleviate some of the Aluminium from behind the Roof Latches and trim to new contour. Passenger side was easy for wiring......Drivers side was another matter.....but I got there in the end.
From the Front.....inconspicuous ( had to check the spelling ) but was right anyway..
Sneaza looks NAKED without the Speaker Enclosure.....  |
 |
Last modified Wednesday, October 15th, 2008, 9:19:59am by Badger |
|
| Logged |
|
|
|
Reply: 625 - 1047 |
|
|
| Badger |
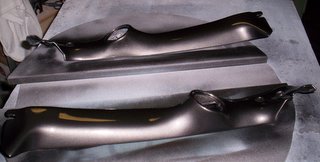
Posted on: Wednesday, October 15th, 2008, 9:18:35am
Attachment: 100_1533.jpg - 12.69 KB (407 views) |
|
|
|
Driver side.....Looks wierd not seeing the Boost Gauge in place...just sitting on Dash until I install Gauge Pod and just thought I'm going to have to remove this side to install the wiring from the Gauges and Turbo Timer...DOH!!!  |
 |
|
| Logged |
|
|
|
Reply: 626 - 1047 |
|
|
| Badger |
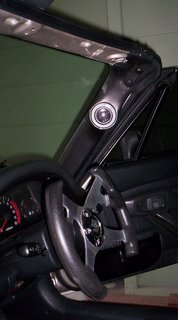
Posted on: Wednesday, October 15th, 2008, 9:22:47am
Attachment: 100_1534.jpg - 20.80 KB (404 views) |
|
|
|
and the Passenger side.....these are connected to the Originals under windscreen. Very Happy so far and what a difference to the sound...even without the Rear Wall.......
The FINE PRINT should read....'Then speed up and see how many you can collect'.... |
 |
Last modified Wednesday, October 15th, 2008, 9:35:23am by Badger |
|
| Logged |
|
|
|
Reply: 627 - 1047 |
|
|
| Badger |
| Posted on: Wednesday, October 15th, 2008, 9:27:37am |
|
|
|
Hey CG, in case you missed it, the Roof Latches can be POLISHED when you get the Powder coating off.....
and now that I have a 'Spare' set of A-Pillars.....( I know I'm going to regret saying this like I don't already have enough to do, but... ) If anyone would like a set made....For Tweeters or Gauges.....Drop me a PM.
There will also be a Dash Top Gauge pod/Storage Drawer/Cup Holder unit available shortly..... and I'll take orders if there is enough interest......But some things I've gotta keep unique.... |
Last modified Wednesday, October 15th, 2008, 9:33:27am by Badger |
|
| Logged |
|
|
|
Reply: 628 - 1047 |
|
|
| capgun |
| Posted on: Wednesday, October 15th, 2008, 1:37:12pm |
|
|
|
| I was thinking about doing the roof latches after I recovered the roof panels in leather! |
|
| Logged |
|
|
|
Reply: 629 - 1047 |
|
|
| CaffieneHit |
| Posted on: Wednesday, October 15th, 2008, 9:44:31pm |
|
|
Maximum Member
Posts: 541
Posts Per Day: 0.32 |
|
I hope you are still 'in business' when I get my Cap Sneaza because I would be honoured for you to make me some things Maybe by then you will have lots of different moulds and the job wouldn't be so large?
Keep up with the fantastic work. Pods look fantastic! |
|
| Logged |
|
|
| |
Reply: 630 - 1047 |
|
|
| Badger |
| Posted on: Wednesday, October 15th, 2008, 11:07:28pm |
|
|
|
| Ha Ha , no worries and thanx. |
|
| Logged |
|
|
|
Reply: 631 - 1047 |
|
|
| grant4561 |
| Posted on: Thursday, October 16th, 2008, 12:25:13am |
|
|
Maximum Member
Posts: 1719
Posts Per Day: 0.98 |
|
“ |
Quoted from Badger, posted Thursday, March 27th, 2008, 9:00:52am at here |
” |
Thanks to Capgun for sending me his mudflaps, so I can make Fibreglass ones to start my Sideskirts
|
|
Just wondering...any progress on the side skirts? |
|
| Logged |
|
|
| |
Reply: 632 - 1047 |
|
|
| Badger |
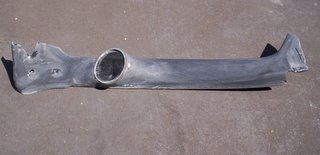
Posted on: Thursday, October 16th, 2008, 1:53:59am
Attachment: sideskirts.jpg - 7.88 KB (370 views) |
|
|
|
I'm getting there....SLOOOOWWWLLLLYYYY....
Bought these ( preview in 'How To' ) and am going to Modify them to suit....
Will need to cut 2ft off end, you can just see Pencil Line....then will attach fibreglass Front 1/4's I made earlier, Then mold into rear Flares...( yet to be actioned )...need to finish Rear Bumper 1st. Not sure if I'll fill the vents and still retain the Cappo ones or keep them...???
But that's s far as I got before other things intervened......But thanx for nagging asking....lol |
 |
|
| Logged |
|
|
|
Reply: 633 - 1047 |
|
|
| grant4561 |
| Posted on: Thursday, October 16th, 2008, 4:56:47am |
|
|
Maximum Member
Posts: 1719
Posts Per Day: 0.98 |
|
You will need some sort ofd vents as the help get rid of hot air from the rear area of the motor (nag nag)  |
|
| Logged |
|
|
| |
Reply: 634 - 1047 |
|
|
| Badger |
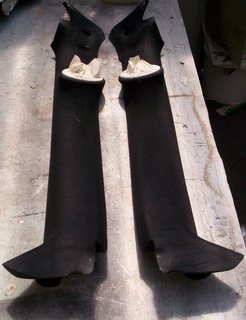
Posted on: Thursday, October 16th, 2008, 8:59:55am
Attachment: qtr._panels.jpg - 21.02 KB (360 views) |
|
|
|
Ha Ha that's why I take off the roof....so the Hot Air escapes when she starts talking...lol
Seriously though, when I attach these to the 1/4's, they still have the Original Vents.....
These will be Trimmed and placed in the Rear of the Sideskirt, but, will be making Fibreglass 1/4's to attach to front. |
 |
Last modified Thursday, October 16th, 2008, 9:01:52am by Badger |
|
| Logged |
|
|
|
Reply: 635 - 1047 |
|
|
| Badger |
Posted on: Friday, October 17th, 2008, 6:53:58am
Attachment: 100_1535.jpg - 9.96 KB (344 views) |
|
|
|
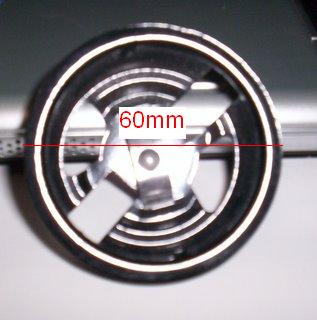
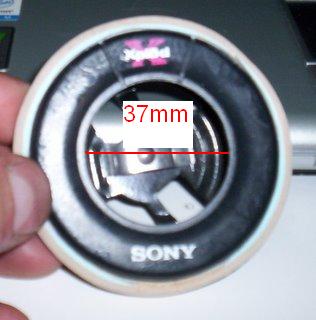
| Okay, Matt, made up ring so as to recess Tweeter...this not necessary...personal choice |
 |
|
| Logged |
|
|
|
Reply: 636 - 1047 |
|
|
| Badger |
Posted on: Friday, October 17th, 2008, 6:55:15am
Attachment: 100_1536.jpg - 25.70 KB (344 views) |
|
|
|
| Base that sits in Ring and Holds Tweeter.... |
 |
|
| Logged |
|
|
|
Reply: 637 - 1047 |
|
|
| Badger |
Posted on: Friday, October 17th, 2008, 6:56:26am
Attachment: 100_1537.jpg - 13.37 KB (342 views) |
|
|
|
| Outer Cover...this fits over everything and sits into recess..... |
 |
|
| Logged |
|
|
|
Reply: 638 - 1047 |
|
|
| Badger |
Posted on: Friday, October 17th, 2008, 6:57:19am
Attachment: 100_1538.jpg - 25.22 KB (343 views) |
|
|
|
| Before Glued into place... |
 |
|
| Logged |
|
|
|
Reply: 639 - 1047 |
|
|
Pages: « ... 10, 11, 12, 13, 14, 15, 16, 17, 18, 19, 20, 21, 22 ... » |
|
|
 Cappuccino Owners Club › Gallery › Cappo Related Album › Sneaza (Moderators: )
 Locked Board