|
|
 Author Author |
 Sneaza (currently 18292 views) Sneaza (currently 18292 views) |
| Badger |
Posted on: Wednesday, December 22nd, 2010, 11:35:53am
 Attachment: 100_2187.jpg - 21.13 KB (615 views) Attachment: 100_2187.jpg - 21.13 KB (615 views) |
  |
|
|
| Holes cut for Holders...........Foam applied and shaped ready for the 'Glass..... |
 |
|
 Logged Logged |
|
|
 |
Reply: 960 - 1047 |
|
|
| Badger |
Posted on: Wednesday, December 22nd, 2010, 11:36:28am
Attachment: 100_2189.jpg - 26.18 KB (612 views) |
|
|
|
| Test fit. |
 |
|
| Logged |
|
|
|
Reply: 961 - 1047 |
|
|
| Badger |
Posted on: Wednesday, December 22nd, 2010, 11:37:33am
Attachment: 100_2190.jpg - 34.74 KB (612 views) |
|
|
|
Test Fit Terminal Cup.......Told ya....  |
 |
|
| Logged |
|
|
|
Reply: 962 - 1047 |
|
|
| Badger |
Posted on: Wednesday, December 22nd, 2010, 11:38:25am
Attachment: 100_2191.jpg - 23.94 KB (612 views) |
|
|
|
| Fitted and 'Glassed in place along with foam covered......... |
 |
|
| Logged |
|
|
|
Reply: 963 - 1047 |
|
|
| Badger |
Posted on: Wednesday, December 22nd, 2010, 11:39:18am
Attachment: 100_2193.jpg - 24.17 KB (610 views) |
|
|
|
| Cut down and rough sanded........... |
 |
|
| Logged |
|
|
|
Reply: 964 - 1047 |
|
|
| Badger |
Posted on: Wednesday, December 22nd, 2010, 11:40:06am
Attachment: 100_2196.jpg - 40.07 KB (609 views) |
|
|
|
| ........a view from inside |
 |
|
| Logged |
|
|
|
Reply: 965 - 1047 |
|
|
| Badger |
Posted on: Wednesday, December 22nd, 2010, 11:41:06am
Attachment: 100_2197.jpg - 33.56 KB (608 views) |
|
|
|
Other side........  Thick enough for the screws to hold. Thick enough for the screws to hold. |
 |
|
| Logged |
|
|
|
Reply: 966 - 1047 |
|
|
| capgun |
| Posted on: Thursday, December 23rd, 2010, 5:13:12pm |
|
|
|
Great work Dave! sorry, haven't been on here much lately but goo to see your cappi is still moving ahead in leaps and bounds 
Out of curiosity why are you having multiple terminal cups, for the look or the way you are going to wire it up afterwards? |
|
| Logged |
|
|
|
Reply: 967 - 1047 |
|
|
| grant4561 |
| Posted on: Friday, December 24th, 2010, 12:35:46am |
|
|
Maximum Member

Posts: 1719
Posts Per Day: 0.98 |
|
| I think why there is so many as they probably double up as stubby holders |
|
| Logged |
|
|
 |
Reply: 968 - 1047 |
|
|
| soongster |
| Posted on: Friday, December 24th, 2010, 2:36:51am |
|
|
|
hahaha if only i could "like" grants post!
im also confused dave, why so many of those terminal thingies? |
|
| Logged |
|
|
|
Reply: 969 - 1047 |
|
|
| dave660 |
| Posted on: Friday, December 24th, 2010, 4:11:17am |
|
|
|
|
| Logged |
|
|
|
Reply: 970 - 1047 |
|
|
| Badger |
| Posted on: Friday, December 24th, 2010, 5:00:50am |
|
|
|
| EXACTLY.........4 X 8" DVC Audiopipe subs..= 1 Amp, Rear Speaker Pods will be next...actually, the Enclosure is Sitting on one of them to level it out while the Resin Dries.....More to come. Merry Xmas to ALL............... |
|
| Logged |
|
|
|
Reply: 971 - 1047 |
|
|
| lord |
| Posted on: Friday, December 24th, 2010, 10:26:32am |
|
|
|
| you have PM. MERRY XMAS !!!!! |
|
| Logged |
|
|
|
Reply: 972 - 1047 |
|
|
| Badger |
| Posted on: Friday, December 24th, 2010, 1:33:36pm |
|
|
|
and now so do you...lol
Grant, I like you thinking...lol, though at that angle, it'd probably spill the good stuff..... |
|
| Logged |
|
|
|
Reply: 973 - 1047 |
|
|
| Erik |
| Posted on: Monday, January 3rd, 2011, 9:57:42pm |
|
|
|
Hi Sneaza, I just spent the whole evening browsing through all the articles (instead of working on my car  ) and as everyone I'm very, very impressed by your craftmanship. Congratulations on an incredible job. Your creativity and quality of work is an inspiration and I hope the restoration of my Cappuccino will be half as good. Thanks for the insight and the ideas. ) and as everyone I'm very, very impressed by your craftmanship. Congratulations on an incredible job. Your creativity and quality of work is an inspiration and I hope the restoration of my Cappuccino will be half as good. Thanks for the insight and the ideas. |
|
| Logged |
|
|
|
Reply: 974 - 1047 |
|
|
| Badger |
| Posted on: Monday, January 3rd, 2011, 10:25:48pm |
|
|
|
| No Probs mate, Happy New Year and thanx for the kind words..... |
|
| Logged |
|
|
|
Reply: 975 - 1047 |
|
|
| lord |
| Posted on: Tuesday, January 4th, 2011, 12:14:57am |
|
|
|
|
| Logged |
|
|
|
Reply: 976 - 1047 |
|
|
| Badger |
Posted on: Wednesday, January 26th, 2011, 2:59:47am
Attachment: 100_2202.jpg - 25.04 KB (448 views) |
|
|
|
Bit of an update...Finally decided on the Speaker and Tweet Placement..........
This is just a 'MOCK UP' and you wont notice the Pods and bar when finished....  |
 |
Last modified Wednesday, January 26th, 2011, 3:01:11am by Badger |
|
| Logged |
|
|
|
Reply: 977 - 1047 |
|
|
| Badger |
Posted on: Wednesday, January 26th, 2011, 3:11:13am
Attachment: 100_2203.jpg - 39.76 KB (444 views) |
|
|
|
Close up.....The bar the Pods are sitting on is actually made from Aluminium Flat Bar and Copper tube (Had left Overs) Covered in fibreglass....This will act as a kind of strut brace. Though the whole Enclosure does that anyway....It all mounts at the Seat Belt Connections.
The Speaker Cable runs through this from Amp to Speakers...same for Tweets.......HIDDEN CABLES...
Though the Tweet Bar will remain Chrome, The rest will be Painted to match rest of interior
.....NO, IT WONT LOOK LIKE THIS WHEN IT'S FINISHED..... |
 |
|
| Logged |
|
|
|
Reply: 978 - 1047 |
|
|
| lord |
| Posted on: Wednesday, January 26th, 2011, 12:46:27pm |
|
|
|
Will it look like this when it's finished??
LOL
Just abit worried as it's rather large??
interesting design though with the chrome bar..it's one of those. Only when it's mounted in the car can we see it too fully appreciate the finished product...?
You need to make a video too of it pumping he he
and you should join these! ha ha
http://www.cardesignnews.com/site/home/ |
Last modified Wednesday, January 26th, 2011, 12:53:14pm by lord |
|
| Logged |
|
|
|
Reply: 979 - 1047 |
|
|
| Badger |
| Posted on: Wednesday, January 26th, 2011, 1:10:38pm |
|
|
|
LOL...........At present the Pods look skeletal...but have yet to have the 'Skin' attached.....
and it's actually smaller in design than the one Currently in my car....The Original.....
The Pods sit same height as the Seat Headrests. Interesting site.... |
|
| Logged |
|
|
|
Reply: 980 - 1047 |
|
|
| capgun |
| Posted on: Wednesday, January 26th, 2011, 9:11:44pm |
|
|
|
I *think* I can visualise what you're going to do Sneaza, Will look good
pm too |
|
| Logged |
|
|
|
Reply: 981 - 1047 |
|
|
| Badger |
Posted on: Monday, February 28th, 2011, 9:26:22pm
Attachment: 100_2206.jpg - 21.21 KB (368 views) |
|
|
|
| Been trying to catch up and finish off a few things and as a result, put this on the slow.....'Stockings applied and a layer of Mat on the underside...... |
 |
Last modified Monday, February 28th, 2011, 9:52:27pm by Badger |
|
| Logged |
|
|
|
Reply: 982 - 1047 |
|
|
| Badger |
Posted on: Monday, February 28th, 2011, 9:30:33pm
Attachment: 100_2205.jpg - 23.61 KB (369 views) |
|
|
|
Now that I have FINALLY got the 'Blue Slip' for the Red One....It can now be registered, so I can now Pull it all apart again and start fitting the bits ready for paint, but needed to finish the Rear Lights I started a while ago first.......
Masked up and Foiled the Spare Tail lights and applied Fibreglass..... |
 |
Last modified Monday, February 28th, 2011, 9:50:16pm by Badger |
|
| Logged |
|
|
|
Reply: 983 - 1047 |
|
|
| Badger |
Posted on: Monday, February 28th, 2011, 9:31:50pm
Attachment: 100_2207.jpg - 25.43 KB (366 views) |
|
|
|
| Once cured, removed....will clean the masking tape glue off the lens and back into storage.... |
 |
|
| Logged |
|
|
|
Reply: 984 - 1047 |
|
|
| Badger |
Posted on: Monday, February 28th, 2011, 9:33:02pm
Attachment: 100_2208.jpg - 27.67 KB (368 views) |
|
|
|
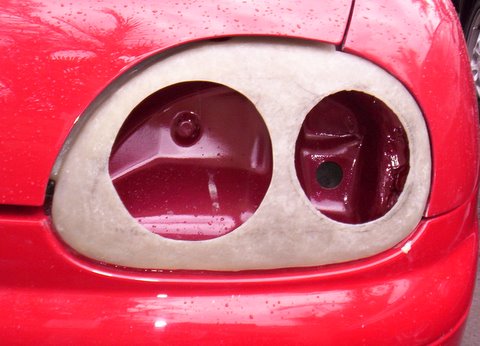
| Determine size of holes to be cut and spacing......... |
 |
|
| Logged |
|
|
|
Reply: 985 - 1047 |
|
|
| Badger |
Posted on: Monday, February 28th, 2011, 9:34:00pm
Attachment: 100_2209.jpg - 45.08 KB (369 views) |
|
|
|
| Make the Tubes........ |
 |
|
| Logged |
|
|
|
Reply: 986 - 1047 |
|
|
| Badger |
Posted on: Monday, February 28th, 2011, 9:35:56pm
Attachment: 100_2210.jpg - 30.06 KB (366 views) |
|
|
|
| Because these are pushed from the rear, had to enlarge the hole to fit, especially as they will be on an angle.......you'll see.... |
 |
|
| Logged |
|
|
|
Reply: 987 - 1047 |
|
|
| Badger |
Posted on: Monday, February 28th, 2011, 9:38:03pm
Attachment: 100_2213.jpg - 43.49 KB (363 views) |
|
|
|
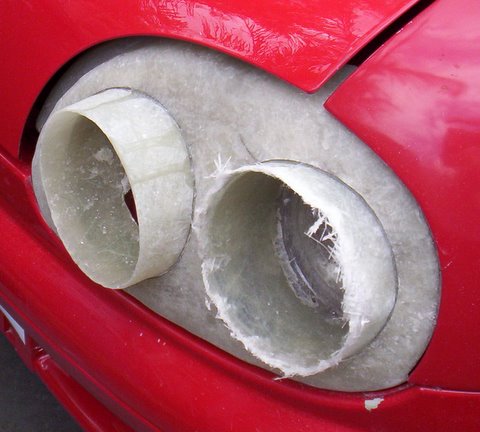
| Test fit on the car......bit of sanding / shaping involved as they are Larger than Original. |
 |
|
| Logged |
|
|
|
Reply: 988 - 1047 |
|
|
| Badger |
Posted on: Monday, February 28th, 2011, 9:40:50pm
Attachment: 100_2215.jpg - 39.16 KB (366 views) |
|
|
|
Test fit the Tube....b*gger, wht's stopping it going further back......That bit!!!!
Now, after I removed this section, it Dawned on me it would have been EASIER to use my hammer to persuade the panel inwards..... |
 |
|
| Logged |
|
|
|
Reply: 989 - 1047 |
|
|
| Badger |
Posted on: Monday, February 28th, 2011, 9:42:28pm
Attachment: 100_2217.jpg - 24.80 KB (361 views) |
|
|
|
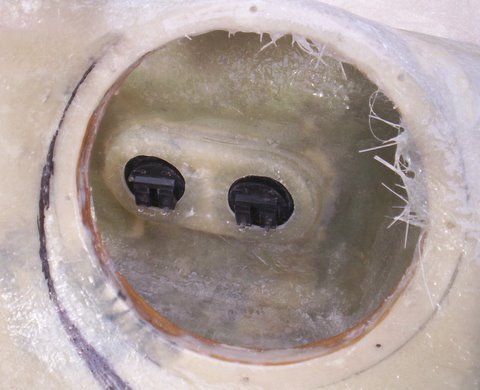
| This is why it needed to go further in.....as you can see, this is the Angle I mentioned, that will be removed soon.... |
 |
Last modified Monday, February 28th, 2011, 9:51:11pm by Badger |
|
| Logged |
|
|
|
Reply: 990 - 1047 |
|
|
| Badger |
Posted on: Monday, February 28th, 2011, 9:43:09pm
Attachment: 100_2216.jpg - 27.46 KB (363 views) |
|
|
|
| Test fit the Light......... |
 |
|
| Logged |
|
|
|
Reply: 991 - 1047 |
|
|
| Badger |
Posted on: Monday, February 28th, 2011, 9:43:54pm
Attachment: 100_2218.jpg - 46.55 KB (358 views) |
|
|
|
| Attach other tube for placement..... |
 |
|
| Logged |
|
|
|
Reply: 992 - 1047 |
|
|
| Badger |
Posted on: Monday, February 28th, 2011, 9:44:56pm
Attachment: 100_2221.jpg - 37.38 KB (358 views) |
|
|
|
| Removed and 'Glassed from the rear.............. More holes to cut for the cables, but that's about it |
 |
Last modified Monday, February 28th, 2011, 9:49:05pm by Badger |
|
| Logged |
|
|
|
Reply: 993 - 1047 |
|
|
| Badger |
Posted on: Monday, February 28th, 2011, 9:47:32pm
Attachment: 100_2220.jpg - 37.60 KB (357 views) |
|
|
|
| Tubes Cut to Size..........Now start the Other side. Very happy so far, just need to clean them up, fill the gaps and sand back before filling and painting. |
 |
|
| Logged |
|
|
|
Reply: 994 - 1047 |
|
|
| lord |
| Posted on: Monday, February 28th, 2011, 10:16:22pm |
|
|
|
| can I say f**king genius??? |
|
| Logged |
|
|
|
Reply: 995 - 1047 |
|
|
| alliballi |
| Posted on: Tuesday, March 1st, 2011, 3:01:00am |
|
|
|
wow sneaza I just came accross this thread your car is awsome well done what a great job I LUUUUVVVVV THE FRONT LIGHTS AND THE CUTE BOOT SPOILER LOVELY
Edited sorry i did know they where back lights and they look brill |
Last modified Tuesday, March 1st, 2011, 10:00:17pm by alliballi |
|
| Logged |
|
|
|
Reply: 996 - 1047 |
|
|
| Badger |
| Posted on: Tuesday, March 1st, 2011, 3:11:34am |
|
|
|
Thanx alliballi, Front Lights...??? the ones above are Rear Lights...lol.
Soongster is now the Owner of the BOOT, Though I do have plans for another, incorporating the Hi-Level Brake Light...So many things, So little time...lol |
|
| Logged |
|
|
|
Reply: 997 - 1047 |
|
|
| soongster |
| Posted on: Tuesday, March 1st, 2011, 4:19:47am |
|
|
|
| sweet mother of god... D you are crazy hahaha... did u use a stubby as a mold for the tubes? lol |
|
| Logged |
|
|
|
Reply: 998 - 1047 |
|
|
| Badger |
| Posted on: Tuesday, March 1st, 2011, 4:53:13am |
|
|
|
| LOL.......No, Coffee Jar....(Not Cappuccino)...lol |
|
| Logged |
|
|
|
Reply: 999 - 1047 |
|
|
|
 Cappuccino Owners Club › Gallery › Cappo Related Album › Sneaza (Moderators: )


 Locked Board