|
|
 Author Author |
 Sulki sees a strip show... (Brappuccino) (currently 10646 views) Sulki sees a strip show... (Brappuccino) (currently 10646 views) |
| Ricou |
| Posted on: Wednesday, December 23rd, 2009, 10:07:11pm |
  |
|
Maximum Member

Posts: 1110
Posts Per Day: 0.65 |
|
Front sided exhaust ? It looks a bit weird to me, and it's gonna be so noisy 
But good work indeed  |
|
 Logged Logged |
|
|
  |
Reply: 360 - 402 |
|
|
| bob_g |
Posted on: Wednesday, January 13th, 2010, 11:59:14pm
 Attachment: cimg2353sm.jpg - 84.05 KB (1118 views) Attachment: cimg2353sm.jpg - 84.05 KB (1118 views) |
|
|
|
Pic of the exhaust off the car (had to take the turbo off (again)), but have now added the boss for the Lamda sensor
One thing I have noticed is how much all the little bits cost - hose fittings especially. I dread to think how much this whole car is costing (have got a good idea though)
|
 |
|
| Logged |
|
|
|
Reply: 361 - 402 |
|
|
| bob_g |
Posted on: Thursday, January 14th, 2010, 12:04:23am
Attachment: cimg2347sm.jpg - 114.66 KB (1115 views) |
|
|
|
Finally turned the garage full of wiring into a loom - engine bay looks pretty tidy.
It still needs wrapping & conduit in places (for protection), but will leave that until I've got it running - no point taping it all up until I know it all works. |
 |
|
| Logged |
|
|
|
Reply: 362 - 402 |
|
|
| bob_g |
Posted on: Thursday, January 14th, 2010, 12:11:30am
Attachment: cimg2348sm.jpg - 114.29 KB (1114 views) |
|
|
|
Inside the car looks less tidy - although that's mainly because it's all wrapped temporarily in red tape, and isn't fastened neatly in position.
I thought it'd be nice to do it as a new loom, rather than trying to merge the cappo and rx-7 looms, so started from scratch, drew a full schematic, and then made it to that (surprisingly few changes were required from the schematic to the car - a few circuits are different to the design, but I'll update the diagram to suit.
Only got some ground wires to terminate, and a couple of other bits to add (which will be done once it's running)
BTW - the blue paint isn't staying - it was just to avoid having any bare metal showing. |
 |
Last modified Thursday, January 14th, 2010, 12:12:49am by bob_g |
|
| Logged |
|
|
|
Reply: 363 - 402 |
|
|
| Andy |
| Posted on: Thursday, January 14th, 2010, 12:18:04am |
|
|
Official C.O.C Contributor

Gender:  Male Male
Posts: 23604
Posts Per Day: 3.47 |
|
Very nice work Bob  |
Drop me a PM if you would like to be added to the ClubCappo Member Map. More details can be found here.
We now have an official Facebook group as well as a page! See here |
|
| Logged |
|
|
| |
Reply: 364 - 402 |
|
|
| bob_g |
| Posted on: Thursday, January 14th, 2010, 1:18:19am |
|
|
|
Thank you
It's getting there! |
|
| Logged |
|
|
|
Reply: 365 - 402 |
|
|
| bob_g |
| Posted on: Wednesday, February 24th, 2010, 10:19:34pm |
|
|
|
| Some pics to add after tea, but the good news is..... she runs |
|
| Logged |
|
|
|
Reply: 366 - 402 |
|
|
| Mac81 |
| Posted on: Wednesday, February 24th, 2010, 10:25:07pm |
|
|
|
“ |
Quoted from bob_g, posted Wednesday, February 24th, 2010, 10:19:34pm at here |
” |
Some pics to add after tea, but the good news is..... she runs
|
|
Bob, you KNOW that we deserve a video of that first run |
|
| Logged |
|
|
|
Reply: 367 - 402 |
|
|
| Andy |
| Posted on: Wednesday, February 24th, 2010, 10:25:27pm |
|
|
Official C.O.C Contributor
Gender: Male
Posts: 23604
Posts Per Day: 3.47 |
|
| Excellent! |
Drop me a PM if you would like to be added to the ClubCappo Member Map. More details can be found here.
We now have an official Facebook group as well as a page! See here |
|
| Logged |
|
|
| |
Reply: 368 - 402 |
|
|
| bob_g |
| Posted on: Wednesday, February 24th, 2010, 10:28:26pm |
|
|
|
“ |
Quoted from Mac81, posted Wednesday, February 24th, 2010, 10:25:07pm at here |
” |
Bob, you KNOW that we deserve a video of that first run
|
|
I think a video of the first run should head off to You've Been Framed - sprayed oil everywhere, i think out of the pressure sender, but everything is covered in oil so can't really tell 
none the less, it does run - it's not a sound you'll miss. Just need to sort out the rest of the car now, so I can drive it.
and fix the oil leak....... |
|
| Logged |
|
|
|
Reply: 369 - 402 |
|
|
| bob_g |
Posted on: Thursday, February 25th, 2010, 11:17:03pm
Attachment: cimg2424sm.jpg - 89.33 KB (1019 views) |
|
|
|
Oil leak fixed - kicking myself - there are three 1/8npt tapped holes - two are stopped (for knock sensors) and the third is open to the oil pump - for the oil pressure sender - can you guess what I did wrong?
Just pictures for now, will try to sort a video shortly. |
 |
|
| Logged |
|
|
|
Reply: 370 - 402 |
|
|
| bob_g |
Posted on: Thursday, February 25th, 2010, 11:20:22pm
Attachment: cimg2426sm.jpg - 103.20 KB (1015 views) |
|
|
|
| Engine bay |
 |
|
| Logged |
|
|
|
Reply: 371 - 402 |
|
|
| bob_g |
Posted on: Thursday, February 25th, 2010, 11:24:37pm
Attachment: cimg2432sm.jpg - 60.72 KB (1006 views) |
|
|
|
Hoses and wires aren't clipped in the right place yet, so should look a bit tidier when finished.
The new boot (drip tray and support bracket yet to fit to the filler neck) : |
 |
|
| Logged |
|
|
|
Reply: 372 - 402 |
|
|
| bob_g |
Posted on: Thursday, February 25th, 2010, 11:27:58pm
Attachment: cimg2428sm.jpg - 108.26 KB (1012 views) |
|
|
|
| One more of the engine bay (just cos it makes me smile - it's quite full in there - although a 20B would probably fit with a bit of work. |
 |
|
| Logged |
|
|
|
Reply: 373 - 402 |
|
|
| Mac81 |
| Posted on: Thursday, February 25th, 2010, 11:32:01pm |
|
|
|
“ |
Quoted from bob_g, posted Thursday, February 25th, 2010, 11:27:58pm at here |
” |
One more of the engine bay (just cos it makes me smile - it's quite full in there - although a 20B would probably fit with a bit of work.
|
|
Leave the 20Bs where they are. You cannibal of a mechanic....:p So many Cosmos ruined.....  |
|
| Logged |
|
|
|
Reply: 374 - 402 |
|
|
| jaik |
| Posted on: Thursday, February 25th, 2010, 11:53:16pm |
|
|
|
|
| Logged |
|
|
|
Reply: 375 - 402 |
|
|
| crisp |
| Posted on: Wednesday, March 3rd, 2010, 10:55:30pm |
|
|
|
|
| Logged |
|
|
|
Reply: 376 - 402 |
|
|
| bob_g |
Posted on: Friday, March 12th, 2010, 8:01:05pm
Attachment: cimg2500_768x576.jpg - 56.62 KB (915 views) |
|
|
|
| not a lot to see this week. spent a couple of evenings making a rear cowl, and lifted the rear edge of the bonnet to hopefully suck a little more air through. |
 |
|
| Logged |
|
|
|
Reply: 377 - 402 |
|
|
| bob_g |
Posted on: Friday, March 12th, 2010, 8:01:49pm
Attachment: cimg2502_768x576.jpg - 63.82 KB (912 views) |
|
|
|
| and from the back |
 |
|
| Logged |
|
|
|
Reply: 378 - 402 |
|
|
| Andy |
| Posted on: Friday, March 12th, 2010, 8:18:33pm |
|
|
Official C.O.C Contributor
Gender: Male
Posts: 23604
Posts Per Day: 3.47 |
|
| Taking shape nicely |
Drop me a PM if you would like to be added to the ClubCappo Member Map. More details can be found here.
We now have an official Facebook group as well as a page! See here |
|
| Logged |
|
|
| |
Reply: 379 - 402 |
|
|
| capgun |
| Posted on: Friday, March 12th, 2010, 10:22:23pm |
|
|
|
|
| Logged |
|
|
|
Reply: 380 - 402 |
|
|
| Badger |
| Posted on: Saturday, March 13th, 2010, 9:06:06am |
|
|
|
| WOOO HOOO!!!!!! Fibreglass up North......Looks EXCELLENT, Well Done. |
|
| Logged |
|
|
|
Reply: 381 - 402 |
|
|
| lord |
| Posted on: Sunday, March 14th, 2010, 11:08:30am |
|
|
|
| keep up the good work.. this project looks like it's needed some patients!! |
|
| Logged |
|
|
|
Reply: 382 - 402 |
|
|
| hemanismyhero |
| Posted on: Wednesday, March 24th, 2010, 4:06:08pm |
|
|
|
| Love this project, It's coming along nicely! Hope all is well with you! Tim |
|
| Logged |
|
|
|
Reply: 383 - 402 |
|
|
| bob_g |
Posted on: Saturday, April 10th, 2010, 5:05:46pm
Attachment: photo0036_640x480.jpg - 38.70 KB (776 views) |
|
|
|
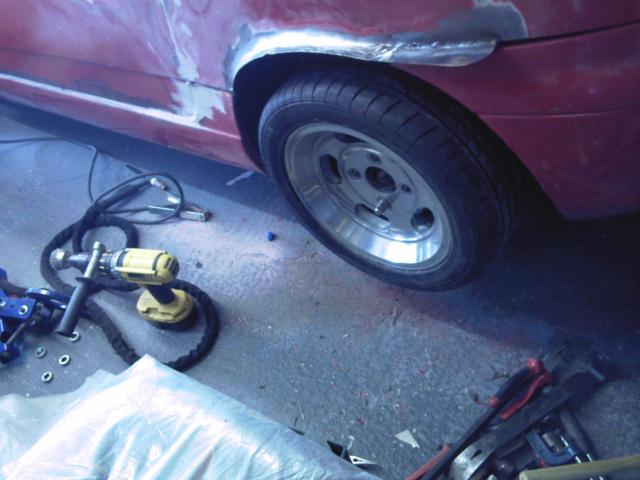
Slow progress
but some is better than none - have partly done one wheel arch  - only the rest of this one and the other three to do........ - only the rest of this one and the other three to do........ |
 |
|
| Logged |
|
|
|
Reply: 384 - 402 |
|
|
| Badger |
| Posted on: Sunday, April 11th, 2010, 12:36:19am |
|
|
|
| Now That I like ...but what is the Tail bit for....not going all 'LEEPU' on us...??? |
|
| Logged |
|
|
|
Reply: 385 - 402 |
|
|
| bob_g |
Posted on: Sunday, April 11th, 2010, 7:45:57pm
Attachment: cimg2619sm.jpg - 89.12 KB (735 views) |
|
|
|
Hopefully not Leepu-like - I need to cover the tread of the tyre, and although I wasn't sure how it'd look, it's growing on me (figure it suits the wheels quite well). This side is now done (see pic below) - has an 8mm tube edge so as not to slice too many pedestrians open
All steel here - none of this plastic tat  Except the dash, cowl, door cappings, centre console........ Except the dash, cowl, door cappings, centre console........ 
The other side has all the sheet work done - just need to get some more 8mm steel tube to finish it off.
Not sure how to do the fronts yet - could do something similar (fold the return of the arch outwards, then put a nice rolled edge on it), or could go down the simple route - cut some sheet, put a rolled edge on it, and weld to the wing. Time will tell I guess.
The list of jobs left to do seems to be huge & ever growing
Never mind - at least it drives |
 |
|
| Logged |
|
|
|
Reply: 386 - 402 |
|
|
| bob_g |
Posted on: Friday, April 23rd, 2010, 5:55:47pm
Attachment: cimg2659sm.jpg - 104.35 KB (694 views) |
|
|
|
| A smelly week - door caps made, filled and sanded, centre console made. |
 |
|
| Logged |
|
|
|
Reply: 387 - 402 |
|
|
| bob_g |
Posted on: Sunday, April 25th, 2010, 7:41:31pm
Attachment: cimg2672sm.jpg - 63.85 KB (673 views) |
|
|
|
| Do you ever wish you hadn't started a job - polished one of the roll hoops this afternoon one more to do - i think the original coating must have been powder coating - took forever to sand it all off before I could even get at the aluminium to start polishing. |
 |
|
| Logged |
|
|
|
Reply: 388 - 402 |
|
|
| steve |
| Posted on: Sunday, April 25th, 2010, 8:02:23pm |
|
|
|
Top job  I know the feeling very well... I know the feeling very well... |
|
| Logged |
|
|
|
Reply: 389 - 402 |
|
|
| lord |
| Posted on: Monday, April 26th, 2010, 12:07:16am |
|
|
|
| My car is the first time ive ever stripped a car! Never mind what you're doing. You really need patience!!!!! Do u ever get stuck and sit there lol I do...keep working at it though! |
|
| Logged |
|
|
|
Reply: 390 - 402 |
|
|
| bob_g |
| Posted on: Monday, April 26th, 2010, 5:40:27pm |
|
|
|
Yep - regularly get stuck. Best to either leave it & come back to it later, or open a beer and contemplate it
Patience doesn't start to cover it with this one :s |
|
| Logged |
|
|
|
Reply: 391 - 402 |
|
|
| Badger |
| Posted on: Tuesday, April 27th, 2010, 12:03:15am |
|
|
|
Yep sit there and wonder WHY...??? ALL the time...then 'The SMILE' arrives and it's back to work.
Don't have any design plans so I got to sit and look to make sure things don't look Naff....
First time pulling a Cap apart for me too. As long as you make note/or seperate and label your parts as to where they belong, you should'nt have too much of a problem putting them back on.
You picked a colour for this Beast yet Bob...??? and what about the windscreen...??? Short Height wrap around...??? similar to MX5 Concept or ALPINE MINI Show car. |
Last modified Tuesday, April 27th, 2010, 12:04:37am by Badger |
|
| Logged |
|
|
|
Reply: 392 - 402 |
|
|
| bob_g |
| Posted on: Tuesday, April 27th, 2010, 1:01:32am |
|
|
|
I've found the cappo very easy to work on (when working on standard bits anyway) - everything is nice and small, and for a low volume car, it's fairly easy to get to things (comparing to the TVR here). I think the best way to rebuild one would be to have a spare shell, get that perfect & painted, then as you remove the bits from one car, clean / refurb them, then refit to the new shell
Yep - colour is picked. Well, the first one is anyway - may well change it a few times, who knows? It'll be even easier than a standard cappo to paint - much easier to mask up (and the only shut line that needs painting is the boot).
Still not sure what it's going to look like until it's painted and assembled, so not sure on the windscreen as yet. Have got a big sheet of polycarbonate to make it from (thanks Chris), just not sure where to cut it (or how to attach it).
|
|
| Logged |
|
|
|
Reply: 393 - 402 |
|
|
| Badger |
| Posted on: Tuesday, April 27th, 2010, 1:34:54am |
|
|
|
CAREFULLY.....LOL, Just a thought....Form a shape around the base where it will sit, attach Sheet from centre outwards, then apply HEAT and bend around as you do....Same principal for bending Steel Rod...??? Once Shape/Curve is established, attach to base, trim to size and shape.
This works in my Head...lol, but it may not in practice...??? |
|
| Logged |
|
|
|
Reply: 394 - 402 |
|
|
| bob_g |
| Posted on: Tuesday, April 27th, 2010, 12:05:34pm |
|
|
|
Not quite what I meant - It's just about flexible enough to make the shapes I want, and have a good idea how to get the shape - just not quite sure how to fix it to the dash - I should have moulded a lip in to bolt it through, but didn't.
I did think about masking the dash, then laying up the lip ontop of the masking, then trim it all and bond the lip on. Not sure that works in text, but can see the picture in my head |
|
| Logged |
|
|
|
Reply: 395 - 402 |
|
|
| bob_g |
| Posted on: Thursday, June 3rd, 2010, 8:36:13pm |
|
|
|
Woop!!! she lives!!! (again)
Finally got round to working on the death sled again, so I can take it for MOT. A slight wiring issue (cough!) was causing the ECU to go into limp mode, run far too rich, and hence have no hope of starting. Now sorted with a bit of a loom made to fix the problem
Just need to do the other jobs on it now..... |
|
| Logged |
|
|
|
Reply: 396 - 402 |
|
|
| Andy |
| Posted on: Thursday, June 3rd, 2010, 8:38:53pm |
|
|
Official C.O.C Contributor
Gender: Male
Posts: 23604
Posts Per Day: 3.47 |
|
|
Drop me a PM if you would like to be added to the ClubCappo Member Map. More details can be found here.
We now have an official Facebook group as well as a page! See here |
|
| Logged |
|
|
| |
Reply: 397 - 402 |
|
|
| EVL |
| Posted on: Saturday, July 17th, 2010, 1:38:06am |
|
|
|
This car is a work of art - work to be really proud of! I was seriously impressed when I saw
it. Once you get the power down, there won't be much that will be able to keep up.
Like I said, if you ever decide to sell it, give me a shout!! |
|
| Logged |
|
|
|
Reply: 398 - 402 |
|
|
| brett |
| Posted on: Monday, July 26th, 2010, 9:47:08am |
|
|
|
|
| Logged |
|
|
|
Reply: 399 - 402 |
|
|
|
 Cappuccino Owners Club › Gallery › Cappo Related Album › Sulki sees a strip show... (Brappuccino) (Moderators: )


 Locked Board