|
|
 Author Author |
 SUB ENCLOSURE VOLUME (currently 1847 views) SUB ENCLOSURE VOLUME (currently 1847 views) |
| crisp |
| Posted on: Saturday, September 20th, 2008, 3:04:45pm |
  |
|
|
| Perhaps, Andy should get a new sticky thread going for club&members trophies for their Cappos? |
|
 Logged Logged |
|
|
 |
Reply: 40 - 189 |
|
|
| Andy |
| Posted on: Saturday, September 20th, 2008, 4:01:07pm |
|
|
Official C.O.C Contributor


Gender:  Male Male
Posts: 23604
Posts Per Day: 3.47 |
|
But I'd never get to post in it  |
Drop me a PM if you would like to be added to the ClubCappo Member Map. More details can be found here.
We now have an official Facebook group as well as a page! See here |
|
| Logged |
|
|
 |
Reply: 41 - 189 |
|
|
| capgun |
| Posted on: Sunday, September 21st, 2008, 1:47:32am |
|
|
|
It was for the show class there that day  Fair few cars, I got judged in the 'intermediate class' on audio too but I have a lot of tuning to go before that's 100% Fair few cars, I got judged in the 'intermediate class' on audio too but I have a lot of tuning to go before that's 100% |
|
| Logged |
|
|
|
Reply: 42 - 189 |
|
|
| Badger |
Posted on: Tuesday, September 23rd, 2008, 12:27:33pm
 Attachment: 100_1481.jpg - 10.59 KB (299 views) Attachment: 100_1481.jpg - 10.59 KB (299 views) |
|
|
|
Hey CG, This is what I meant....The Shaded Areas are the Recessed Part...
The Front on the 'DUAL' Would be 'Flat' except for the Recess.
The Front on the Individual would have more of a 'Curved/Flowing' feel about it, though would primarily be 'Flat'. These would be 2 seperate recesses.
Either of these should allow you to retain the 'Hoops'..... 
Let me know what you think |
 |
|
| Logged |
|
|
|
Reply: 43 - 189 |
|
|
| capgun |
| Posted on: Tuesday, September 23rd, 2008, 12:45:50pm |
|
|
|
| I think the middle one looks the best FIG 1 - like the 'figure of 8' Maybe I could make a surround for the outside edge of the recesses too, Thanks Sneaza |
|
| Logged |
|
|
|
Reply: 44 - 189 |
|
|
| Badger |
| Posted on: Tuesday, September 23rd, 2008, 1:14:28pm |
|
|
|
| The WHITE Section inside the Shaded area is the Plate I assumed you would Mount them to and the Holes, so it should look okay..... |
|
| Logged |
|
|
|
Reply: 45 - 189 |
|
|
| Badger |
Posted on: Wednesday, September 24th, 2008, 1:23:04am
Attachment: 100_1482.jpg - 23.26 KB (283 views) |
|
|
|
| Threw a 'Sickie' and decided to measure up the recess 'Bucket'. While I think this would be good, it doesn't leave you much room for your 'ALLY' Faceplate...... |
 |
|
| Logged |
|
|
|
Reply: 46 - 189 |
|
|
| Badger |
Posted on: Wednesday, September 24th, 2008, 1:25:18am
Attachment: 100_1483.jpg - 16.73 KB (279 views) |
|
|
|
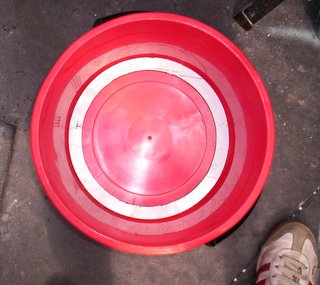
| ....so back down to 'Bunnings' to get a slightly larger one.....approx. 315mm outside edge. Red one is 290...approx., but this will give you room for the plate. |
 |
|
| Logged |
|
|
|
Reply: 47 - 189 |
|
|
| Badger |
Posted on: Wednesday, September 24th, 2008, 1:29:34am
Attachment: 100_1485.jpg - 13.55 KB (280 views) |
|
|
|
Sideshot.....see profile and where the Masking Tape is, is how 'Deep' the recess will be...from the bottom of the bucket obviously....I calculated 100mm, which should be enough with depth of Subs and the 8mm plate.
Let me know what you think BEFORE I POUR THE RESIN........ then I can begin.
This wont take long to knock together..... |
 |
Last modified Wednesday, September 24th, 2008, 1:31:21am by Badger |
|
| Logged |
|
|
|
Reply: 48 - 189 |
|
|
| capgun |
| Posted on: Wednesday, September 24th, 2008, 10:18:37am |
|
|
|
I wish I wasn't on day shift now! The blue one looks fine thanks Sneaza - The less of the box volume I use would be beneficial but it's only slightly bigger than the red
The sub is exactly 270mm across where it bolts on and 100mm high or deep.
So...
If it will fit in the enclosure could you please use the blue one (more of the sub will be seen too because of the conical shape!) otherwise the red will still be fine thankyou
100mm of depth would be great |
|
| Logged |
|
|
|
Reply: 49 - 189 |
|
|
| Badger |
| Posted on: Wednesday, September 24th, 2008, 10:39:34am |
|
|
|
| Consider it done.....watch this space.... |
|
| Logged |
|
|
|
Reply: 50 - 189 |
|
|
| capgun |
| Posted on: Wednesday, September 24th, 2008, 11:30:14am |
|
|
|
Thsnks Sneaza
|
|
| Logged |
|
|
|
Reply: 51 - 189 |
|
|
| capgun |
| Posted on: Friday, September 26th, 2008, 6:43:56am |
|
|
|
One of the guys at the audio meet came up up with a great idea last night too - More than likely the enclosure volume won't be 'optimal' for the two PHD's so he said I could run a pipe through to the boot into another enclosure... There is heaps of space for that under the raised amplifiers - I just need to work out hope much space is left in the gap after the rear window is down (and run a flatish pipe from the interior into the boot area). No problems at all
Just thought if it's only a little bit of volume needed I could make two pipes come down either side from the main enclosure and seal them to small flat boxes under the seats. |
|
| Logged |
|
|
|
Reply: 52 - 189 |
|
|
| Badger |
| Posted on: Friday, September 26th, 2008, 8:11:39am |
|
|
|
Okay, what is 'optimal'...Manufacturers RECOMMENDATION...??? you would only be approx .85cm short of 'Capacity' if that, and as I pointed out earlier, unless you intend to push the subs at 'FULL VOLUME' everytime you turn on the stereo, then you wouldn't need to be exact. If you DON'T put the Hoops back in, then behind the headrests could be utilised, giving you exactly what you need.
The thought of 'Plumbing' pipes through to the boot is not an option I would consider....can't see how this would give you the extra capacity and would mean destroying the interior panels, fabricating another enclosure and then because they will need to be 'Sealed' to the unit at both ends, would be impossible to remove without destroying it.
At the end of the day it's your call and I don't wish to offend and upset you, so I'm sorry if I'm stepping out of line here....please tell me, but, commonsense has to play a part in this also. Your subs will be 'Reversed', so won't the 'Cabin' play a major role in this...???
After reading a lot of posts on MEA, sometimes people just can't think 'Outside the Box'.
Most of what I have seen from the people 'in the know' are using MDF Boxes shoved into the boot, and seem mainly geared toward 'Loud' rather than 'Sound'.
Having been to a few events where the cars are full of speakers/subs in 'Custom Enclosures' and I'm sure after spending major $$$$ on some of these installs, there is No Way that they could possibly be built to 'Spec' to accomodate the amount, yet they are still sounding good and still have more than enough 'Balanced Volume'....???
Will post the pics of the recess when it is dried and seperated.....over weekend.
|
|
| Logged |
|
|
|
Reply: 53 - 189 |
|
|
| crisp |
| Posted on: Friday, September 26th, 2008, 8:18:42am |
|
|
|
A bit of strange and lateral thought.
Once the car gets to a show do you have to move it other than to get home?
If not then it would be easier to put the extra boxes in the rear wheel arches?
Then have some nice GRP covers to go over where the wheels were?
Or:
Do you normally take passengers to these events?
If not you've huge amounts of space in the passenger side once the seat is removed.
|
|
| Logged |
|
|
|
Reply: 54 - 189 |
|
|
| capgun |
| Posted on: Friday, September 26th, 2008, 9:41:49am |
|
|
|
| It's ok Sneaza If I went that route the sub box design would remain unchanged but two pipes added to it - that's all |
|
| Logged |
|
|
|
Reply: 55 - 189 |
|
|
| capgun |
| Posted on: Friday, September 26th, 2008, 11:00:58am |
|
|
|
| I was just discussing it with them and that scenario was given as an option should the volume not be sufficient |
|
| Logged |
|
|
|
Reply: 56 - 189 |
|
|
| Badger |
| Posted on: Friday, September 26th, 2008, 8:06:16pm |
|
|
|
| No probs CG, as I said, Your Call... |
|
| Logged |
|
|
|
Reply: 57 - 189 |
|
|
| capgun |
| Posted on: Saturday, September 27th, 2008, 4:09:15am |
|
|
|
I'll definately try it without first!
If for some unknown reason it sounds weird I can always add the pipes later |
|
| Logged |
|
|
|
Reply: 58 - 189 |
|
|
| Badger |
| Posted on: Saturday, September 27th, 2008, 7:07:54am |
|
|
|
| Running from front down to under each seat would be best I think...??? |
|
| Logged |
|
|
|
Reply: 59 - 189 |
|
|
| capgun |
| Posted on: Saturday, September 27th, 2008, 7:14:18am |
|
|
|
I think so too (if needed)
I've got resin and bits of matting over my hands atm! (fibreglassing some enclosures to seal my mids inside the door - they need about 1.25 -1.5litres each though! Got about 1100ml so that will have to do! I used a 90mm long 100mm diameter bit of ally tube attached to the fibreglass enclosure (I need to put the f/g bit in first and then araldyte the pipe that goes b/w the two enclosures to make it one!
(halfway through it all) |
Last modified Saturday, September 27th, 2008, 7:16:00am by capgun |
|
| Logged |
|
|
|
Reply: 60 - 189 |
|
|
| Badger |
Posted on: Saturday, September 27th, 2008, 8:36:01am
Attachment: 100_1487.jpg - 11.15 KB (227 views) |
|
|
|
Good Luck and don't forget the Pics..... Batteries died in camera, so have only got set up pics for now.
Levelled, squared and screwed to workbench...... |
 |
|
| Logged |
|
|
|
Reply: 61 - 189 |
|
|
| Badger |
Posted on: Saturday, September 27th, 2008, 8:37:20am
Attachment: 100_1486.jpg - 6.64 KB (227 views) |
|
|
|
| MDF Placed and Circles drawn..... |
 |
|
| Logged |
|
|
|
Reply: 62 - 189 |
|
|
| Badger |
Posted on: Saturday, September 27th, 2008, 8:42:07am
Attachment: 100_1488.jpg - 7.39 KB (226 views) |
|
|
|
| Circles joined....but this isn't how 'DEEP' the centre curve will be. This now gets Cut-Out to allow it to slide down over the Tubs till I get to the 100mm Mark, then, when I 'Glass the Tubs, I will 'Glass onto MDF as it gives me a straight face to then attach to the Fibreglass Front Panel...... . If your confused, imagine how I feel.....I hope it works...lol |
 |
|
| Logged |
|
|
|
Reply: 63 - 189 |
|
|
| Badger |
Posted on: Saturday, September 27th, 2008, 8:44:20am
Attachment: 100_1489.jpg - 9.86 KB (225 views) |
|
|
|
| Had to modify the Tubs to get 'em close enough and then remove the Lip to get a smooth surface......not concerned with centre as this will be removed anyway. |
 |
|
| Logged |
|
|
|
Reply: 64 - 189 |
|
|
| Badger |
Posted on: Saturday, September 27th, 2008, 8:46:40am
Attachment: 100_1490.jpg - 10.98 KB (226 views) |
|
|
|
| and finally, the Gap.......Wait till you see the next bit.....just need batteries...... |
 |
|
| Logged |
|
|
|
Reply: 65 - 189 |
|
|
| capgun |
| Posted on: Saturday, September 27th, 2008, 10:42:32am |
|
|
|
Thanks for going to all this trouble Sneaza!  I'll pt up pics in a sec after uploading them on photobucket I'll pt up pics in a sec after uploading them on photobucket |
|
| Logged |
|
|
|
Reply: 66 - 189 |
|
|
| capgun |
| Posted on: Saturday, September 27th, 2008, 11:08:43am |
|
|
|
Here are my pics of my tiny enclosures for the midrange speakers!
I went to great (!) lengths to make them
Firstly I 'permanently borrowed' my parent's weed killer bottle (roundup) because it was the right size to fit in the bottom corner of the doors! I applied some resin to the inside of the cut-up bottle and then after viewing Sneaza's fiberglass tuition thread I applied matting scraps all over the inside of the bottle.
The layers were built up over a couple of hours (3 layers) but the last layer I used a bit too much catalyst and the bowl and brush I was using with the resin started crackling and smoking because they were very hot! Luckily this didn't happen on the actual enclosure.
After I got the 'bowl' part of the container done I had to cap it so it was sealed - not super-easy for a beginner like me but I managed a few layers (stuck a rubber band around the side of the enclosure to keep the resin from making the matting sag!
Came out 'ok' considering it won't be seen (thank God!) and I filled it up with 150ml of water so it will make the total air volume about 1150ml - maybe I'll put some dacron in the enclosure too to compensate for it's small stature...

I cut a section of 100mm diameter aluminium tube and worked out how to link it to my fg enclosure by way of another small pipe off to the side which I will araldyte in after it all mounted. I still need to make a mount for the front of the mids and add t-nuts behind it for easy secure mounting.
Test fitting showed no problems
|
|
| Logged |
|
|
|
Reply: 67 - 189 |
|
|
| Badger |
Posted on: Tuesday, September 30th, 2008, 7:28:57am
Attachment: 100_1491.jpg - 14.73 KB (213 views) |
|
|
|
| Gap filled and ready for shaping.. |
 |
|
| Logged |
|
|
|
Reply: 68 - 189 |
|
|
| Badger |
Posted on: Tuesday, September 30th, 2008, 7:31:28am
Attachment: 100_1492.jpg - 14.20 KB (207 views) |
|
|
|
| Shaped and wood cut to size.... |
 |
|
| Logged |
|
|
|
Reply: 69 - 189 |
|
|
| Badger |
Posted on: Tuesday, September 30th, 2008, 7:35:47am
Attachment: 100_1493.jpg - 17.59 KB (207 views) |
|
|
|
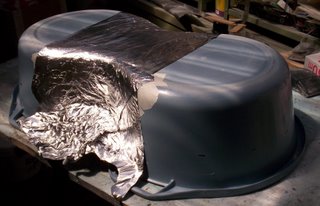
| Trimmed, Taped and Foiled.... |
 |
|
| Logged |
|
|
|
Reply: 70 - 189 |
|
|
| Badger |
Posted on: Tuesday, September 30th, 2008, 7:37:19am
Attachment: 100_1494.jpg - 17.23 KB (206 views) |
|
|
|
| Side view.... |
 |
|
| Logged |
|
|
|
Reply: 71 - 189 |
|
|
| Badger |
Posted on: Tuesday, September 30th, 2008, 7:38:53am
Attachment: 100_1495.jpg - 10.94 KB (208 views) |
|
|
|
| Materialising before my eyes..... Taped and ready for 'Glassing.... |
 |
|
| Logged |
|
|
|
Reply: 72 - 189 |
|
|
| Badger |
Posted on: Tuesday, September 30th, 2008, 7:40:26am
Attachment: 100_1496.jpg - 15.60 KB (201 views) |
|
|
|
| First layer applied.... |
 |
|
| Logged |
|
|
|
Reply: 73 - 189 |
|
|
| Badger |
Posted on: Tuesday, September 30th, 2008, 7:42:37am
Attachment: 100_1497.jpg - 12.17 KB (200 views) |
|
|
|
| Close up......2 more layers to go..... |
 |
|
| Logged |
|
|
|
Reply: 74 - 189 |
|
|
| capgun |
| Posted on: Tuesday, September 30th, 2008, 9:09:09am |
|
|
|
| Looks fantastic Sneaza! Doesn't take much time to see huge progress |
|
| Logged |
|
|
|
Reply: 75 - 189 |
|
|
| Badger |
Posted on: Friday, October 3rd, 2008, 1:26:53am
Attachment: 100_1502.jpg - 14.83 KB (180 views) |
|
|
|
| Nope, and here's some more..... Removed....No damage to the Bowls underneath..... |
 |
|
| Logged |
|
|
|
Reply: 76 - 189 |
|
|
| Badger |
Posted on: Friday, October 3rd, 2008, 1:27:58am
Attachment: 100_1503.jpg - 11.45 KB (183 views) |
|
|
|
| Just need to clean up the wood in case I need to use it again...??? |
 |
|
| Logged |
|
|
|
Reply: 77 - 189 |
|
|
| Badger |
Posted on: Friday, October 3rd, 2008, 1:29:48am
Attachment: 100_1504.jpg - 18.16 KB (180 views) |
|
|
|
Just to show you how much space you have, Placed my 10" Shallow Mount Pioneer....
|
 |
|
| Logged |
|
|
|
Reply: 78 - 189 |
|
|
| Badger |
Posted on: Friday, October 3rd, 2008, 1:34:44am
Attachment: 100_1505.jpg - 14.96 KB (180 views) |
|
|
|
....and the other way up....will Trim it up next and cut to fit Parcel Shelf.
Question: Do you want me to attach 2 MDF Rings to the rear and 'Glass them in place...???
|
 |
|
| Logged |
|
|
|
Reply: 79 - 189 |
|
|
|
 Cappuccino Owners Club › Gallery › Cappo Related Album › SUB ENCLOSURE VOLUME (Moderators: )


 Locked Board