|
|
 Author Author |
 SUB ENCLOSURE VOLUME (currently 1846 views) SUB ENCLOSURE VOLUME (currently 1846 views) |
| capgun |
| Posted on: Friday, October 3rd, 2008, 5:46:43am |
  |
|
|
It shouldn't need MDF rings on the back but thanks for offering Sneaza  I will bolt the Subs to the Ally plate and bolt the ally plate you your amazing enclosure! I will bolt the Subs to the Ally plate and bolt the ally plate you your amazing enclosure! 
I'm glad it's you doing the fiberglassing and not me - my last one was 'ok' but heaps of bubbles and roughness underneath! Yours is 1000 times better!  |
|
 Logged Logged |
|
|
 |
Reply: 80 - 189 |
|
|
| Badger |
Posted on: Friday, October 3rd, 2008, 6:06:38am
 Attachment: 100_1507.jpg - 11.68 KB (283 views) Attachment: 100_1507.jpg - 11.68 KB (283 views) |
|
|
|
| Ha Ha Ha...it's all practise CG...Sounds good tho'. Okay, trimmed the edges and inner rings/recess... |
 |
|
| Logged |
|
|
|
Reply: 81 - 189 |
|
|
| Badger |
Posted on: Friday, October 3rd, 2008, 6:08:19am
Attachment: 100_1508.jpg - 11.58 KB (281 views) |
|
|
|
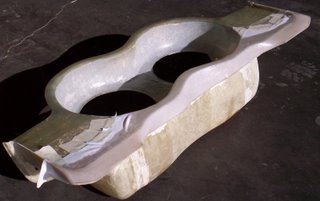
| Traced around Parcel Shelf and cut out, sat in place for a test fit.....Need to fill in the Bottom, then Glass the inside edges to make STRONG, SEALED FRONT.... |
 |
Last modified Friday, October 3rd, 2008, 6:10:12am by Badger |
|
| Logged |
|
|
|
Reply: 82 - 189 |
|
|
| Badger |
Posted on: Friday, October 3rd, 2008, 6:11:29am
Attachment: 100_1510.jpg - 7.97 KB (276 views) |
|
|
|
| View from the top.....showing the Gaps to be filled at bottom. |
 |
|
| Logged |
|
|
|
Reply: 83 - 189 |
|
|
| Badger |
Posted on: Friday, October 3rd, 2008, 6:21:14am
Attachment: 100_1509.jpg - 8.58 KB (275 views) |
|
|
|
and from the side....see just how much space is there.... .
Now, the next all important question.....Where do you want the Front Trimmed to...???
meaning, what shape...How close to the Recess Curves etc....
This will be the LAST thing to go on after I have glassed the next bit and strengthened the inside, then figured out the seat belt arrangement. I should cut the Holes for the Subs so that I can access the inner top at rear for extra Glassing strength, but it's your call...and something you could do...??? Let me know what you think..... |
 |
|
| Logged |
|
|
|
Reply: 84 - 189 |
|
|
| capgun |
Posted on: Friday, October 3rd, 2008, 6:34:08am
Attachment: mockup1.jpg - 18.51 KB (269 views) |
|
|
|
I think your initial idea would be the best - Just a smooth-ish bend across the top and only allow for the seat belt mounts on the sides
It is nice to see it all together and visualise the end piece
I am thinking of buying some new leather from the states (via ebay) and trimming it like the rest of the interior - just means it doesn't have to be all super smooth because it needs foam over the top of the f/g initially
|
 |
|
| Logged |
|
|
|
Reply: 85 - 189 |
|
|
| capgun |
Posted on: Friday, October 3rd, 2008, 6:48:32am
Attachment: bluie.jpg - 83.74 KB (267 views) |
|
|
|
| My LED strips came from overseas too - rough idea of how they look (will be a perfect circle once mounted properly! ) |
 |
|
| Logged |
|
|
|
Reply: 86 - 189 |
|
|
| Badger |
| Posted on: Friday, October 3rd, 2008, 8:33:26am |
|
|
|
So you don't want to follow the recess shape...??? even easier.
The Spaceship has Landed...lol.....should look very COOOOOOOL when installed. |
|
| Logged |
|
|
|
Reply: 87 - 189 |
|
|
| capgun |
| Posted on: Saturday, October 4th, 2008, 2:59:15am |
|
|
|
It probably will follow the recess so more of the sides of the subs can be seen now you mention it
I thought it looked a bit like a UFO too! |
|
| Logged |
|
|
|
Reply: 88 - 189 |
|
|
| Badger |
Posted on: Saturday, October 4th, 2008, 9:26:27am
Attachment: mockup11.jpg - 19.02 KB (250 views) |
|
|
|
| I meant follow the shape for the top of the enclosure...lol |
 |
|
| Logged |
|
|
|
Reply: 89 - 189 |
|
|
| capgun |
| Posted on: Saturday, October 4th, 2008, 9:48:34am |
|
|
|
Actually that would look better but is it a lot harder to do that in f/g than a gradual curve across the top?
I vote for that treatment as long as it's not really hard to do! If it is maybe the single curve instead |
|
| Logged |
|
|
|
Reply: 90 - 189 |
|
|
| Badger |
| Posted on: Saturday, October 4th, 2008, 5:12:38pm |
|
|
|
| er.....no Though it will restrict the VOLUME a little, but not much... |
|
| Logged |
|
|
|
Reply: 91 - 189 |
|
|
| capgun |
| Posted on: Saturday, October 4th, 2008, 11:22:08pm |
|
|
|
I'll call you a bit later on today! (or message me to call you if it gets to late afternoon!)
edit : your phone went to message bank so I thought you must be sleeping - or working! |
Last modified Sunday, October 5th, 2008, 12:45:52pm by capgun |
|
| Logged |
|
|
|
Reply: 92 - 189 |
|
|
| Badger |
Posted on: Tuesday, October 14th, 2008, 3:24:13am
Attachment: 100_1515.jpg - 12.21 KB (213 views) |
|
|
|
| So, after trimming the holes and sides, Glassed the edges Front and Inside also at back of recess under neath to stop any unwanted movement..... |
 |
|
| Logged |
|
|
|
Reply: 93 - 189 |
|
|
| Badger |
Posted on: Tuesday, October 14th, 2008, 3:26:08am
Attachment: 100_1516.jpg - 13.91 KB (212 views) |
|
|
|
| Then added the 'Pockets' where the seat belts will pass through....Pass. side |
 |
|
| Logged |
|
|
|
Reply: 94 - 189 |
|
|
| Badger |
Posted on: Tuesday, October 14th, 2008, 3:26:54am
Attachment: 100_1517.jpg - 15.64 KB (210 views) |
|
|
|
| Drivers side... |
 |
|
| Logged |
|
|
|
Reply: 95 - 189 |
|
|
| Badger |
Posted on: Tuesday, October 14th, 2008, 3:27:55am
Attachment: 100_1518.jpg - 9.77 KB (208 views) |
|
|
|
| Stretched the T-Shirts once again..... |
 |
|
| Logged |
|
|
|
Reply: 96 - 189 |
|
|
| Badger |
Posted on: Tuesday, October 14th, 2008, 3:29:13am
Attachment: 100_1519.jpg - 10.81 KB (209 views) |
|
|
|
| Different angle, but you can seehow this quickly gets the desired shape on the bottom... |
 |
|
| Logged |
|
|
|
Reply: 97 - 189 |
|
|
| Badger |
Posted on: Tuesday, October 14th, 2008, 3:30:00am
Attachment: 100_1520.jpg - 13.45 KB (207 views) |
|
|
|
| Coat of Resin and out in the SUN....... |
 |
|
| Logged |
|
|
|
Reply: 98 - 189 |
|
|
| Badger |
Posted on: Tuesday, October 14th, 2008, 3:31:53am
Attachment: 100_1524.jpg - 12.33 KB (208 views) |
|
|
|
| Followed by the Fibreglass....on the inside as well to reinforce and strengthen the front Edges..... |
 |
|
| Logged |
|
|
|
Reply: 99 - 189 |
|
|
| Badger |
Posted on: Tuesday, October 14th, 2008, 3:34:09am
Attachment: 100_1521.jpg - 15.16 KB (205 views) |
|
|
|
| Pass. side Pockets with holes now in place.....and yes the excess that you see, though won't have any bearing on the operation of the seat belts, will be trimmed smooth....even though you won't see this when the TOP GOES ON.... |
 |
|
| Logged |
|
|
|
Reply: 100 - 189 |
|
|
| Badger |
Posted on: Tuesday, October 14th, 2008, 3:35:44am
Attachment: 100_1522.jpg - 17.60 KB (203 views) |
|
|
|
| Drivers side, you can see the reinforcing at the bottom....all this was then sanded smooth, so that if you have to poke around inside for any reason, you won't get splinters..... |
 |
|
| Logged |
|
|
|
Reply: 101 - 189 |
|
|
| Badger |
Posted on: Tuesday, October 14th, 2008, 3:43:24am
Attachment: 100_1525.jpg - 14.38 KB (202 views) |
|
|
|
So at this point am feeling quite good....removed my Sub Enclosure to get a 'Test Fit' BEFORE I attach the Top and also to see just how much room for Seats, wether it would clear window, if Release would operate...etc, etc......BASTRAD!!!!!......Needs to go back 3" and couldn't for the life of me think why.....then it dropped.
Front is TOO WIDE....when I attached the Front Panel, I had it sitting in my Spare Parcel Shelf Panels on work bench and Pushed Panel in to get nice Tight fit prior to Glassing in place. Now comes the MODIFICATIONS...... >  > > 
But before that, this is the view.... |
 |
|
| Logged |
|
|
|
Reply: 102 - 189 |
|
|
| Badger |
Posted on: Tuesday, October 14th, 2008, 3:44:32am
Attachment: 100_1526.jpg - 13.81 KB (203 views) |
|
|
|
| Almost in place..... |
 |
|
| Logged |
|
|
|
Reply: 103 - 189 |
|
|
| Badger |
Posted on: Tuesday, October 14th, 2008, 3:46:26am
Attachment: 100_1527.jpg - 11.23 KB (135 views) |
|
|
|
| Different angle....Plenty of room for Release to operate, Enclosure actually sits further back than mine at present, so Leg room I don't think will be an issue... |
 |
|
| Logged |
|
|
|
Reply: 104 - 189 |
|
|
| Badger |
Posted on: Tuesday, October 14th, 2008, 3:48:42am
Attachment: 100_1529.jpg - 13.37 KB (134 views) |
|
|
|
My concern is that I think I should remove the 50mm Edge from the Top to give more rear viewing...???Let me know what you think CG..... 
With the roof up.....plenty of room..... |
 |
|
| Logged |
|
|
|
Reply: 105 - 189 |
|
|
| Badger |
Posted on: Tuesday, October 14th, 2008, 3:50:39am
Attachment: 100_1530.jpg - 14.09 KB (201 views) |
|
|
|
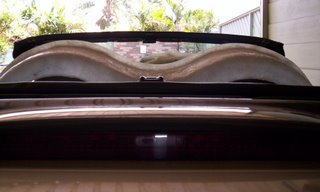
| From the Rear.....I think you can just make out the Line.....obviously you wont see the Holes but this gives an idea of what you will see..... |
 |
|
| Logged |
|
|
|
Reply: 106 - 189 |
|
|
| Badger |
Posted on: Tuesday, October 14th, 2008, 3:55:04am
Attachment: 100_1531.jpg - 15.55 KB (199 views) |
|
|
|
And now you can see how much I have to remove, ( I have to bring this edge inwards ).....!#$!#!##$.....The Grey one is another Shell awaiting a front, but yours will look as smooth as this when I'm done.....
CG, Let me know A.S.A.P. about that Top edge, so I don't have to get Covered Twice....  |
 |
Last modified Tuesday, October 14th, 2008, 3:56:57am by Badger |
|
| Logged |
|
|
|
Reply: 107 - 189 |
|
|
| capgun |
| Posted on: Tuesday, October 14th, 2008, 4:34:35am |
|
|
|
That's SO good Sneaza, Thankyou!
Sorry it has become a bit of a headache with making it fit - may be if it not too hard you could make the top edge about 10-15mm instead of 50mm? Honestly though, I can see how hard this is while making everything fit so I will leave the ball in your court so to speak! (in regards to any necessary fitting/view mods). It looks so professional |
|
| Logged |
|
|
|
Reply: 108 - 189 |
|
|
| Badger |
| Posted on: Tuesday, October 14th, 2008, 4:52:20am |
|
|
|
| Cheers Mate, consider it done....Off to work now so this will happen tomorrow.... |
|
| Logged |
|
|
|
Reply: 109 - 189 |
|
|
| capgun |
| Posted on: Tuesday, October 14th, 2008, 4:59:46am |
|
|
|
|
| Logged |
|
|
|
Reply: 110 - 189 |
|
|
| crisp |
| Posted on: Wednesday, October 15th, 2008, 10:00:11pm |
|
|
|
Indeed I'll second that - extremely proffessional look there Sneaza !
|
|
| Logged |
|
|
|
Reply: 111 - 189 |
|
|
| Badger |
| Posted on: Wednesday, October 15th, 2008, 11:04:46pm |
|
|
|
| Cheers Crisp, that's what I'd expect if I where buying one....so no different for me |
|
| Logged |
|
|
|
Reply: 112 - 189 |
|
|
| Badger |
Posted on: Monday, October 20th, 2008, 9:12:21am
Attachment: 100_1565.jpg - 19.23 KB (167 views) |
|
|
|
| Trimmed down, width reduced, fits like a glove...... |
 |
|
| Logged |
|
|
|
Reply: 113 - 189 |
|
|
| Badger |
Posted on: Monday, October 20th, 2008, 9:13:10am
Attachment: 100_1567.jpg - 13.59 KB (167 views) |
|
|
|
| Before I cover it up....... |
 |
|
| Logged |
|
|
|
Reply: 114 - 189 |
|
|
| Badger |
Posted on: Monday, October 20th, 2008, 9:14:06am
Attachment: 100_1568.jpg - 23.44 KB (164 views) |
|
|
|
| Release at full operation....plenty of room.... |
 |
|
| Logged |
|
|
|
Reply: 115 - 189 |
|
|
| Badger |
Posted on: Monday, October 20th, 2008, 9:14:54am
Attachment: 100_1569.jpg - 18.23 KB (167 views) |
|
|
|
| Not much higher than seats. |
 |
|
| Logged |
|
|
|
Reply: 116 - 189 |
|
|
| Badger |
Posted on: Monday, October 20th, 2008, 9:15:49am
Attachment: 100_1570.jpg - 7.40 KB (163 views) |
|
|
|
| Now the bit you've been waiting for....... |
 |
|
| Logged |
|
|
|
Reply: 117 - 189 |
|
|
| Badger |
Posted on: Monday, October 20th, 2008, 9:17:09am
Attachment: 100_1571.jpg - 12.02 KB (161 views) |
|
|
|
| and from the front..... |
 |
|
| Logged |
|
|
|
Reply: 118 - 189 |
|
|
| Badger |
Posted on: Monday, October 20th, 2008, 9:18:12am
Attachment: 100_1572.jpg - 10.62 KB (160 views) |
|
|
|
| Resin applied |
 |
|
| Logged |
|
|
|
Reply: 119 - 189 |
|
|
|
 Cappuccino Owners Club › Gallery › Cappo Related Album › SUB ENCLOSURE VOLUME (Moderators: )


 Locked Board