|
|
 Author Author |
 My rebuild (currently 1088 views) My rebuild (currently 1088 views) |
| healysprite |
Posted on: Sunday, May 9th, 2010, 5:10:10pm
 Attachment: 104.jpg - 142.35 KB (775 views) Attachment: 104.jpg - 142.35 KB (775 views) |
  |
|
|
I have tried a couple of times to start this thread and always get defeated by the pics being the wrong size, Hopefully I have resolved this problem and will try to get some pics up as I go along,
I previously owned a silver cappo which was rotten and I made a brave attempt at repairing it but I managed to get hold of a damaged cappo and have been slowly rebuilding it with parts from the silver car, I dont have any pics of the original damage which was to the rear and light front but will start the pics from when I removed the damaged parts
|
 |
|
 Logged Logged |
|
|
|
|
| healysprite |
Posted on: Sunday, May 9th, 2010, 5:15:45pm
Attachment: 103.jpg - 138.19 KB (773 views) |
|
|
|
| hopefully this will add another pic |
 |
|
| Logged |
|
|
 |
Reply: 1 - 42 |
|
|
| healysprite |
Posted on: Sunday, May 9th, 2010, 5:17:06pm
Attachment: 106.jpg - 141.00 KB (769 views) |
|
|
|
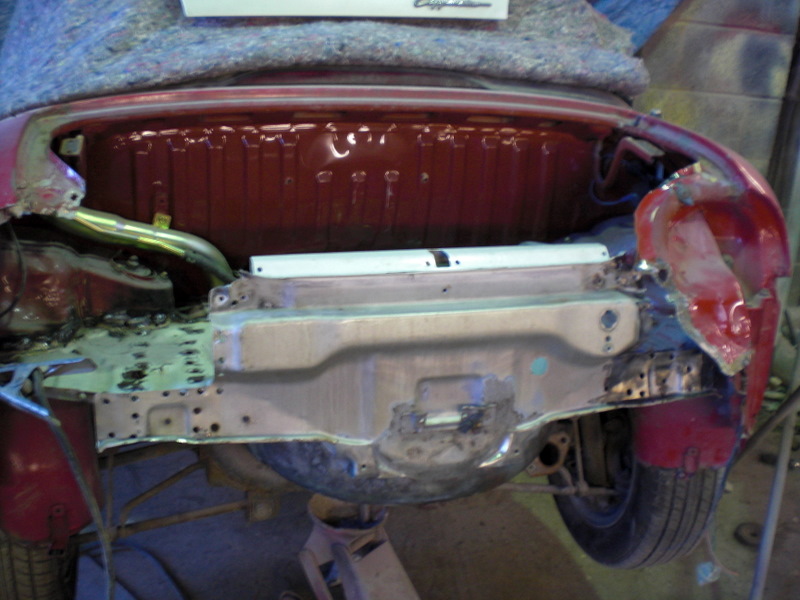
| As you can see the rear end had a fair bit of damage which I cut out, I then used the rear end from the silver car |
 |
|
| Logged |
|
|
|
Reply: 2 - 42 |
|
|
| healysprite |
Posted on: Sunday, May 9th, 2010, 5:18:04pm
Attachment: 107.jpg - 139.29 KB (769 views) |
|
|
|
| took abit of time to sort this |
 |
|
| Logged |
|
|
|
Reply: 3 - 42 |
|
|
| healysprite |
Posted on: Sunday, May 9th, 2010, 5:19:07pm
Attachment: 0131.jpg - 124.04 KB (770 views) |
|
|
|
| slowly I managed to sort it out |
 |
|
| Logged |
|
|
|
Reply: 4 - 42 |
|
|
| healysprite |
Posted on: Sunday, May 9th, 2010, 5:20:06pm
Attachment: 108.jpg - 123.88 KB (767 views) |
|
|
|
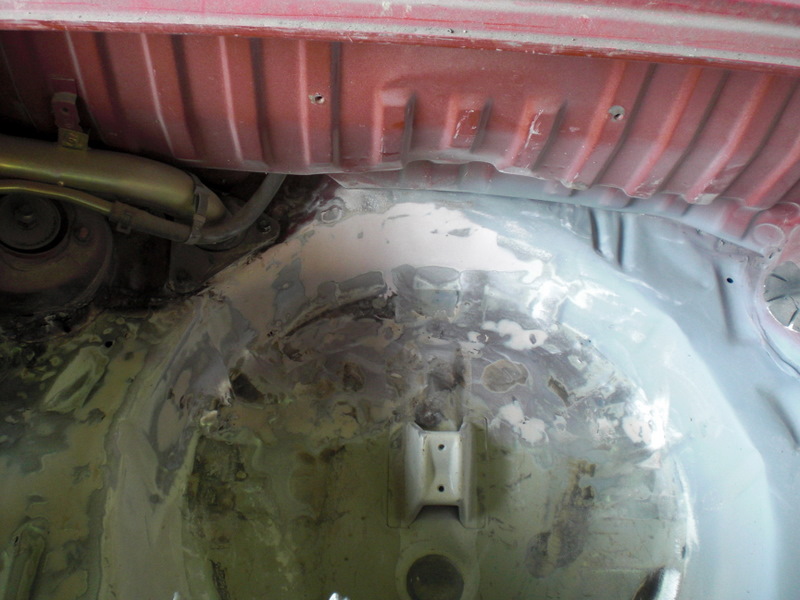
| inside the boot |
 |
|
| Logged |
|
|
|
Reply: 5 - 42 |
|
|
| healysprite |
Posted on: Sunday, May 9th, 2010, 5:21:33pm
Attachment: 168.jpg - 133.09 KB (769 views) |
|
|
|
| after a bit of dressing up |
 |
|
| Logged |
|
|
|
Reply: 6 - 42 |
|
|
| healysprite |
Posted on: Sunday, May 9th, 2010, 5:22:37pm
Attachment: 167.jpg - 147.82 KB (772 views) |
|
|
|
| its starting to look like a car again |
 |
|
| Logged |
|
|
|
Reply: 7 - 42 |
|
|
| healysprite |
Posted on: Sunday, May 9th, 2010, 5:23:25pm
Attachment: 105.jpg - 144.20 KB (763 views) |
|
|
|
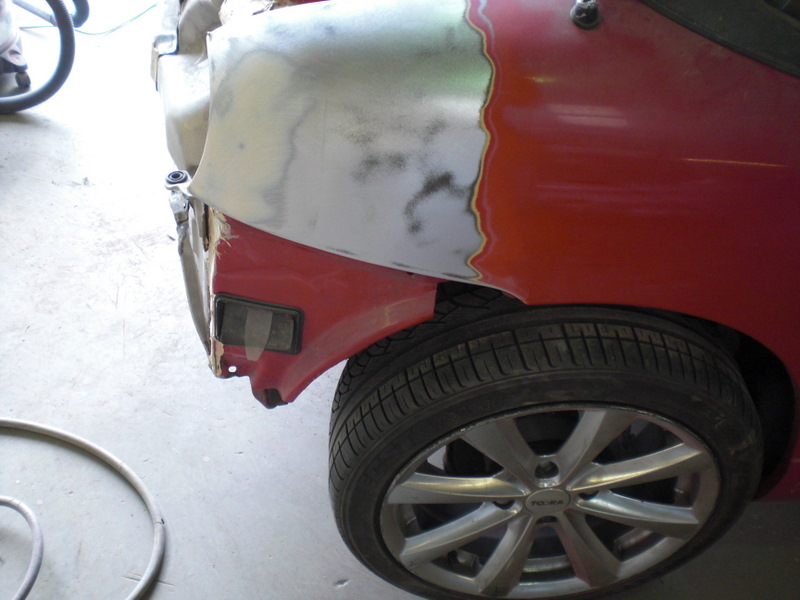
| there was damage to both rear wings as well |
 |
|
| Logged |
|
|
|
Reply: 8 - 42 |
|
|
| healysprite |
Posted on: Sunday, May 9th, 2010, 5:24:03pm
Attachment: 169.jpg - 118.06 KB (763 views) |
|
|
|
| drivers side |
 |
|
| Logged |
|
|
|
Reply: 9 - 42 |
|
|
| healysprite |
Posted on: Sunday, May 9th, 2010, 5:25:51pm
Attachment: cimg0618.jpg - 128.55 KB (761 views) |
|
|
|
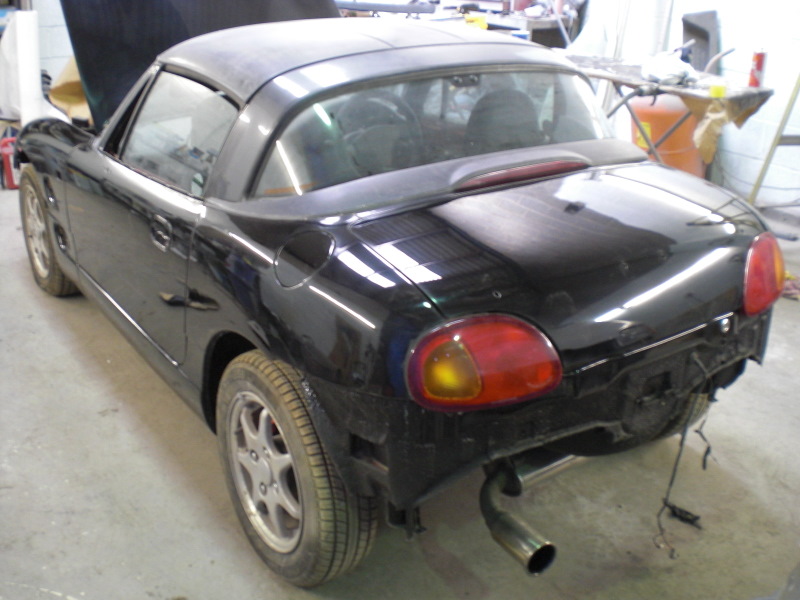
If your interested will carryone putting up the pics, Its nearly complete now and has changed just a little
|
 |
|
| Logged |
|
|
|
Reply: 10 - 42 |
|
|
| Andy |
| Posted on: Sunday, May 9th, 2010, 5:49:39pm |
|
|
Official C.O.C Contributor


Gender:  Male Male
Posts: 23604
Posts Per Day: 3.47 |
|
Amazing job  Please do carry on posting the pics! Please do carry on posting the pics! |
Drop me a PM if you would like to be added to the ClubCappo Member Map. More details can be found here.
We now have an official Facebook group as well as a page! See here |
|
| Logged |
|
|
 |
Reply: 11 - 42 |
|
|
| healysprite |
Posted on: Sunday, May 9th, 2010, 6:11:34pm
Attachment: 166.jpg - 137.62 KB (753 views) |
|
|
|
| Thanks Andy, abouut time I got some pics on, hers a few more further down the rebuild |
 |
|
| Logged |
|
|
|
Reply: 12 - 42 |
|
|
| healysprite |
Posted on: Sunday, May 9th, 2010, 6:13:23pm
Attachment: cimg0240.jpg - 147.41 KB (754 views) |
|
|
|
| That was passenger side sorted, time for drivers side |
 |
|
| Logged |
|
|
|
Reply: 13 - 42 |
|
|
| healysprite |
Posted on: Sunday, May 9th, 2010, 6:15:01pm
Attachment: cimg0247.jpg - 120.99 KB (751 views) |
|
|
|
| now need to make sure the boot lid fits . |
 |
|
| Logged |
|
|
|
Reply: 14 - 42 |
|
|
| healysprite |
Posted on: Sunday, May 9th, 2010, 6:17:21pm
Attachment: cimg0248.jpg - 125.18 KB (752 views) |
|
|
|
| was a bit of a sod but it fitted which was a relief, (I had checked before I welded everything in place) |
 |
|
| Logged |
|
|
|
Reply: 15 - 42 |
|
|
| healysprite |
Posted on: Sunday, May 9th, 2010, 7:29:10pm
Attachment: cimg0251.jpg - 129.65 KB (736 views) |
|
|
|
Tried the spoiler at the same time, next i need to underseal under the front and back wings
|
 |
|
| Logged |
|
|
|
Reply: 16 - 42 |
|
|
| healysprite |
Posted on: Sunday, May 9th, 2010, 7:32:31pm
Attachment: cimg0244.jpg - 157.97 KB (734 views) |
|
|
|
| removed the front wings, cleaned the inner wings up, then used a good quality stone chip, I also used a spray waxoil in the openings just to make sure rust didnt start there |
 |
|
| Logged |
|
|
|
Reply: 17 - 42 |
|
|
| healysprite |
Posted on: Sunday, May 9th, 2010, 7:33:54pm
Attachment: cimg02451.jpg - 155.35 KB (730 views) |
|
|
|
| I had previously repaired the damage to the front, |
 |
|
| Logged |
|
|
|
Reply: 18 - 42 |
|
|
| Badger |
| Posted on: Monday, May 10th, 2010, 1:53:13am |
|
|
|
| Excellent job....is the Black one the same car...??? or did I miss something, looking good. |
|
| Logged |
|
|
|
Reply: 19 - 42 |
|
|
| healysprite |
| Posted on: Monday, May 10th, 2010, 7:06:59am |
|
|
|
| Hi Sneaza, the black one is what this turns into, its just a few more pics down the line, |
|
| Logged |
|
|
|
Reply: 20 - 42 |
|
|
| Badger |
| Posted on: Monday, May 10th, 2010, 11:13:15am |
|
|
|
| Very Cool.....Need to put the other wheels back on though.... |
|
| Logged |
|
|
|
Reply: 21 - 42 |
|
|
| healysprite |
Posted on: Monday, May 10th, 2010, 7:03:11pm
Attachment: cimg0254.jpg - 135.58 KB (683 views) |
|
|
|
| Do you mean the Toora wheels Sneaza? anyway cpl pics of under rear arches in stone chip, |
 |
|
| Logged |
|
|
|
Reply: 22 - 42 |
|
|
| healysprite |
Posted on: Monday, May 10th, 2010, 7:05:03pm
Attachment: cimg0572.jpg - 156.82 KB (679 views) |
|
|
|
| After the stonechip they were coated with gravitex |
 |
|
| Logged |
|
|
|
Reply: 23 - 42 |
|
|
| healysprite |
Posted on: Monday, May 10th, 2010, 7:06:27pm
Attachment: cimg0574.jpg - 148.41 KB (682 views) |
|
|
|
| The underside was wire brushed of any rubbish and gravitex'd |
 |
|
| Logged |
|
|
|
Reply: 24 - 42 |
|
|
| healysprite |
Posted on: Monday, May 10th, 2010, 7:08:18pm
Attachment: cimg0573.jpg - 138.73 KB (678 views) |
|
|
|
| fianlly fitted the stainless exhaust as well. The rear subrame had been completely stripped and repainted previously when I stripped out the original rusty silver cappo |
 |
|
| Logged |
|
|
|
Reply: 25 - 42 |
|
|
| Andy |
| Posted on: Monday, May 10th, 2010, 7:33:29pm |
|
|
Official C.O.C Contributor
Gender: Male
Posts: 23604
Posts Per Day: 3.47 |
|
| Fantastic job |
Drop me a PM if you would like to be added to the ClubCappo Member Map. More details can be found here.
We now have an official Facebook group as well as a page! See here |
|
| Logged |
|
|
| |
Reply: 26 - 42 |
|
|
| healysprite |
| Posted on: Monday, May 10th, 2010, 7:54:43pm |
|
|
|
| What made the rebuild worth while was the fact that it has only done 18,000miles and the underside and inside under the carpets was like it had just left the factory.Plus the fact that it was cheap |
|
| Logged |
|
|
|
Reply: 27 - 42 |
|
|
| Badger |
| Posted on: Tuesday, May 11th, 2010, 1:18:45am |
|
|
|
Very nice  .......and yes, the Tora wheels suit the car...Thank God we 'Southerners' don't have to go through what you guys up North do... .......and yes, the Tora wheels suit the car...Thank God we 'Southerners' don't have to go through what you guys up North do...    |
|
| Logged |
|
|
|
Reply: 28 - 42 |
|
|
| healysprite |
Posted on: Tuesday, May 11th, 2010, 8:16:48pm
Attachment: cimg0598.jpg - 94.62 KB (628 views) |
|
|
|
| needed to sort out the panels after the underside |
 |
|
| Logged |
|
|
|
Reply: 29 - 42 |
|
|
| healysprite |
Posted on: Tuesday, May 11th, 2010, 8:18:02pm
Attachment: cimg0599.jpg - 111.42 KB (626 views) |
|
|
|
| thats the bonnet prepped and primed in 2k primer, Boot to go now |
 |
|
| Logged |
|
|
|
Reply: 30 - 42 |
|
|
| healysprite |
Posted on: Tuesday, May 11th, 2010, 8:19:31pm
Attachment: cimg0607.jpg - 134.30 KB (625 views) |
|
|
|
| painted underside of bonnet first and laquered it before I painted the top |
 |
|
| Logged |
|
|
|
Reply: 31 - 42 |
|
|
| healysprite |
Posted on: Tuesday, May 11th, 2010, 8:20:38pm
Attachment: cimg0606.jpg - 129.43 KB (623 views) |
|
|
|
| 6 coats of black then wet flatted with 1200 paper and its nearly ready |
 |
|
| Logged |
|
|
|
Reply: 32 - 42 |
|
|
| healysprite |
Posted on: Tuesday, May 11th, 2010, 8:21:44pm
Attachment: cimg0604.jpg - 150.51 KB (624 views) |
|
|
|
| same with the boot |
 |
|
| Logged |
|
|
|
Reply: 33 - 42 |
|
|
| healysprite |
Posted on: Sunday, May 16th, 2010, 1:25:03pm
Attachment: cimg0594.jpg - 141.73 KB (573 views) |
|
|
|
| I was originally going to strip the whole car out and repaint it but due to lack of time andbeing busy at work meant I would lose this summer if I did that so opted to paint what could be seen, This is the tub |
 |
|
| Logged |
|
|
|
Reply: 34 - 42 |
|
|
| healysprite |
Posted on: Sunday, May 16th, 2010, 1:26:33pm
Attachment: cimg0595.jpg - 170.04 KB (573 views) |
|
|
|
| different angle, havent had time to flat and polish it all yet |
 |
|
| Logged |
|
|
|
Reply: 35 - 42 |
|
|
| healysprite |
Posted on: Sunday, May 16th, 2010, 1:27:51pm
Attachment: cimg0610.jpg - 158.72 KB (570 views) |
|
|
|
| did the inside of the doors whilst off as well |
 |
|
| Logged |
|
|
|
Reply: 36 - 42 |
|
|
| healysprite |
Posted on: Sunday, May 23rd, 2010, 11:14:50am
Attachment: cimg0616.jpg - 116.79 KB (540 views) |
|
|
|
| Just a cpl more pics, havent finished it off yet as bit busy this week |
 |
|
| Logged |
|
|
|
Reply: 37 - 42 |
|
|
| healysprite |
Posted on: Sunday, May 23rd, 2010, 11:16:19am
Attachment: cimg0617.jpg - 126.10 KB (542 views) |
|
|
|
| will add a cpl more later but need to paint the bumpers and mud flaps firsst, then hopefully take for an MOT, YAH!! |
 |
|
| Logged |
|
|
|
Reply: 38 - 42 |
|
|
| healysprite |
| Posted on: Sunday, May 23rd, 2010, 11:19:53am |
|
|
|
| I see from the last pic that the interior wasnt fitted, It has been cleaned up and refitted along with all the lights fitted and checked, Still trying to find the boxes where the bits were in,Havent decided yet wether to fit the 16inch Tooras or not yet as the will need wheel arches, also I am trying to find some clear front indicators for the jdm wings which are the flat indicators, any clues??? |
|
| Logged |
|
|
|
Reply: 39 - 42 |
|
|
|
 Cappuccino Owners Club › Gallery › Cappo Related Album › My rebuild (Moderators: )


 Locked Board