|
|
 Author Author |
 r32z32 build thread. (currently 1198 views) r32z32 build thread. (currently 1198 views) |
| r32z32 |
Posted on: Wednesday, November 28th, 2012, 12:32:52pm
 Attachment: club_cappo.jpg - 169.81 KB (556 views) Attachment: club_cappo.jpg - 169.81 KB (556 views) |
  |
|
|
| I am still trying to find the time to do a full build thread on my cappo. I have had my car for 1.5 years now. I bought it stock and have spent close to $12k usd. mostly on apearance but i have done some bolt on mods for power. I have loads of pics and intend to post them up in order. For now here is a teaser. more to follow when I can find the time. |
 |
|
 Logged Logged |
|
|
|
|
| kayfour |
| Posted on: Friday, November 30th, 2012, 7:00:15am |
|
|
|
real carbon fenders+bumper?
cant wait! |
|
| Logged |
|
|
 |
Reply: 1 - 77 |
|
|
| ggutnik |
| Posted on: Friday, November 30th, 2012, 8:26:59am |
|
|
|
looks like wrap!
cool nonetheless! |
|
| Logged |
|
|
|
Reply: 2 - 77 |
|
|
| lord |
| Posted on: Friday, November 30th, 2012, 10:49:50am |
|
|
|
Pictures pictures pictures....
Isn't there a short video of this on you tube??? |
|
| Logged |
|
|
|
Reply: 3 - 77 |
|
|
| half-9 |
| Posted on: Friday, November 30th, 2012, 6:30:51pm |
|
|
Big Member

Posts: 453
Posts Per Day: 0.32 |
|
Excellent! Look forward to reading this, great looking Cappo!
What intercooler is that? And what's the extra gauge on the dash for?
Cheers
H |
|
| Logged |
|
|
 |
Reply: 4 - 77 |
|
|
| r32z32 |
| Posted on: Monday, December 3rd, 2012, 4:30:14am |
|
|
|
the intercooler is a cheap copy of MonsterSports FMIC kit.
|
|
| Logged |
|
|
|
Reply: 5 - 77 |
|
|
| r32z32 |
Posted on: Monday, December 3rd, 2012, 1:25:03pm
Attachment: 000001.jpg - 152.29 KB (448 views) |
|
|
|
| day 1 just brought it home. almost all stock. I couldnt believe how small this thing was next to my R34 GTT |
 |
|
| Logged |
|
|
|
Reply: 6 - 77 |
|
|
| r32z32 |
Posted on: Monday, December 3rd, 2012, 1:29:08pm
Attachment: 000002.jpg - 171.02 KB (448 views) |
|
|
|
| just a grounding kit. blitz bov, and oil cap. I later found out it already had 295cc injectors and a chipped ecu. |
 |
|
| Logged |
|
|
|
Reply: 7 - 77 |
|
|
| r32z32 |
Posted on: Monday, December 3rd, 2012, 1:31:15pm
Attachment: 000003.jpg - 150.92 KB (443 views) |
|
|
|
| simple and clean. It also came with an aftermarket exhaust. and some no name coilovers. |
 |
|
| Logged |
|
|
|
Reply: 8 - 77 |
|
|
| r32z32 |
Posted on: Monday, December 3rd, 2012, 1:53:32pm
Attachment: 000006.jpg - 169.73 KB (444 views) |
|
|
|
| most of the people i meet have never heard of a cappuccino and they always think it is a miata. so every chance i get to take a pic of my car next to one i do. |
 |
|
| Logged |
|
|
|
Reply: 9 - 77 |
|
|
| r32z32 |
Posted on: Monday, December 3rd, 2012, 1:58:50pm
Attachment: 000007.jpg - 132.43 KB (445 views) |
|
|
|
| my wheels were nasty. i spent the better part of an evening with a green scrub pad and some heavyduty wheel cleaner. |
 |
|
| Logged |
|
|
|
Reply: 10 - 77 |
|
|
| r32z32 |
Posted on: Monday, December 3rd, 2012, 2:00:55pm
Attachment: 000008.jpg - 136.78 KB (440 views) |
|
|
|
| didnt get it perfect but it was alot better. |
 |
|
| Logged |
|
|
|
Reply: 11 - 77 |
|
|
| r32z32 |
Posted on: Monday, December 3rd, 2012, 2:10:12pm
Attachment: 000009.jpg - 171.96 KB (437 views) |
|
|
|
| Cappo's first apperance at a car show. It was a favorate among the kids. most common phrase was "look dad, that car is my size!" I do hate it when people call my car "cute" but most of them are hot females and it starts a conversation, so i dont mind as much. ;p |
 |
|
| Logged |
|
|
|
Reply: 12 - 77 |
|
|
| r32z32 |
Posted on: Monday, December 3rd, 2012, 2:15:18pm
Attachment: 000004.jpg - 171.47 KB (436 views) |
|
|
|
| first modification: Monster sport F100m turbo kit. complete with turbo, ecu, 295cc injectors, spark plugs, and all the gaskets. |
 |
|
| Logged |
|
|
|
Reply: 13 - 77 |
|
|
| r32z32 |
Posted on: Monday, December 3rd, 2012, 2:20:59pm
Attachment: 000011.jpg - 165.02 KB (435 views) |
|
|
|
| I dont know if anyone has a better way of getting the turbo out but i ended up having to take the exhaust manifold off to get the turbo and down pipe out the top. |
 |
|
| Logged |
|
|
|
Reply: 14 - 77 |
|
|
| r32z32 |
Posted on: Monday, December 3rd, 2012, 2:22:42pm
Attachment: 000012.jpg - 160.64 KB (435 views) |
|
|
|
| it took my a frustrating 4 days to get everything to come apart and only 4 hours to get it all back together. |
 |
|
| Logged |
|
|
|
Reply: 15 - 77 |
|
|
| r32z32 |
Posted on: Monday, December 3rd, 2012, 2:25:52pm
Attachment: 000013.jpg - 155.12 KB (434 views) |
|
|
|
| here you can see the difference between the F100 and the stock turbo intake side |
 |
|
| Logged |
|
|
|
Reply: 16 - 77 |
|
|
| r32z32 |
Posted on: Monday, December 3rd, 2012, 2:26:18pm
Attachment: 000014.jpg - 147.07 KB (432 views) |
|
|
|
| here you can see the difference between the F100 and the stock turbo exhause side |
 |
|
| Logged |
|
|
|
Reply: 17 - 77 |
|
|
| r32z32 |
Posted on: Monday, December 3rd, 2012, 2:28:11pm
Attachment: 000005.jpg - 129.81 KB (431 views) |
|
|
|
| here is a comparison between the old(blue) suzuki sport 295cc injectors and the new(red) monster sport 295cc injectors. 12 small holes compared to 1 big hole for better atomization. |
 |
|
| Logged |
|
|
|
Reply: 18 - 77 |
|
|
| r32z32 |
Posted on: Monday, December 3rd, 2012, 2:30:50pm
Attachment: 000015.jpg - 171.46 KB (426 views) |
|
|
|
| I did have to disconnect the throttle body to get the fuel rail to come out far enough to get the injecor to come free. |
 |
|
| Logged |
|
|
|
Reply: 19 - 77 |
|
|
| r32z32 |
| Posted on: Monday, December 3rd, 2012, 2:34:57pm |
|
|
|
i do have to note that the F100m turbo kit is a bit laggier than stock and wont actually make more power without a boost controller. I was really disappointed with the new turbo until I installed my boost controller.
|
|
| Logged |
|
|
|
Reply: 20 - 77 |
|
|
| kayfour |
| Posted on: Monday, December 3rd, 2012, 5:34:42pm |
|
|
|
With regards to the monster sports turbo, i believe it is because the actuator is set to 0.9 bar, but it is a screw type which you can adjust all the way to ~1.2 bar, which should be quite a bit more power
from what i read, you dont need a boost controller for the F100 kit?
someone correct me if i am wrong! |
|
| Logged |
|
|
|
Reply: 21 - 77 |
|
|
| r32z32 |
| Posted on: Tuesday, December 4th, 2012, 5:20:20am |
|
|
|
The actuator is not adjustable on the turbo. A boost controller is required to boost more than .9 bar. I used a greddy profec B spec II and am boosting 1.2bar now.
|
|
| Logged |
|
|
|
Reply: 22 - 77 |
|
|
| r32z32 |
Posted on: Tuesday, December 4th, 2012, 9:43:30am
Attachment: 000016.jpg - 166.08 KB (395 views) |
|
|
|
| the first body mod I did was the Toyoshima Craft duck tail carbon boot lid. |
 |
|
| Logged |
|
|
|
Reply: 23 - 77 |
|
|
| r32z32 |
Posted on: Tuesday, December 4th, 2012, 9:44:57am
Attachment: 000017.jpg - 148.16 KB (394 views) |
|
|
|
| I kind of wished it stuck out alittle farther. |
 |
|
| Logged |
|
|
|
Reply: 24 - 77 |
|
|
| r32z32 |
Posted on: Tuesday, December 4th, 2012, 9:45:50am
Attachment: 000018.jpg - 167.92 KB (393 views) |
|
|
|
| that one piece changed the way the whole car looked. |
 |
|
| Logged |
|
|
|
Reply: 25 - 77 |
|
|
| r32z32 |
Posted on: Tuesday, December 4th, 2012, 9:47:04am
Attachment: 000019.jpg - 136.86 KB (391 views) |
|
|
|
| i love the silhouette that it creates. |
 |
|
| Logged |
|
|
|
Reply: 26 - 77 |
|
|
| r32z32 |
Posted on: Tuesday, December 4th, 2012, 9:54:03am
Attachment: 000020.jpg - 163.38 KB (388 views) |
|
|
|
| the next thing I did was start looking for and intake. after seeing the prices for alot of name brand and even no name brand intakes, i decided to make my own. quite a bit cheaper than anything you can buy off the internet. |
 |
|
| Logged |
|
|
|
Reply: 27 - 77 |
|
|
| r32z32 |
Posted on: Tuesday, December 4th, 2012, 9:55:47am
Attachment: 000021.jpg - 170.99 KB (388 views) |
|
|
|
| there is a lot of induction noise with my intake and you can really hear the turbo spool up. |
 |
|
| Logged |
|
|
|
Reply: 28 - 77 |
|
|
| r32z32 |
Posted on: Tuesday, December 4th, 2012, 9:56:53am
Attachment: 000022.jpg - 164.67 KB (388 views) |
|
|
|
| definately an eye catcher when you open the hood. |
 |
|
| Logged |
|
|
|
Reply: 29 - 77 |
|
|
| r32z32 |
Posted on: Tuesday, December 4th, 2012, 10:03:40am
Attachment: 000023.jpg - 170.92 KB (388 views) |
|
|
|
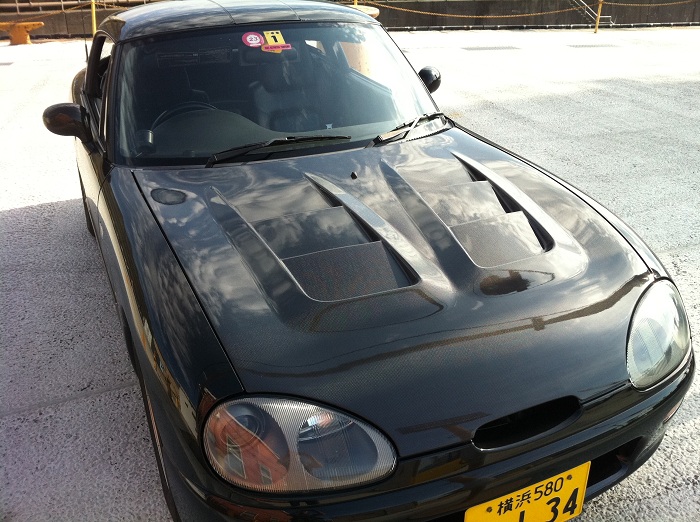
| when i bought my boot lid i pretty much had the whole body kit planned out. but since the body kit was sooo expensive i had to buy it in stages. the second piece I bought which is my favorite part of the body kit is the Toyoshima Craft carbon hood. |
 |
|
| Logged |
|
|
|
Reply: 30 - 77 |
|
|
| r32z32 |
Posted on: Tuesday, December 4th, 2012, 10:07:17am
Attachment: 000024.jpg - 169.50 KB (384 views) |
|
|
|
| even though the stock hood is aluminium and weighs almost nothing, this hood weighs less than half of what the stock one weighs. the air ducts help release the pressure under the hood to keep it from lifting at the sides when going faster than 150kph. |
 |
|
| Logged |
|
|
|
Reply: 31 - 77 |
|
|
| r32z32 |
| Posted on: Tuesday, December 4th, 2012, 10:11:35am |
|
|
|
| after a few months driving, i started to notice that my breaks were really sub par and started to grind. I did a lot of reaserch and compared price to performance. |
|
| Logged |
|
|
|
Reply: 32 - 77 |
|
|
| r32z32 |
Posted on: Tuesday, December 4th, 2012, 10:15:20am
Attachment: 000025.jpg - 161.96 KB (381 views) |
|
|
|
| I decided not to go for the big break kit due to budget constraints and the fact that i would need bigger wheels. I kept the stock calipers and got slotted Dixcel rotors and Endless NS97 pads on all 4 corners. |
 |
|
| Logged |
|
|
|
Reply: 33 - 77 |
|
|
| r32z32 |
Posted on: Tuesday, December 4th, 2012, 10:38:39am
Attachment: 000026.jpg - 157.93 KB (382 views) |
|
|
|
| I am really happy with this set up. for very spirited street driving they work very well. alot of initial bite and almost no fade in heavy breaking conditions. although now that i can stop very fast i am always worried that the guy behind me wont be able too. |
 |
|
| Logged |
|
|
|
Reply: 34 - 77 |
|
|
| r32z32 |
Posted on: Tuesday, December 4th, 2012, 10:45:50am
Attachment: 000027.jpg - 131.31 KB (379 views) |
|
|
|
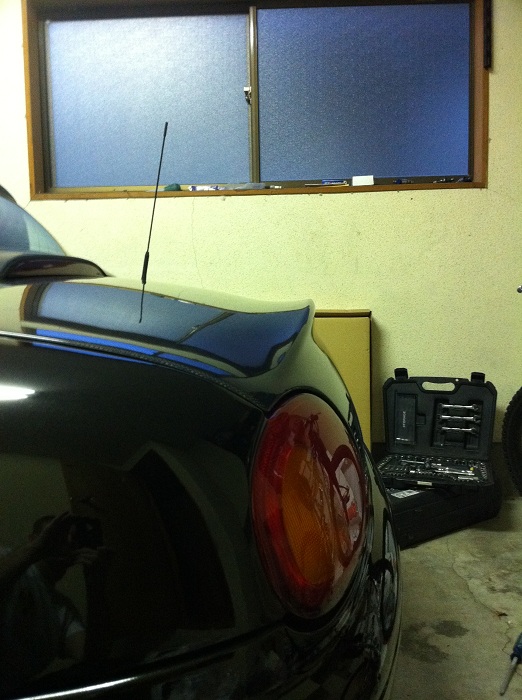
| about the same time my rear over fender came in, I did my reverse light mod. there are 2 small LEDs, one on each side of the license plate. I couldnt stand seeing the ugly stock reverse light anymore. plus it made room for my future exhaust project. On another note I test fitted my rear overfenders to see what modification was going to be needed. |
 |
|
| Logged |
|
|
|
Reply: 35 - 77 |
|
|
| r32z32 |
Posted on: Tuesday, December 4th, 2012, 10:51:33am
Attachment: 000028.jpg - 173.85 KB (375 views) |
|
|
|
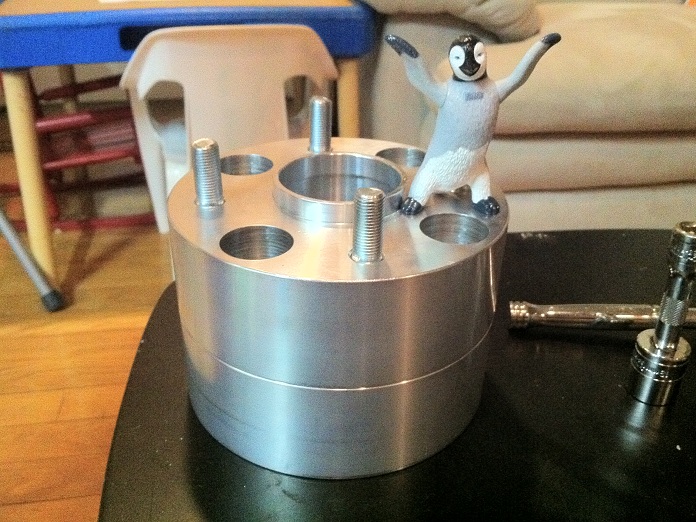
| With 50mm over fenders it was only natural to get 50mm wheel spacers specially ordered to fit the wheel hub perfectly. |
 |
|
| Logged |
|
|
|
Reply: 36 - 77 |
|
|
| r32z32 |
Posted on: Tuesday, December 4th, 2012, 10:54:49am
Attachment: 000029.jpg - 154.45 KB (376 views) |
|
|
|
| looks rediculous. |
 |
|
| Logged |
|
|
|
Reply: 37 - 77 |
|
|
| r32z32 |
Posted on: Tuesday, December 4th, 2012, 10:57:13am
Attachment: 000030.jpg - 146.31 KB (375 views) |
|
|
|
| I widend the stance alot. |
 |
|
| Logged |
|
|
|
Reply: 38 - 77 |
|
|
| r32z32 |
Posted on: Tuesday, December 4th, 2012, 11:00:48am
Attachment: 000031.jpg - 137.14 KB (372 views) |
|
|
|
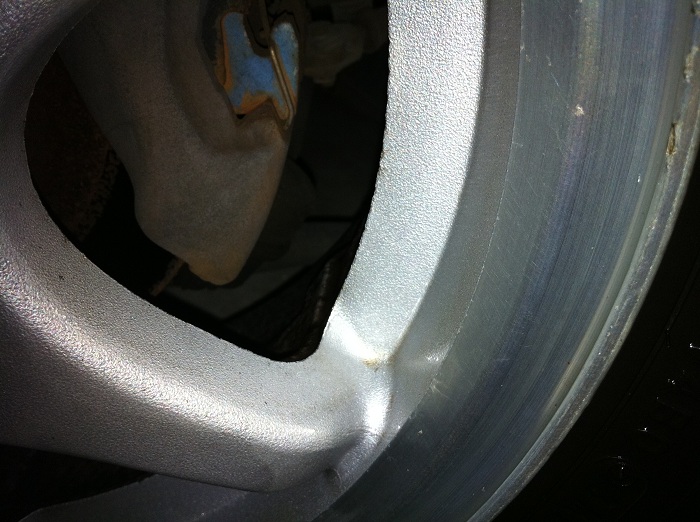
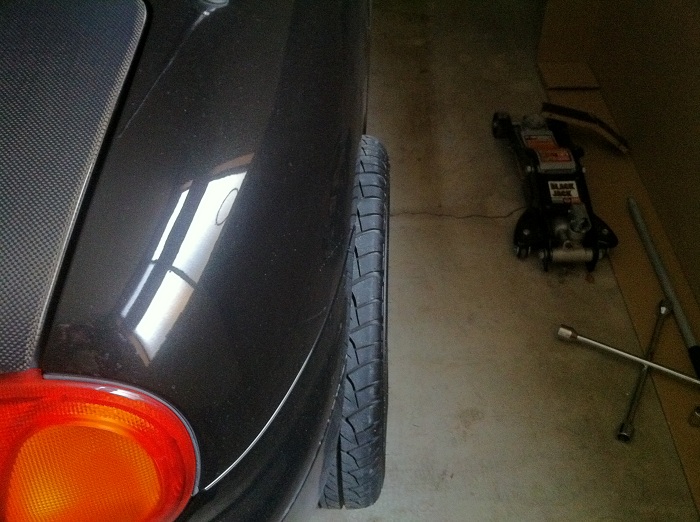
| the gap between the wheel and the fender was only 1.5cm. I knew I would either have to do some serious wheel rolling or cutting and welding. since rolling wouldnt really do the trick and im not a welder, I decided to have a local race fabrication/body shop do the work. which was the only mod on this car i didnt do myself. |
 |
|
| Logged |
|
|
|
Reply: 39 - 77 |
|
|
|
 Cappuccino Owners Club › Gallery › Cappo Related Album › r32z32 build thread. (Moderators: )


 Locked Board