|
|
 Author Author |
 Pepe's Hot Coffee (currently 1925 views) Pepe's Hot Coffee (currently 1925 views) |
| kingpow |
| Posted on: Tuesday, July 26th, 2016, 7:41:25pm |
  |
|
|
| Very nice. The Nankang NS2R is a good tyre, I've got a set on my RS Mx5, they are as good as the Yokohama AD08R but with better wear rate. I've got some Achilles ATR-K Sport tyres that came fitted to my cappo from Japan, and they provide really good grip too, unfortunately that tyre doesn't seem to be sold here in the UK. |
|
 Logged Logged |
|
|
 |
Reply: 40 - 66 |
|
|
| Pepito |
| Posted on: Friday, July 29th, 2016, 1:05:06pm |
|
|
Big Member

Posts: 193
Posts Per Day: 0.11 |
|
| I agree the NS2Rs are very good tyres absolutely loving them, the speed I can carry through corners now is mighty impressive compared to what I had before (Yoko S760s I think). Left a few people in their merc and bmw behind (around the corners that is) their face though is priceless! |
|
| Logged |
|
|
 |
Reply: 41 - 66 |
|
|
| Pepito |
| Posted on: Wednesday, November 30th, 2016, 4:10:43pm |
|
|
Big Member
Posts: 193
Posts Per Day: 0.11 |
|
Well its been a long few months that have been very busy with wedding organising and planning, sorting the house out and many other commitments and the poor cappo is feeling a little neglected, but now I can start giving it some attention.
I have finally sorted out my garage and made my workbench (after Wickes decided to deliver my order back in July 3-4 weeks late, and yes I have been that busy since) so its looking alot tidier and means I have room to actually work.
As the cappo is going to be our wedding car I now have about 10 months to get it ready and get it looking the way I want it. Plan is to get the following done:
Sort out body work (bumps and dents)
Install Heartland front bumper
Install Suzuki Sport mud flaps and sill protectors
Sort out leaking manifold gasket again - might even install the tubular manifold I got off Don while I'm at it
Swap out the radiator for the Fairfax Aluminium radiator I got from Lord (shiny, shiny)
Get my new front mount intercooler installed and get custom intercooler piping done
Install boot spoiler and change over a few bits of trim I got from Lewis (aceofhearts)
Get and install BC coilovers
Get it wrapped
So lots to do, hopefully enough time. Will try and keep this up to date as I go. |
|
| Logged |
|
|
| |
Reply: 42 - 66 |
|
|
| Pepito |
| Posted on: Monday, February 13th, 2017, 11:21:19am |
|
|
Big Member
Posts: 193
Posts Per Day: 0.11 |
|
Well since my last update here is what I've been up to.
Removed most of the interior to remove the rear garnish that houses the rear brake light so that I can a) intall a new one and b) replace the rubber that goes round it as the ones on both garnishes are a little worse for wear. Just have to finish this by putting the new rubber on.
Taken off the front bumper, removed front towing eye, removed what was left of a horn (only had high pitch) as I have new horns to put on Hella Supertones - nice and loud! Ready to remove old rad and install new one and also get the new bumper to fit.
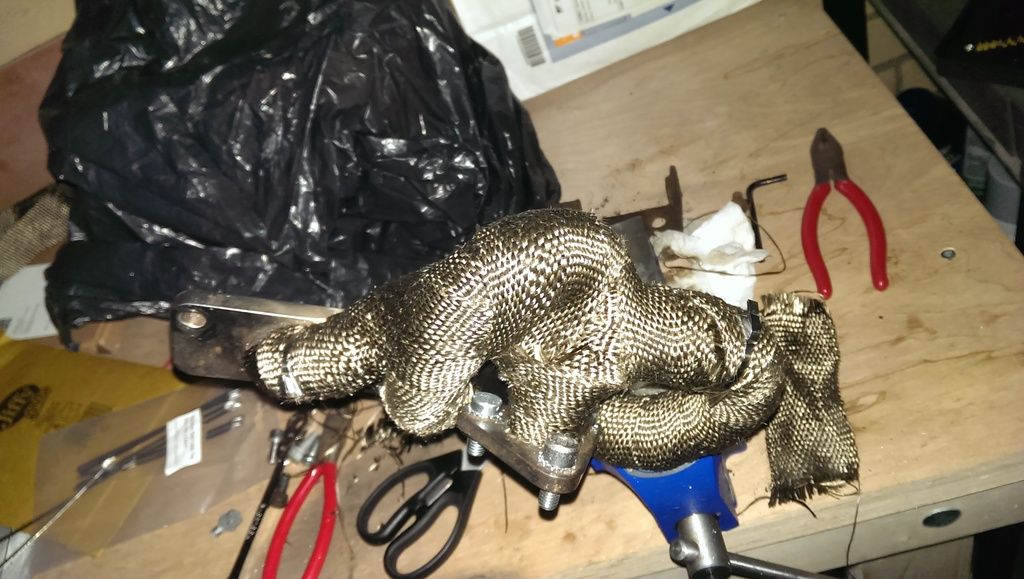
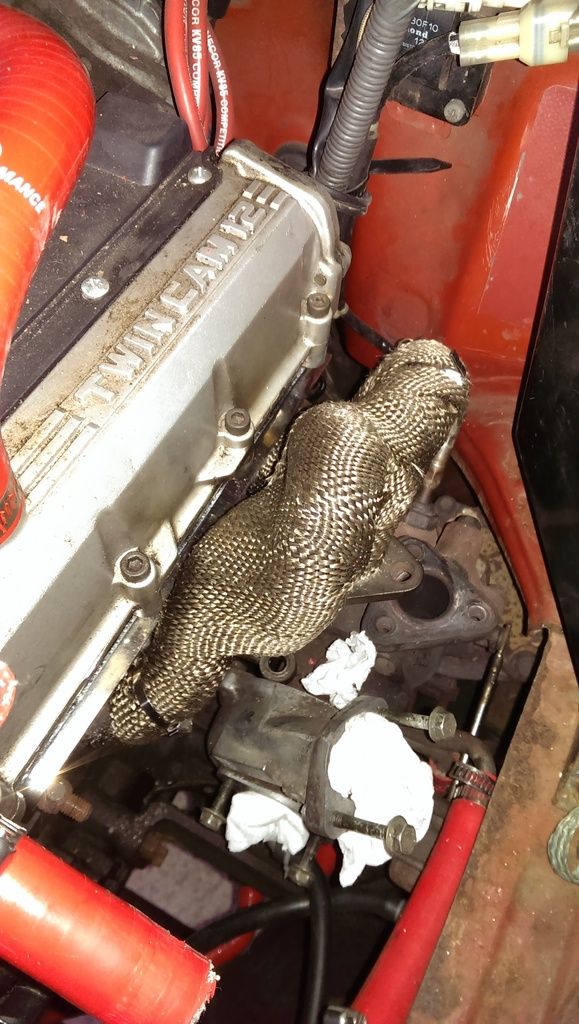
Removed the old (but still relatively new) exhaust manifold and have exhaust wrapped the new tubular manifold (well that was a nice challenge) and installed.
Its been slow progress and weekends have been few and far between but hopefully will be able to get a few more weekends in. |
|
| Logged |
|
|
| |
Reply: 43 - 66 |
|
|
| Andy |
| Posted on: Thursday, February 23rd, 2017, 11:03:40am |
|
|
Official C.O.C Contributor


Gender:  Male Male
Posts: 23604
Posts Per Day: 3.49 |
|
 |
Drop me a PM if you would like to be added to the ClubCappo Member Map. More details can be found here.
We now have an official Facebook group as well as a page! See here |
|
| Logged |
|
|
| |
Reply: 44 - 66 |
|
|
| Pepito |
| Posted on: Wednesday, April 12th, 2017, 2:40:11pm |
|
|
Big Member
Posts: 193
Posts Per Day: 0.11 |
|
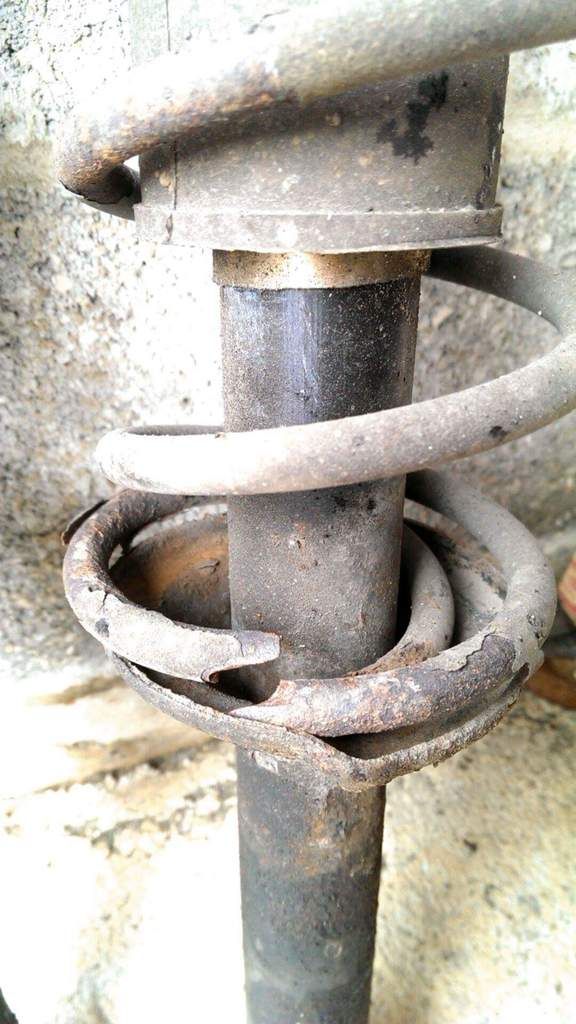
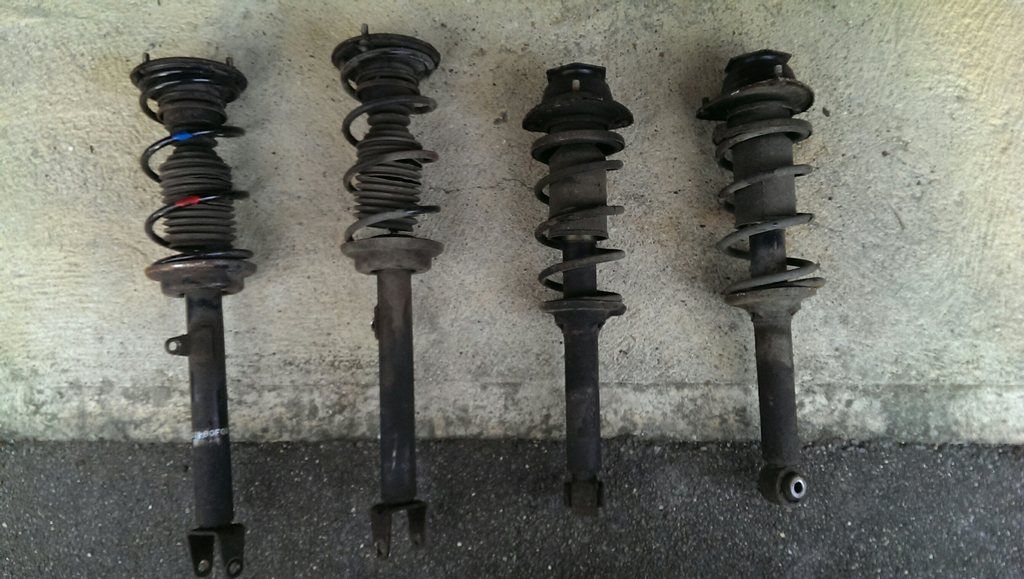
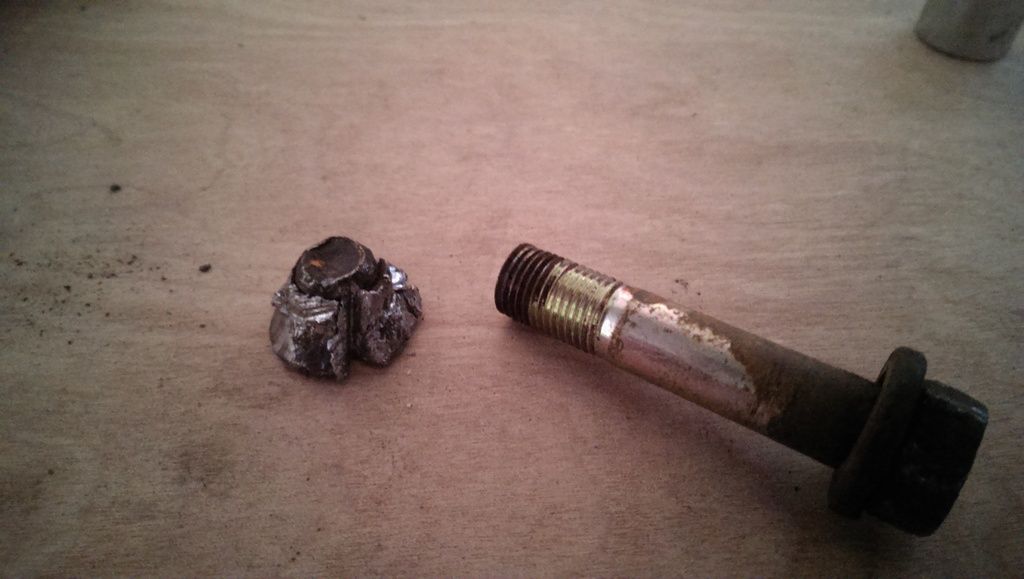
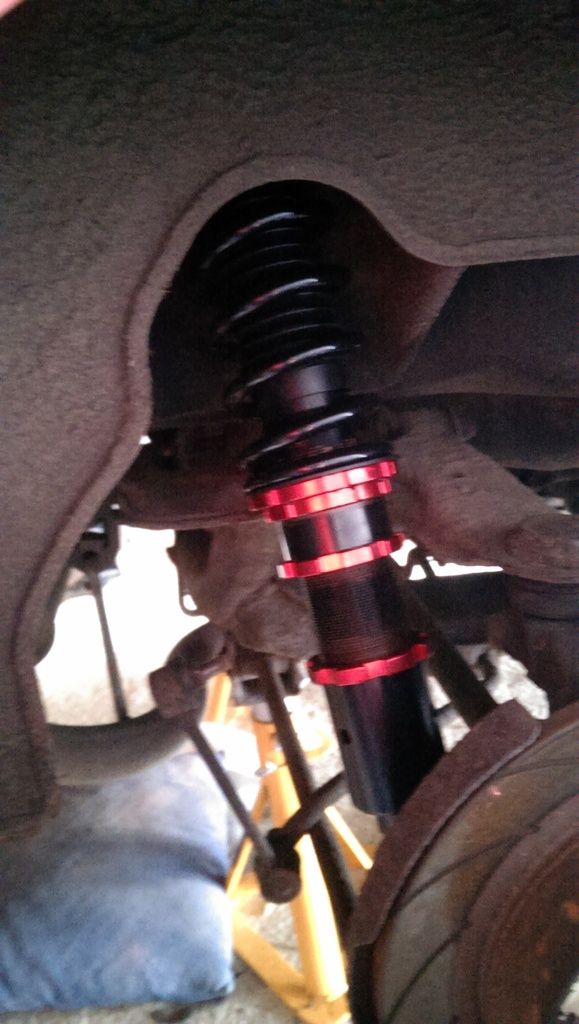
The build continues. This time I have installed the BC Racing coilovers, wasn't too bad a job although there was a problem in trying to remove the drivers side rear lower mounting bolt. It just wouldn't come off so in the end I just had to cut it off, with a metal saw, while lying on the ground, sawing upwards. I ached the next day is all I'm going to say.
The rest of the bolts just required some penetrating oil and good leverage to get off and the old struts came out fine. I did find however that one of the front springs had actually snapped! If I ever needed an excuse, there it was!
Old ones out
What was left of that pesky nut and bolt.
Now lets install the new coilovers. They are nice and shiney.
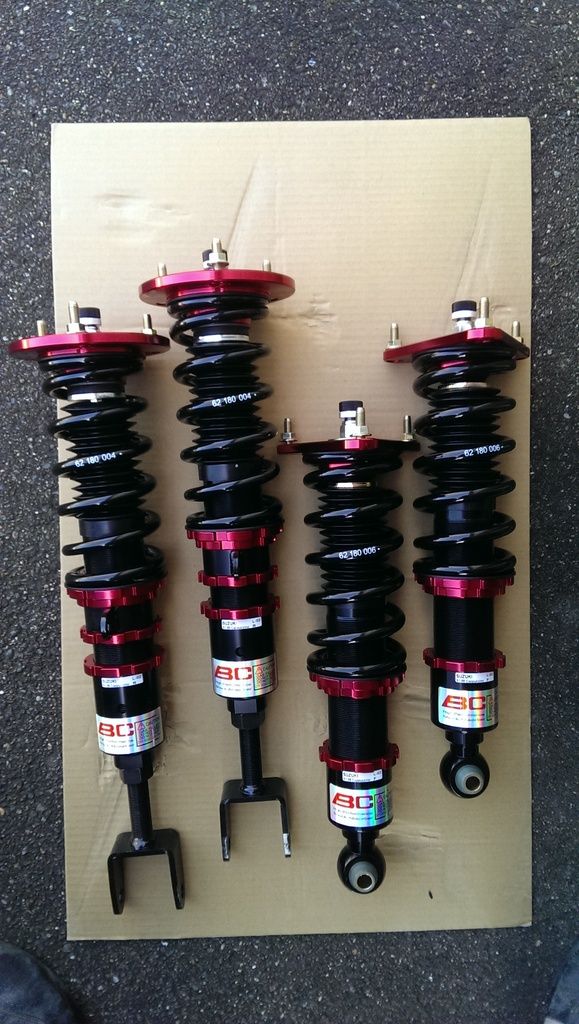
Before installing I wanted to make sure that the preload was correct as it has been found that they can be set incorrectly from the factory. I settled for a preload of 3mm, BC say 4mm, Nicky said her set up was good and she went for 2mm so 3mm is nicely in the middle. Grease up all the threads before installing so that nothing seizes.
It terms of ride hieght I measured the lengths of the standard and reduced from there. BC say you need minimum 25mm in the bottom bracket so at the moment all the shocks are roughly at maximum length and are 50mm smaller than standard. Hopefully that doesnt turn out to be too much of a drop. They all went in very easily and not to mention look great.

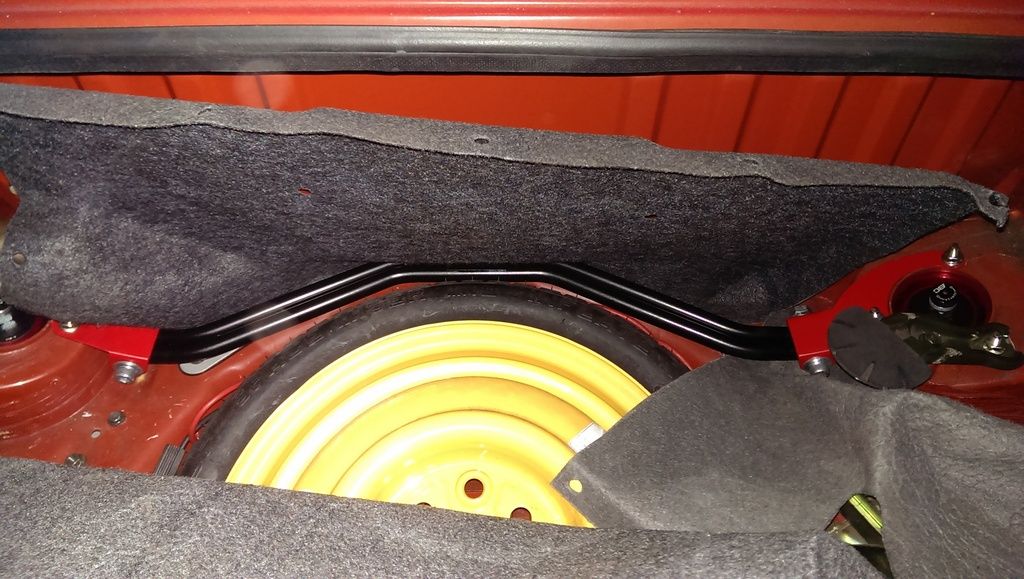
I had the strut braces I got repowder-coated as some of the coating had started to flake plus I wanted them a different colour (were blue and chrome) I think they look really good.
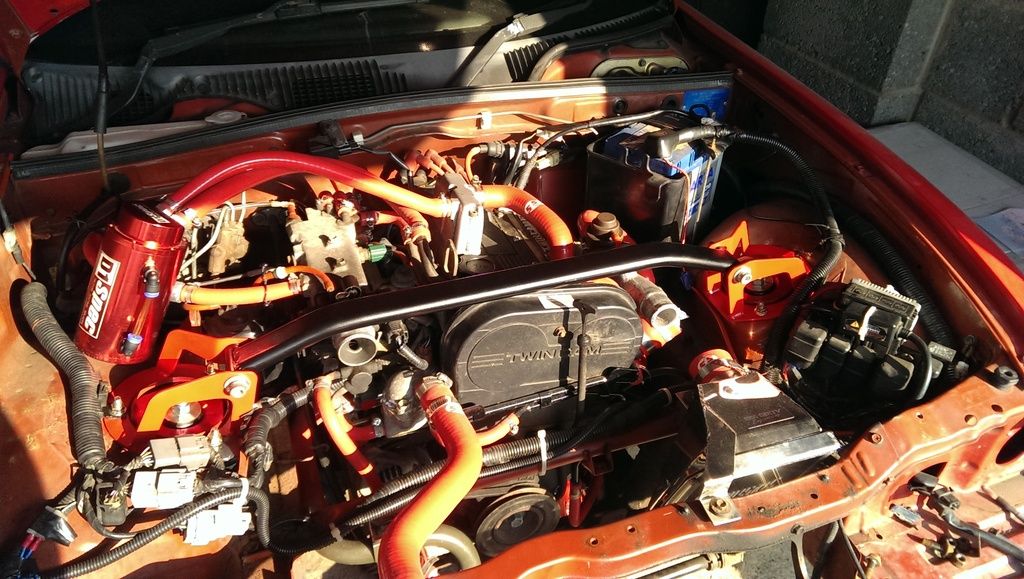
I cant wait till it is back on the ground to see how it looks as the ride hight might need some alteration. Then once its back on the road will take it for 4 wheel laser alignment.
Next on the cards is new aluminium radiator. |
|
| Logged |
|
|
| |
Reply: 45 - 66 |
|
|
| Andy |
| Posted on: Wednesday, April 12th, 2017, 8:10:20pm |
|
|
Official C.O.C Contributor
Gender: Male
Posts: 23604
Posts Per Day: 3.49 |
|
| Coming along nicely |
Drop me a PM if you would like to be added to the ClubCappo Member Map. More details can be found here.
We now have an official Facebook group as well as a page! See here |
|
| Logged |
|
|
| |
Reply: 46 - 66 |
|
|
| Pepito |
| Posted on: Monday, June 5th, 2017, 12:18:21pm |
|
|
Big Member
Posts: 193
Posts Per Day: 0.11 |
|
Been a while but here is an update!
I have been busy over the last month or so getting it ready for its MOT (which is tomorrow!) so best get too it.
I have installed the new ally radiator with a new SPAL fan and got a new high pressure radiator cap while I was at it. I must say the new fan is alot quieter than the stock one. The only thing though, the radiator can with a new ally expansion tank, great! although I have no cap for it and the stock on doesn't fit either  So for now the stock expansion tank remains. So for now the stock expansion tank remains.
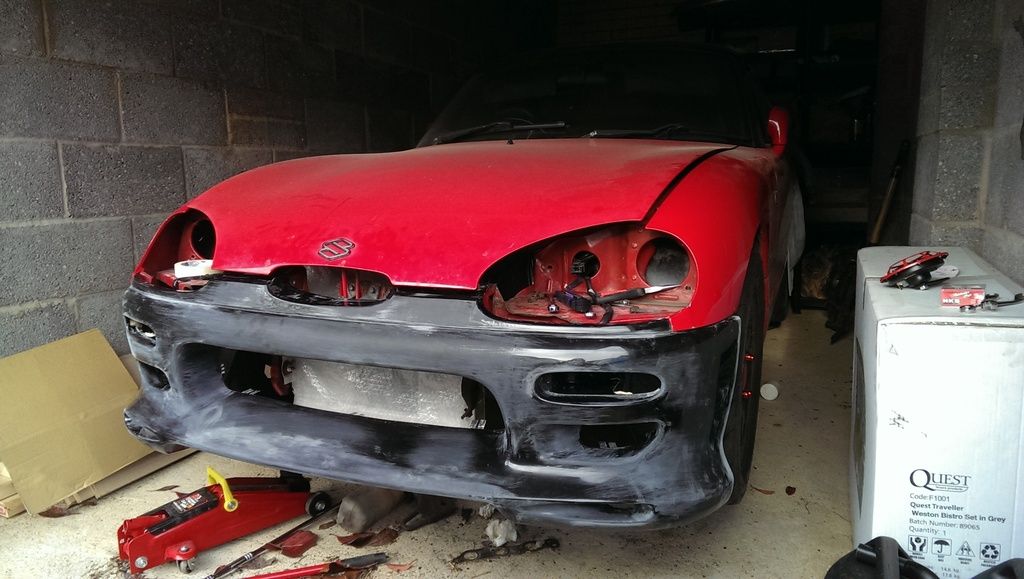
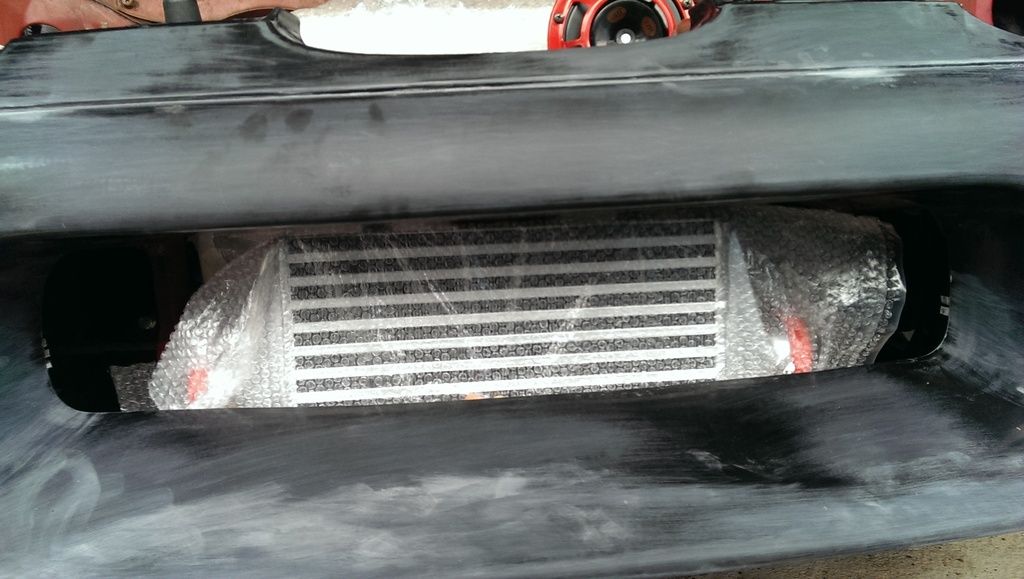
I have also test fitted and sanded down my new Heartland front bumper which I think looks great! And also has room for my new FMIC which will be installed and have custom pipe work done next week!
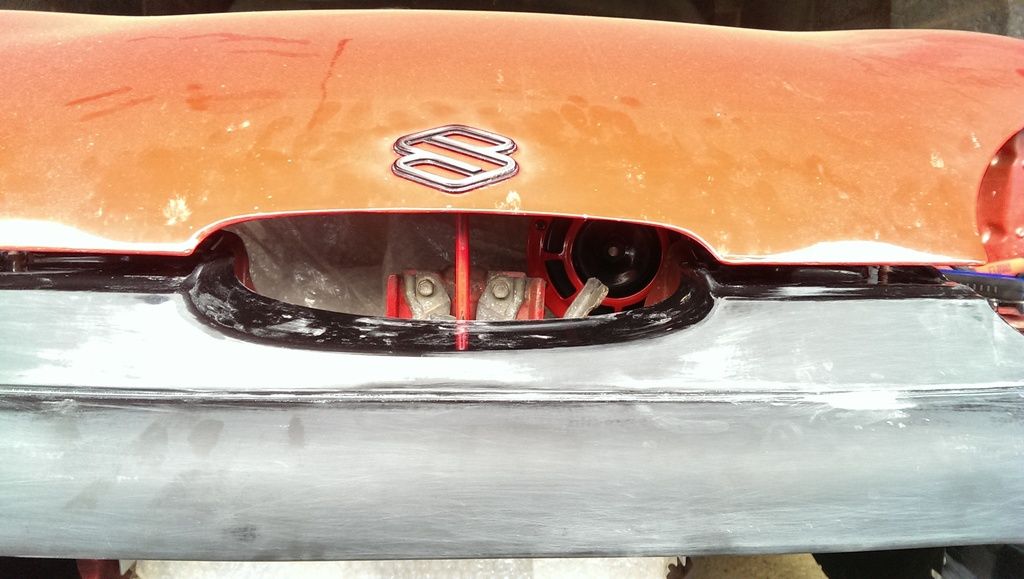
The rear garnish I have sanded down and painted and put new rubber round it so now looks good!
I have also fitted new horns as the stock one is naff, especially if you only have the high tone, what happened to the low tone was before my ownership. So have installed Hella Supertones. All I can say is if I get cut up again, they will know about it! "LOUD NOISES!!" Horns have moved slightly as need the room for intercooler piping where they are stock so now one now placed in the little opening and the other one just under the front bumper mount on the same side. For the MOT though I had to remove the one in the opening to get the stock intercooler back in but still it will make lots on noise!
With the car on the ground, I did need to alter the ride heights slightly to make sure they were all level and at the height I wanted and I think it looks good!
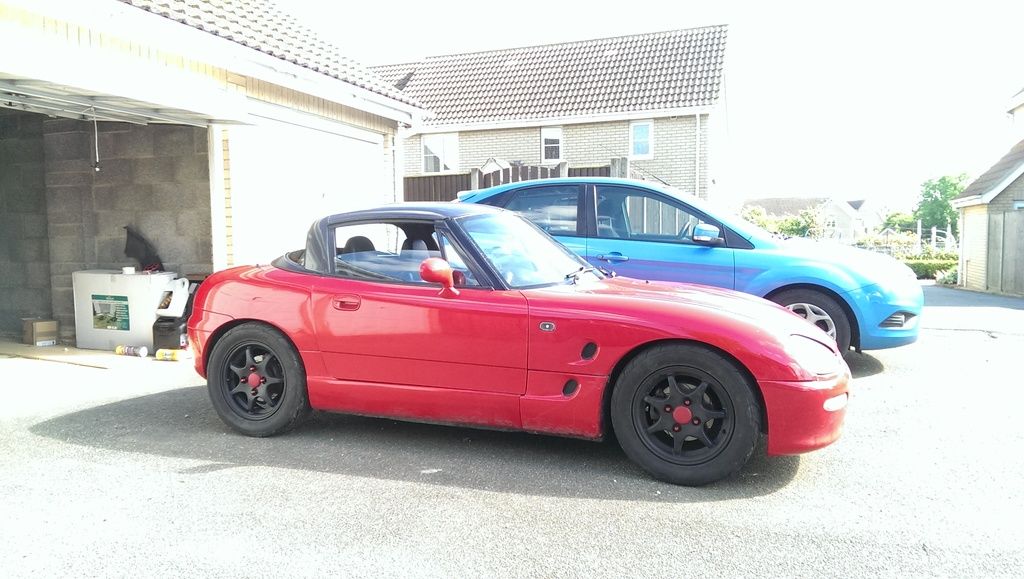
Finally, need somewhere to put my number plate with the heartland bumper one. So I have a Jass Performance side mount support for it. Its for MX5s but I have managed to make it work. Yes I know its the stock bumper but didn't want to risk damaging the Heartland one on its first drive.
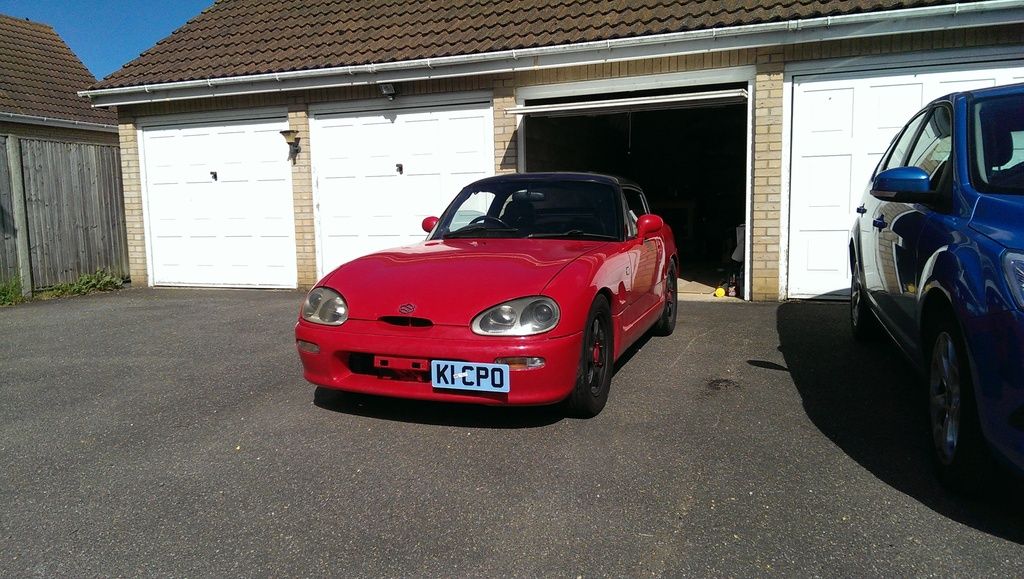
It started first turn of the key! Got a new IAC valve and checked the duty cycles and idle speed etc but stick a bit tricky, not as much as my old one but still there
Taking it for a quick spin it was quite firm so I softened it up (15 clicks from hard) so half way. Felt ok but rears still felt firm so softened the rear by another 5 clicks and that felt better.
Wheel alignment was next as a) front haven't felt straight in a while so toe needed adjusting b) the rear coilovers had brought everything up with it so had some negative camber to them. They managed to get the fronts done and now tracking straight! The rears however were not willing to budge and they didn't want to risk rounding the bolts so for now negative camber stays.
Overall very happy with the progress. Hope it passes its MOT tomorrow then I can take it to get the FMIC done. Then after that all that is left is the body work to do. |
|
| Logged |
|
|
| |
Reply: 47 - 66 |
|
|
| Pepito |
| Posted on: Monday, June 5th, 2017, 12:40:29pm |
|
|
Big Member
Posts: 193
Posts Per Day: 0.11 |
|
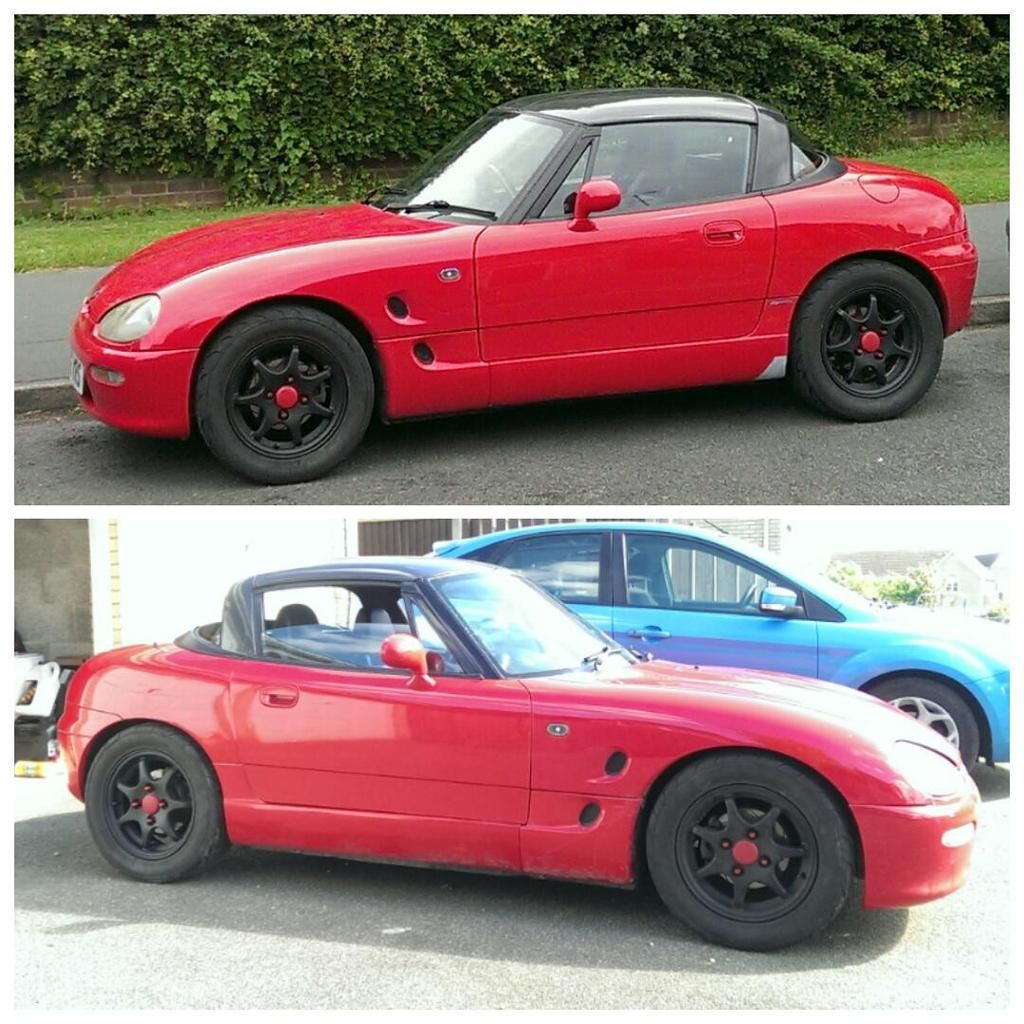
Best before and after I can get, definitely lower though.
 |
|
| Logged |
|
|
| |
Reply: 48 - 66 |
|
|
| john&ann |
| Posted on: Tuesday, June 6th, 2017, 11:15:15am |
|
|
|
| Looks like you've been busy ! Good luck with the MOT again..hope the weather is better for you than it is here in Yorkshire ! |
|
| Logged |
|
|
|
Reply: 49 - 66 |
|
|
| Pepito |
| Posted on: Thursday, June 8th, 2017, 4:01:46pm |
|
|
Big Member
Posts: 193
Posts Per Day: 0.11 |
|
Well on a rainy Tuesday day in Cambridgeshire, the Cappo passed! And no advisories! 
Now to get the FMIC made next week! |
|
| Logged |
|
|
| |
Reply: 50 - 66 |
|
|
| Andy |
| Posted on: Friday, June 9th, 2017, 7:03:45pm |
|
|
Official C.O.C Contributor
Gender: Male
Posts: 23604
Posts Per Day: 3.49 |
|
|
Drop me a PM if you would like to be added to the ClubCappo Member Map. More details can be found here.
We now have an official Facebook group as well as a page! See here |
|
| Logged |
|
|
| |
Reply: 51 - 66 |
|
|
| Pepito |
| Posted on: Saturday, June 17th, 2017, 5:22:13pm |
|
|
Big Member
Posts: 193
Posts Per Day: 0.11 |
|
Well I have a new FMIC! I have a friend who started up his own fabricating company in Milton Keynes and I know he can weld, really nice. Would highly recommend him to anyone looking to get custom work done (http://www.flowdynamics.co.uk). I shall be going back to him to get my exhaust done in the future.
So here are some pictures.
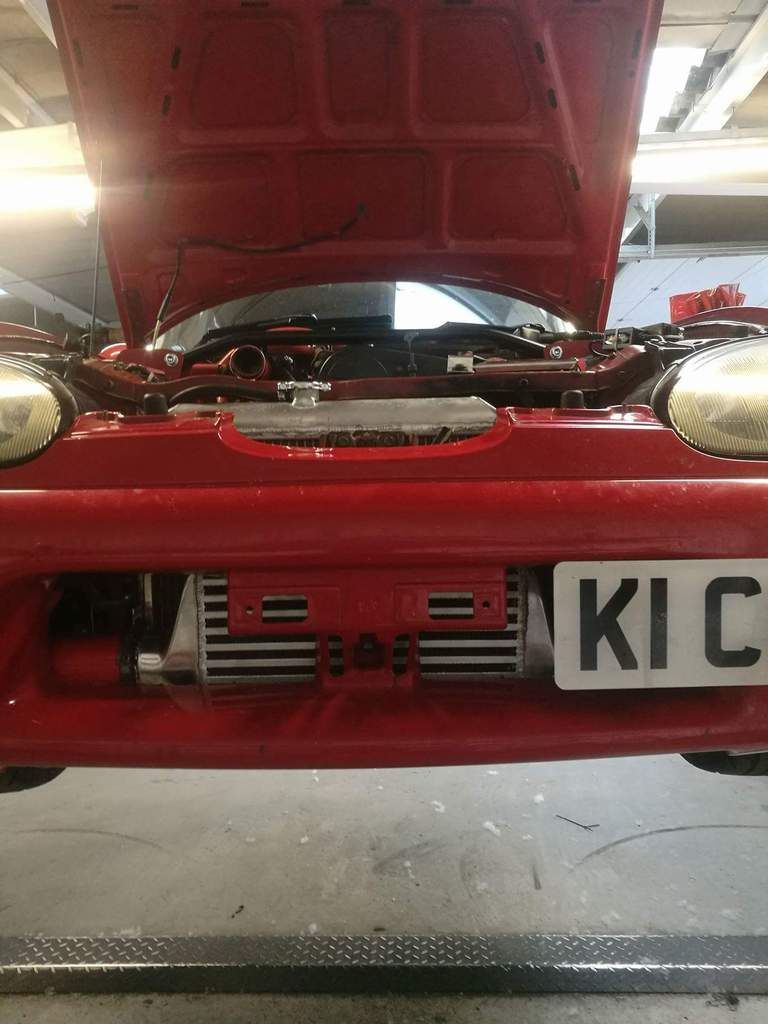
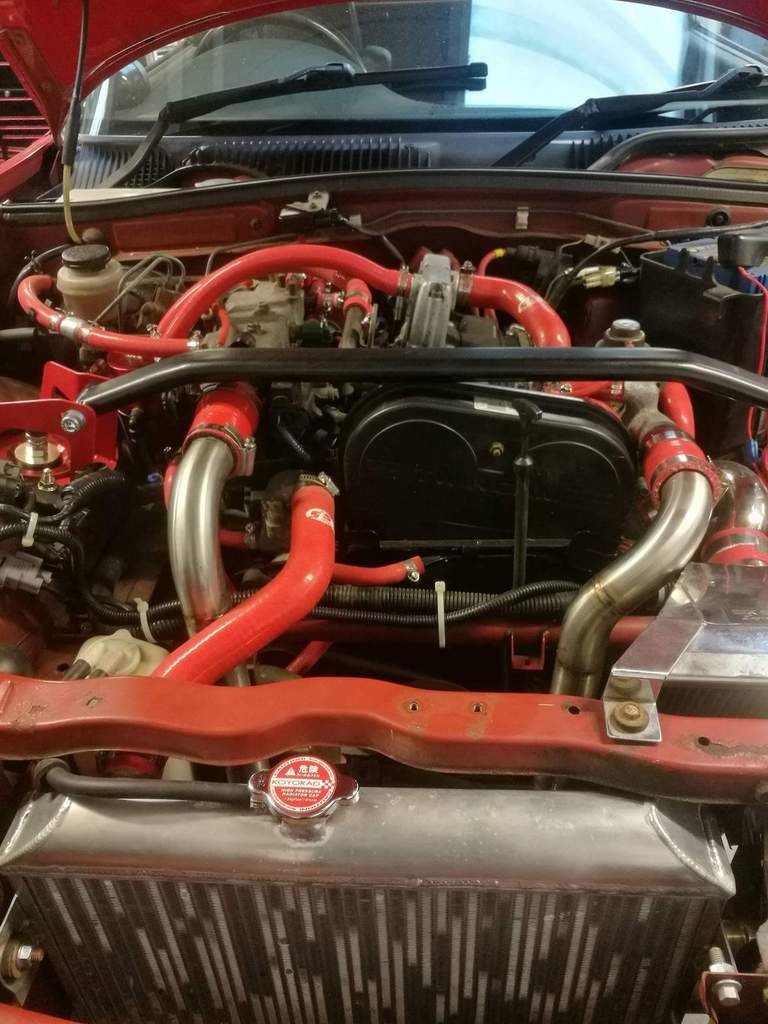
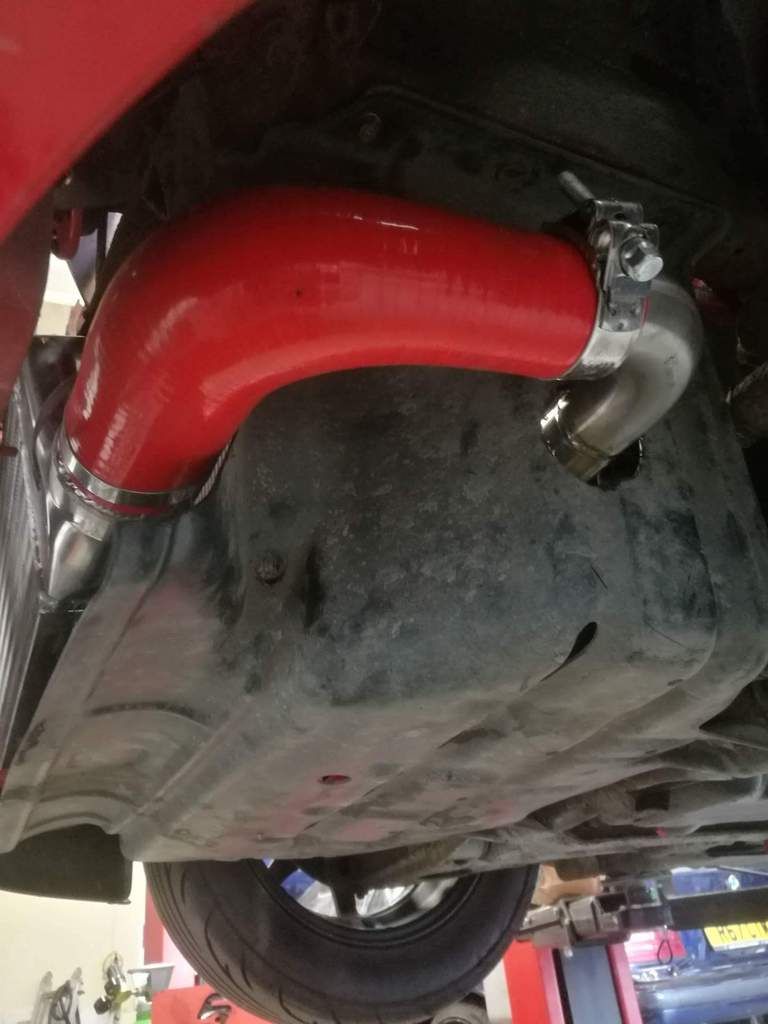
Pressure drop was not very much, only 0.05bar, which is good but still will get that back! Overall very happy. Now onto the body work. |
|
| Logged |
|
|
| |
Reply: 52 - 66 |
|
|
| lord |
| Posted on: Friday, July 28th, 2017, 9:07:59pm |
|
|
|
|
| Logged |
|
|
|
Reply: 53 - 66 |
|
|
| Pepito |
| Posted on: Tuesday, September 19th, 2017, 5:06:06pm |
|
|
Big Member
Posts: 193
Posts Per Day: 0.11 |
|
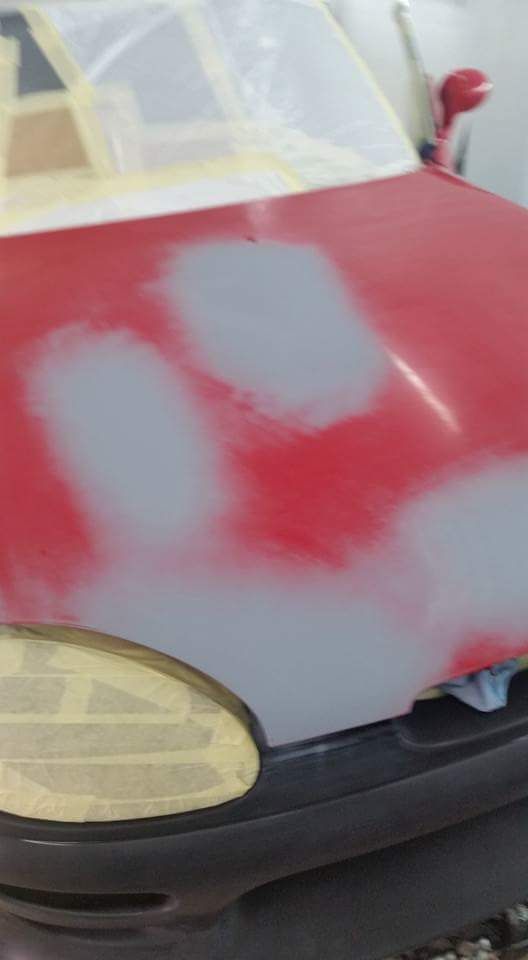
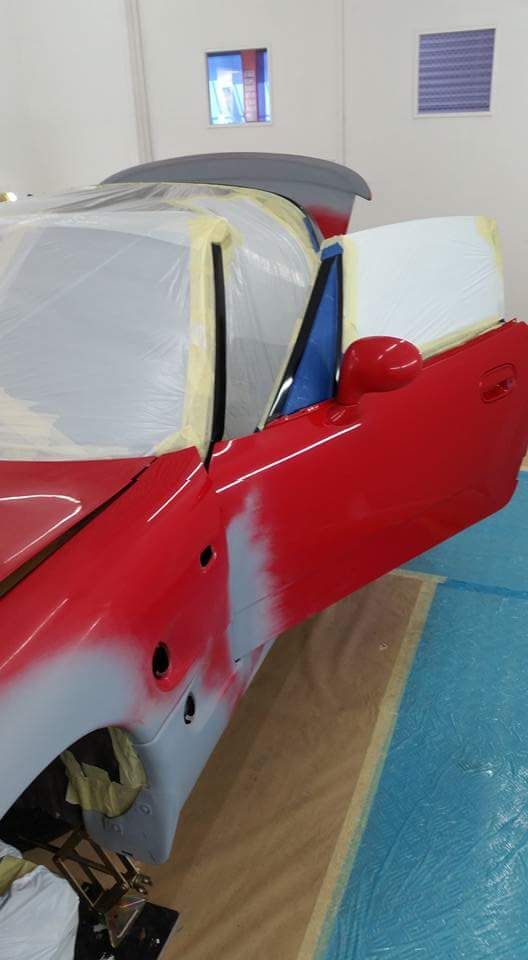
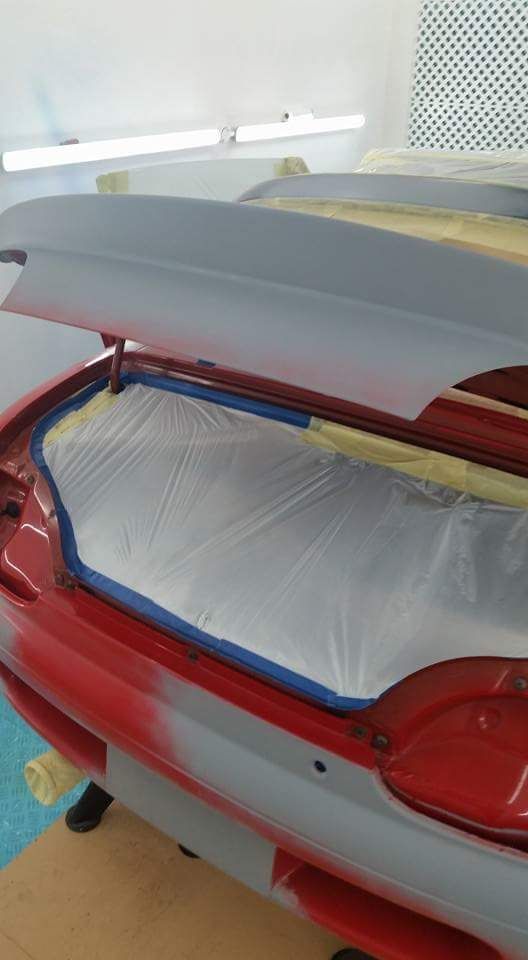
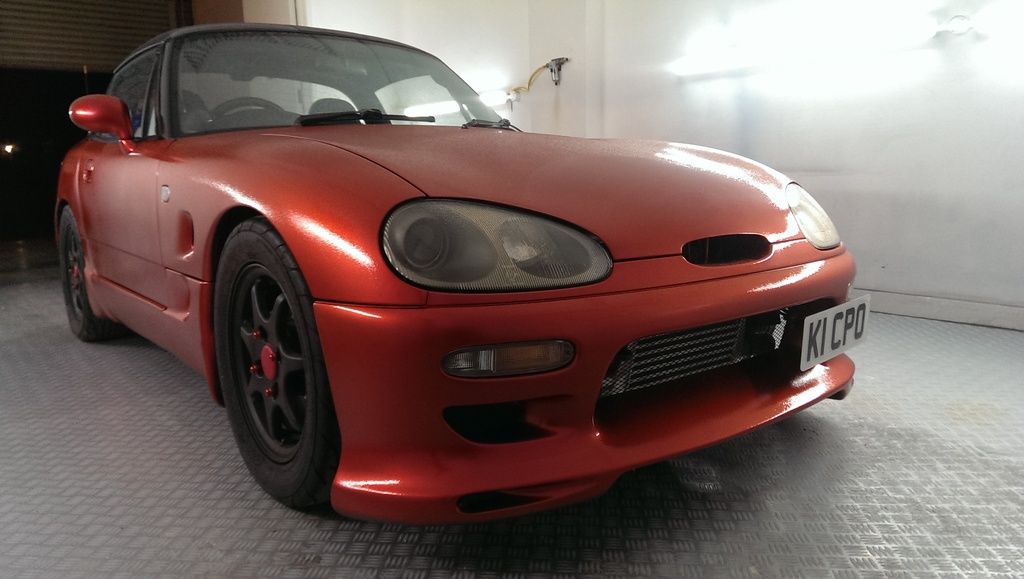
Well after nearly 2 months of solid work on the cappo's body, installing a rear spoiler and the Suzuki Sport mud flap, sill extensions and the heartland front bumper, and much filling and sanding and priming, the car is off to get its new paint. Will come back in a slightly darker than normal red with the dark charcoal roof. Should look good when it is done, just have to wait now.
Will look good just in time for my wedding!
 |
Last modified Tuesday, September 19th, 2017, 5:06:51pm by Pepito |
|
| Logged |
|
|
| |
Reply: 54 - 66 |
|
|
| Andy |
| Posted on: Wednesday, September 20th, 2017, 10:46:15pm |
|
|
Official C.O.C Contributor
Gender: Male
Posts: 23604
Posts Per Day: 3.49 |
|
Nice!!!!!
On another note have you paid Photobucket's ransom??? |
Drop me a PM if you would like to be added to the ClubCappo Member Map. More details can be found here.
We now have an official Facebook group as well as a page! See here |
|
| Logged |
|
|
| |
Reply: 55 - 66 |
|
|
| Pepito |
| Posted on: Thursday, September 21st, 2017, 12:14:09pm |
|
|
Big Member
Posts: 193
Posts Per Day: 0.11 |
|
No I have not paid Photobucket even 1 English penny  . As fair as I'm concerned, nothing has changed for me, so shall keep using it for free until the photos no longer show on here! Then I shall find elsewhere, which will be a pain, but for now lets see how long it lasts . As fair as I'm concerned, nothing has changed for me, so shall keep using it for free until the photos no longer show on here! Then I shall find elsewhere, which will be a pain, but for now lets see how long it lasts  |
|
| Logged |
|
|
| |
Reply: 56 - 66 |
|
|
| lord |
| Posted on: Wednesday, October 18th, 2017, 10:27:53pm |
|
|
|
| That's gonna look bloody good!!! |
|
| Logged |
|
|
|
Reply: 57 - 66 |
|
|
| Pepito |
| Posted on: Tuesday, October 31st, 2017, 2:07:02pm |
|
|
Big Member
Posts: 193
Posts Per Day: 0.11 |
|
Realised I haven't updated this, but you know, had a wedding to plan. And do.
So here it is in the spray booth, maked up and ready to go!
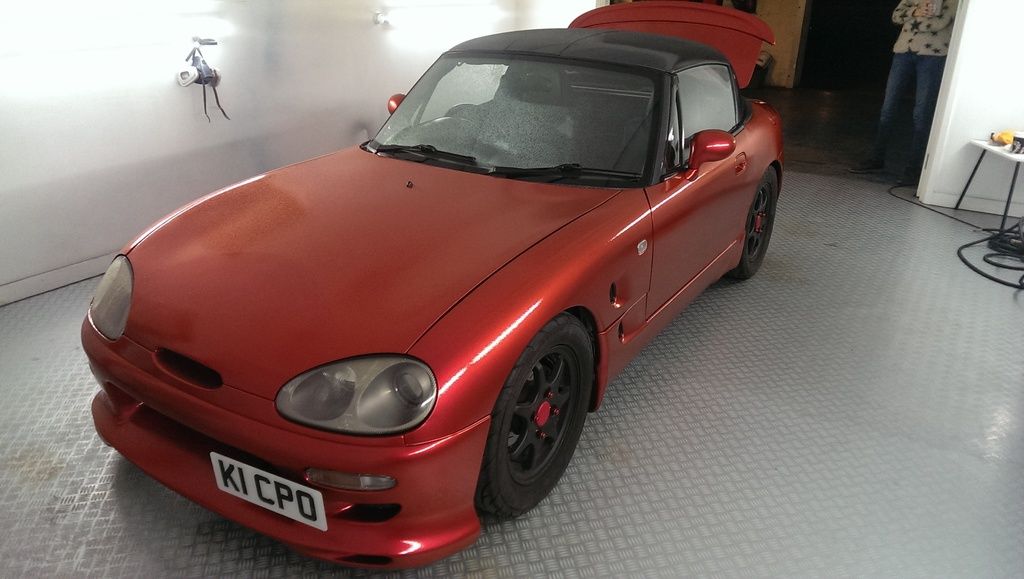
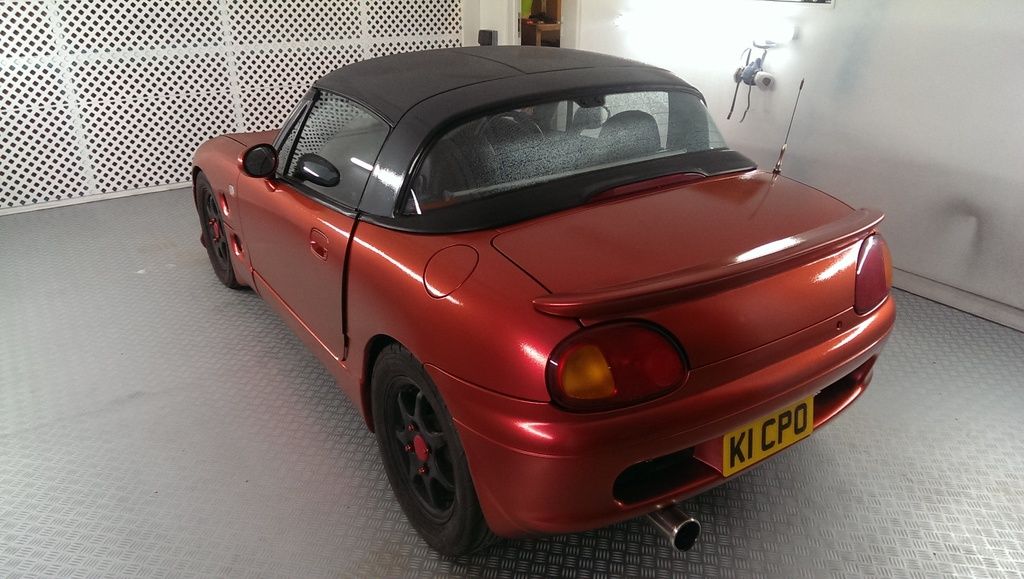
And here she is all sprayed up! Absolutely love it! Just glad the red is all the same red!
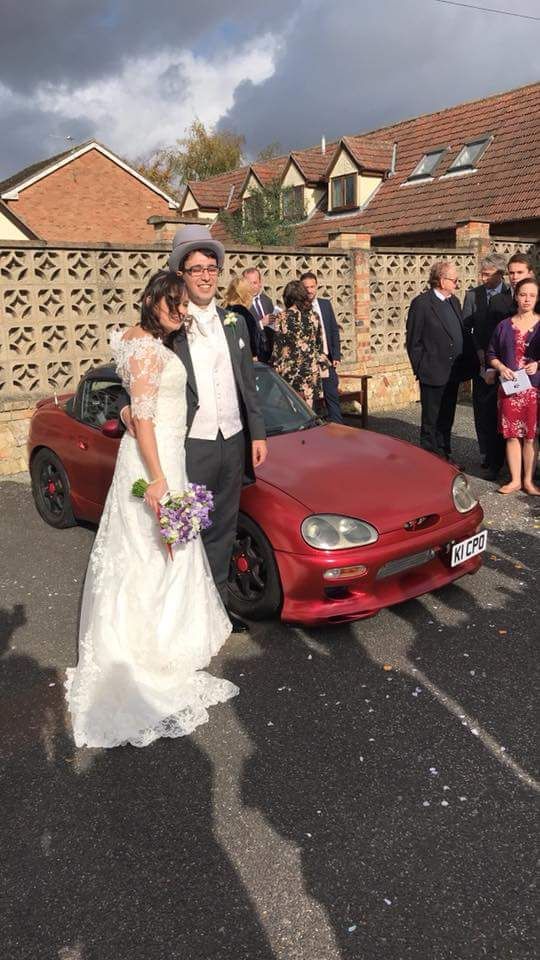
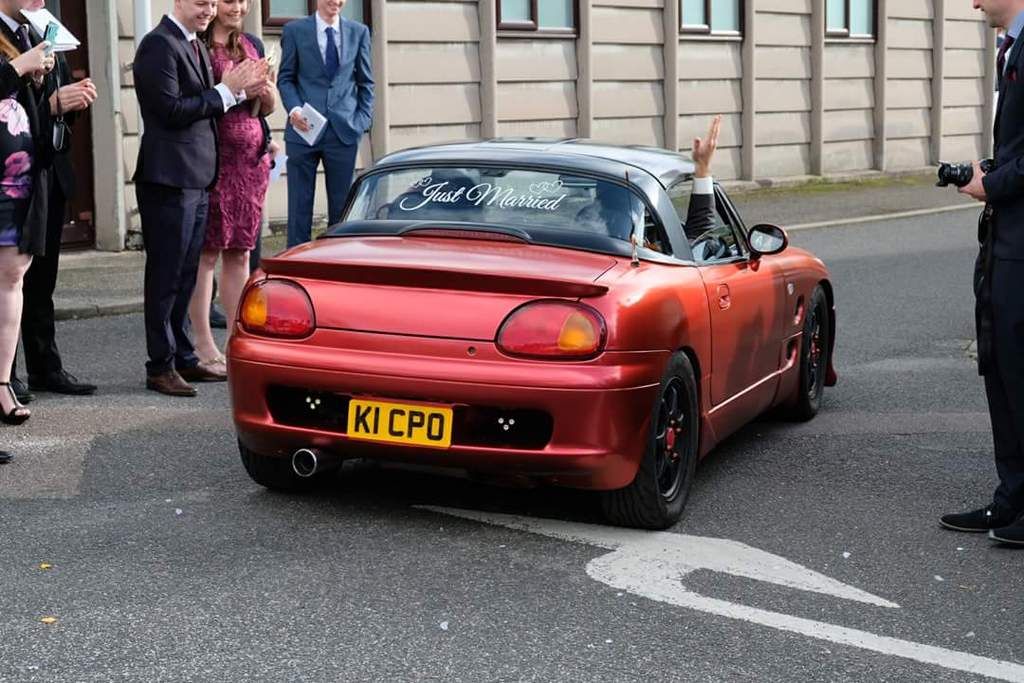
And here she is on my wedding day, doesn't she look amazing! My wife doesn't look bad either  Had an amazing day could not be a happier man. Had an amazing day could not be a happier man.
Now the cappo is back in the garage ready to enjoy the next summer. This winter I wont be doing any work on it, done too much last winter and I think my wife wants to see me at the weekend!
Just going to enjoy it.
Until I crave more tinkering. |
|
| Logged |
|
|
| |
Reply: 58 - 66 |
|
|
| Ricou |
| Posted on: Tuesday, October 31st, 2017, 7:34:19pm |
|
|
Maximum Member
Posts: 1110
Posts Per Day: 0.66 |
|
This red is gorgeous man !
Congrats on the wedding and the car |
|
| Logged |
|
|
| |
Reply: 59 - 66 |
|
|
| lord |
| Posted on: Tuesday, November 14th, 2017, 12:20:04pm |
|
|
|
That’s the colour I wanted many a year ago
Congrats on the wedding also! I had a dream of having a cappo as a wedding car! |
|
| Logged |
|
|
|
Reply: 60 - 66 |
|
|
| Pepito |
| Posted on: Thursday, November 16th, 2017, 12:27:32pm |
|
|
Big Member
Posts: 193
Posts Per Day: 0.11 |
|
| Thanks mate! I was so good having it all looking good for the wedding, so glad I got it ready on time! |
|
| Logged |
|
|
| |
Reply: 61 - 66 |
|
|
| lord |
| Posted on: Monday, November 20th, 2017, 2:13:02pm |
|
|
|
| What are them rear lights? |
|
| Logged |
|
|
|
Reply: 62 - 66 |
|
|
| Pepito |
| Posted on: Tuesday, November 21st, 2017, 12:26:47pm |
|
|
Big Member
Posts: 193
Posts Per Day: 0.11 |
|
I imagine you mean the 3 small lights in each mesh and not the tail lights, as those are standard! 
They are LEDs I put in for the reverse and fog lights, 3 x 9W super bright LEDs, and boy are they bright! Makes the rear look cleaner IMO than the big standard boxes. I have mentioned them in a previous post. |
|
| Logged |
|
|
| |
Reply: 63 - 66 |
|
|
| Pepito |
| Posted on: Tuesday, May 15th, 2018, 2:59:42pm |
|
|
Big Member
Posts: 193
Posts Per Day: 0.11 |
|
| It passed its MOT! Another summer of happy motoring ahead! |
|
| Logged |
|
|
| |
Reply: 64 - 66 |
|
|
| Pepito |
| Posted on: Thursday, July 2nd, 2020, 2:49:55pm |
|
|
Big Member
Posts: 193
Posts Per Day: 0.11 |
|
Its been a while since I have posted on here but hopefully more updates can start happening soon.
If you didnt see on FB last year, my poor Cappo had an argument with a complete and utter d**khead on a moped. Apparently overtaking when someone is indicating to turn right is the correct thing to do!
But atleast I got a nice payout from it, bought the car off the insurance company and ordered parts.

So I have had to order a new drivers outer sill and drivers side A-piller as he hit the drivers door hard enough that it pushed where the door hinges in. This also meant I couldnt open the drivers door fully at the time, so yes in a fit of rage clambered out the passenger door and fell out onto the pavement, quite a sight!
Also got 2nd hand door, wing mirror, bonnet, drivers front fender. Thankfully no damage to the front bumper or Suzuki Sport bits I bonded on, so can atleast reuse them!
So whats my plan.
Well since the accident, my wife and I do now have a lovely little boy  so actually starting to get this going is the first step and he does take up most of my free time. Plus once he is old enough he can atleast help me out! so actually starting to get this going is the first step and he does take up most of my free time. Plus once he is old enough he can atleast help me out!
Well apart from fixing the damage, the plan is to also fully strip the car down and get everything as good as it can be, removing surface rust, painting etc plus upgrade everything using all the bits I have aquired over the last few years.
HT07-4A Turbo
320cc Injectors
1.5way LSD
polybush kit (suspension and diff)
Short Shift kit
Standalone ECU
This is what I can remember I have, I may have more 
I do have an idea of what I want the final outcome to be, it may just take a while for it to be done... |
|
| Logged |
|
|
| |
Reply: 65 - 66 |
|
|
| Andy |
| Posted on: Thursday, July 2nd, 2020, 2:59:33pm |
|
|
Official C.O.C Contributor
Gender: Male
Posts: 23604
Posts Per Day: 3.49 |
|
| Some really nice parts to go on there! Look forward to seeing this progress however long it takes |
Drop me a PM if you would like to be added to the ClubCappo Member Map. More details can be found here.
We now have an official Facebook group as well as a page! See here |
|
| Logged |
|
|
| |
Reply: 66 - 66 |
|
|
|
 Cappuccino Owners Club › Gallery › Cappo Related Album › Pepe's Hot Coffee (Moderators: )


 Locked Board