|
|
 Author Author |
 Gauge pods (currently 1745 views) Gauge pods (currently 1745 views) |
| Badger |
| Posted on: Monday, September 22nd, 2008, 3:29:09am |
  |
|
|
| Where are you George...???, you can't leave this unfinished, It's doin' my head in....withdrawal symptoms while I WAIT YET AGAIN for stuff to dry......... |
|
 Logged Logged |
|
|
 |
Reply: 40 - 79 |
|
|
| george |
| Posted on: Monday, September 22nd, 2008, 6:55:29pm |
|
|
|
Yippee.... I have made it to 'two' pages!
But the bad news is, progress has stopped for a bit now my leg has mended, so I am back at work. So I guess it will be an hour or so at the weekend.
Withdrawal symptoms!!!! 
Also I want to buy the defi gauges before final fettling begins! Just to make sure they fit and all that! So saving the pounds £ and the pennies p! 
Oh it's all so frustrating! |
|
| Logged |
|
|
|
Reply: 41 - 79 |
|
|
| Badger |
| Posted on: Tuesday, September 23rd, 2008, 3:28:20am |
|
|
|
| DAMN.......But I know exactly how you feel. Good to hear the leg has mended. |
|
| Logged |
|
|
|
Reply: 42 - 79 |
|
|
| mattjohns |
| Posted on: Wednesday, October 15th, 2008, 12:31:36am |
|
|
Maximum Member

Posts: 1652
Posts Per Day: 0.95 |
|
“ |
Quoted from george, posted Monday, September 15th, 2008, 8:50:43pm at here |
” |
although I am still picking bits of fibreglass shards out of my arms! There really is no easy way to remove all the tiny that embed themselves into your skin! Argh!!!!!!!!!
|
|
Actually, a REALLY hot shower tends to work wonders. . . a good scrubbing doesn't go astray either |
|
| Logged |
|
|
 |
Reply: 43 - 79 |
|
|
| george |
| Posted on: Wednesday, October 15th, 2008, 7:27:31pm |
|
|
|
Well it is almost December - time for my bath!!! 
On the good news side - I have a week off soon - so I will be able to do a bit more - I really miss the sanding fun! |
|
| Logged |
|
|
|
Reply: 44 - 79 |
|
|
| CaffieneHit |
| Posted on: Wednesday, October 15th, 2008, 9:17:43pm |
|
|
Maximum Member
Posts: 541
Posts Per Day: 0.32 |
|
I'll be keeping an eye on this thread aswell george, Your pods look the goods  Feel like making a mould??? Feel like making a mould??? |
|
| Logged |
|
|
| |
Reply: 45 - 79 |
|
|
| george |
| Posted on: Thursday, October 16th, 2008, 10:17:18pm |
|
|
|
Before I spray them perhaps - but how??
Is this going to add more weeks/months? Erm...
On second thoughts - please no one answer this!  |
|
| Logged |
|
|
|
Reply: 46 - 79 |
|
|
| crisp |
| Posted on: Thursday, October 16th, 2008, 11:07:49pm |
|
|
|
Looks a simple shape (unlike the mould I tried to make) so should take maybe a weekend or two to make and strengthen then maybe a couple or so more of experimentation?
“ |
Quoted from Badger, posted Wednesday, October 15th, 2008, 9:13:42am at here |
” |
...Installed with a bit of messing about. Because of extra thickness, had to eleviate some of the Aluminium from behind the Roof Latches and trim to new contour.
|
|
A copy made from a mould would I think be naturally thinner so this extra trimming to fit would hopefully not be necessary ?
The use of a good mould might also lend itself to carbon copies as well GRP?
|
|
| Logged |
|
|
|
Reply: 47 - 79 |
|
|
| Badger |
| Posted on: Friday, October 17th, 2008, 6:15:13am |
|
|
|
“ |
Quoted from george, posted Thursday, October 16th, 2008, 10:17:18pm at here |
” |
Before I spray them perhaps - but how??
Is this going to add more weeks/months? Erm...
On second thoughts - please no one answer this!
|
|
Ha Ha, sorry mate, but I can't be the ONLY ONE, now you've got the Hang of it.
1: Smooth off your pods till you are 100% happy ready to paint. Mask up the Gauge Holes from the inside...do this really well so no resin gets through.
2: Apply a 'Wax Mold Release'...couple of coats should be able to get this where you got the resin.
3: Lay Fibreglass Matting over entire pod...Don't cut out the Holes...cover all of them. 2 or 3 Layers will be enough.
4: When they are dry, peel them off....that's it. You now have your Mold.
5: remove any Wax from inside and give a good clean...you should have the same smooth surface on the inside as the outside of your originals.
6: Apply Wax mold release to inside of mold, then apply 2-3 Layers of Fibreglass, when dry, peel 'em off and there you have it....another set....  EASY...... EASY......
Good Luck..... 
|
|
| Logged |
|
|
|
Reply: 48 - 79 |
|
|
| Lucian |
| Posted on: Wednesday, March 4th, 2009, 9:31:38pm |
|
|
|
| is it ready yet? i may buy a set for me |
|
| Logged |
|
|
|
Reply: 49 - 79 |
|
|
| george |
| Posted on: Thursday, March 5th, 2009, 9:04:47pm |
|
|
|
| Sadly it's just too cold in my garage to finish them! But will push on over Easter hols and into summer! Still looking for reasonably priced defi gauges to check fit! Man they are expensive! |
|
| Logged |
|
|
|
Reply: 50 - 79 |
|
|
| george |
Posted on: Saturday, August 29th, 2009, 7:08:14pm
 Attachment: p1010434_small.jpg - 70.94 KB (588 views) Attachment: p1010434_small.jpg - 70.94 KB (588 views) |
|
|
|
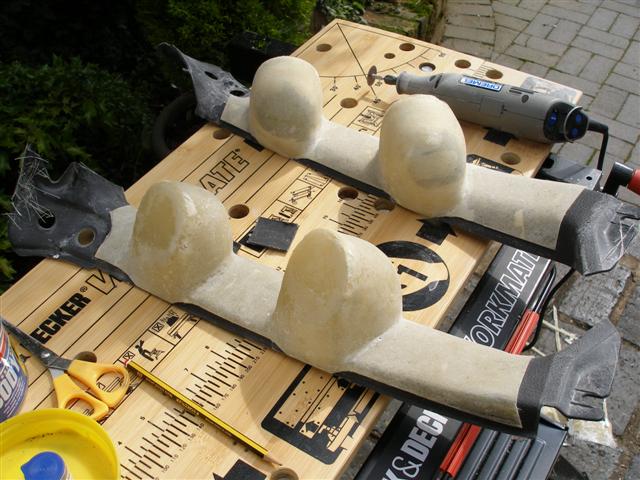
The sun is out whilst I am on holiday! Quick... I can begin again...
I have decided to save time (ha!) and trim the original bits to fit to the original side a pilars. |
 |
|
| Logged |
|
|
|
Reply: 51 - 79 |
|
|
| george |
Posted on: Saturday, August 29th, 2009, 7:11:25pm
Attachment: p1010435_small.jpg - 56.39 KB (583 views) |
|
|
|
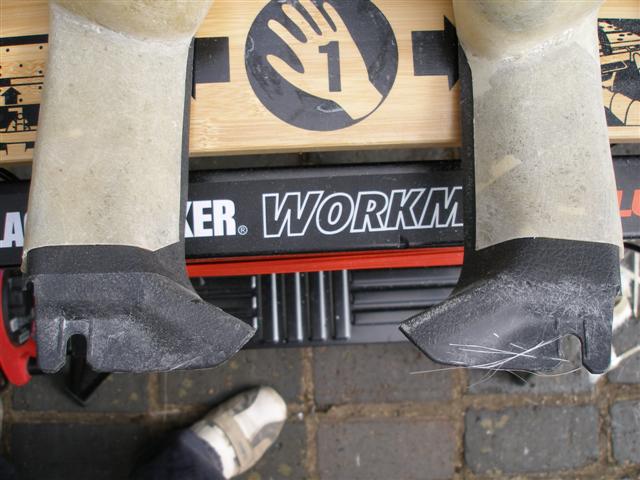
Of course this means I don't have to make these fiddly end bits! The weight save gain was fairly pointless.
Stuck them on with lots of Araldite. Great smell! |
 |
|
| Logged |
|
|
|
Reply: 52 - 79 |
|
|
| george |
Posted on: Saturday, August 29th, 2009, 7:12:32pm
Attachment: p1010436_small.jpg - 49.90 KB (585 views) |
|
|
|
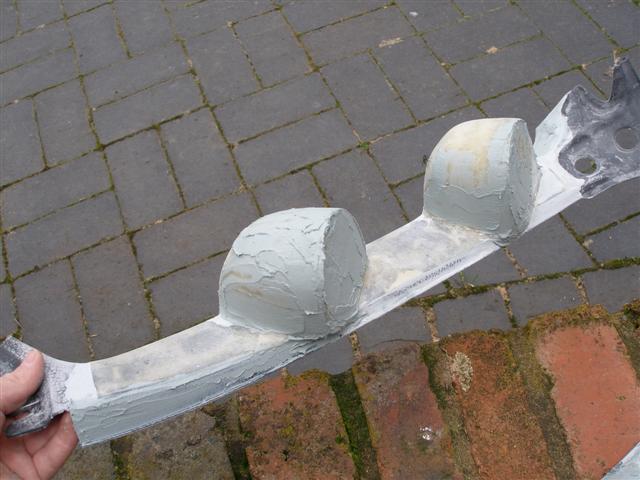
| Lots of filler later! |
 |
|
| Logged |
|
|
|
Reply: 53 - 79 |
|
|
| george |
Posted on: Saturday, August 29th, 2009, 7:13:21pm
Attachment: p1010437_small.jpg - 60.24 KB (581 views) |
|
|
|
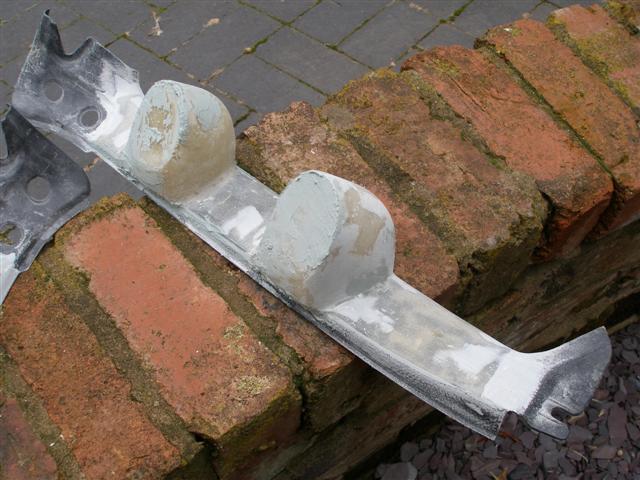
| This is going to take a while... |
 |
|
| Logged |
|
|
|
Reply: 54 - 79 |
|
|
| george |
Posted on: Sunday, December 13th, 2009, 8:03:37pm
Attachment: p1010471_small.jpg - 76.96 KB (533 views) |
|
|
|
Woo Hoo!
Finally found some defi gauges at a sensible price on flea-bay!
Now time to get sanding |
 |
|
| Logged |
|
|
|
Reply: 55 - 79 |
|
|
| george |
Posted on: Sunday, December 13th, 2009, 8:04:52pm
Attachment: p1010473_small.jpg - 54.97 KB (533 views) |
|
|
|
Sanded and sprayed then cut the holes ready for the 60mm gauges!
Rubbish photo - but quality sanding |
 |
|
| Logged |
|
|
|
Reply: 56 - 79 |
|
|
| george |
Posted on: Sunday, December 13th, 2009, 8:06:41pm
Attachment: p1010472_small.jpg - 51.86 KB (530 views) |
|
|
|
Sized up the holes and the gauges fit a treat!
Permission to look smug!
Now all I need is to get them sprayed up in the new year to match the grey plastic. Hmmm..... I wonder if there is a paint code? Anybody got any ideas? |
 |
|
| Logged |
|
|
|
Reply: 57 - 79 |
|
|
| Badger |
| Posted on: Monday, December 14th, 2009, 12:16:44am |
|
|
|
| Looking Good George, as for the Paint code....it would be easy to take a piece of the plastic trim to an Auto paint supply and have them Make-Up a couple of spray cans....as well as a Satin CLEAR Top Coat......Good Luck. |
|
| Logged |
|
|
|
Reply: 58 - 79 |
|
|
| Andy |
| Posted on: Monday, December 14th, 2009, 12:44:27am |
|
|
Official C.O.C Contributor

Gender:  Male Male
Posts: 23604
Posts Per Day: 3.49 |
|
| The colour is 5ES - Off Black but whether there is a paint to match... |
Drop me a PM if you would like to be added to the ClubCappo Member Map. More details can be found here.
We now have an official Facebook group as well as a page! See here |
|
| Logged |
|
|
| |
Reply: 59 - 79 |
|
|
| george |
| Posted on: Monday, December 14th, 2009, 8:06:48pm |
|
|
|
Every bit of info helps! Cheers Andy, I will talk to my man at the car spray shop and see what he comes up with!
|
|
| Logged |
|
|
|
Reply: 60 - 79 |
|
|
| Badger |
| Posted on: Thursday, July 22nd, 2010, 10:49:34am |
|
|
|
| So.....Where's the Finished product...??? installed and working...??? |
|
| Logged |
|
|
|
Reply: 61 - 79 |
|
|
| george |
| Posted on: Sunday, July 25th, 2010, 9:36:13am |
|
|
|
Oh so sad... Took them to be sprayed and got some bad news. Used the wrong filler
I should have used plastic filler which is more flexible. When we put the pods in the paint oven to bake, the filler started to lift - even though I keyed the surface pretty well. Only slightly on the edges, but enough to ruin them, so...
Had to remove all the filler previously used and start again with plastic filler!! I almost cried.
Good news is that they are almost ready to be sprayed again, just a few more hours of sanding!! |
|
| Logged |
|
|
|
Reply: 62 - 79 |
|
|
| Badger |
| Posted on: Sunday, July 25th, 2010, 10:19:49am |
|
|
|
| Bad Luck... Pics when they're done..... |
|
| Logged |
|
|
|
Reply: 63 - 79 |
|
|
| lord |
| Posted on: Sunday, July 25th, 2010, 11:39:40am |
|
|
|
| i was following this.. bad luck bro... its all in the experience ! |
|
| Logged |
|
|
|
Reply: 64 - 79 |
|
|
| george |
| Posted on: Monday, July 26th, 2010, 3:21:24pm |
|
|
|
| Well it's good news - just dropped them off to be sprayed - should be done for Friday. Almost 2 years to the day since I started them. |
|
| Logged |
|
|
|
Reply: 65 - 79 |
|
|
| Badger |
| Posted on: Monday, July 26th, 2010, 10:23:10pm |
|
|
|
| Funny how time flies...........lol |
|
| Logged |
|
|
|
Reply: 66 - 79 |
|
|
| muggle3000 |
| Posted on: Friday, August 6th, 2010, 8:02:05pm |
|
|
|
|
| Logged |
|
|
|
Reply: 67 - 79 |
|
|
| george |
| Posted on: Sunday, August 15th, 2010, 8:44:32pm |
|
|
|
| Yes - woo hoo and they look great - sorry have been on holiday for 2 weeks ) just got back and ready to play in the garage! |
|
| Logged |
|
|
|
Reply: 68 - 79 |
|
|
| george |
Posted on: Monday, August 16th, 2010, 6:15:10pm
Attachment: p1010570_small.jpg - 56.27 KB (372 views) |
|
|
|
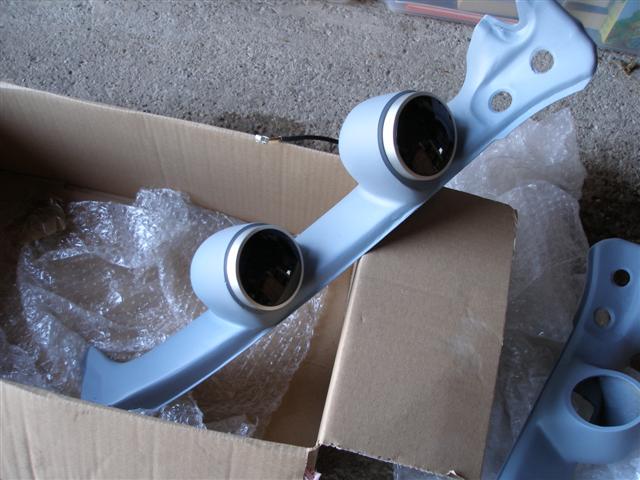
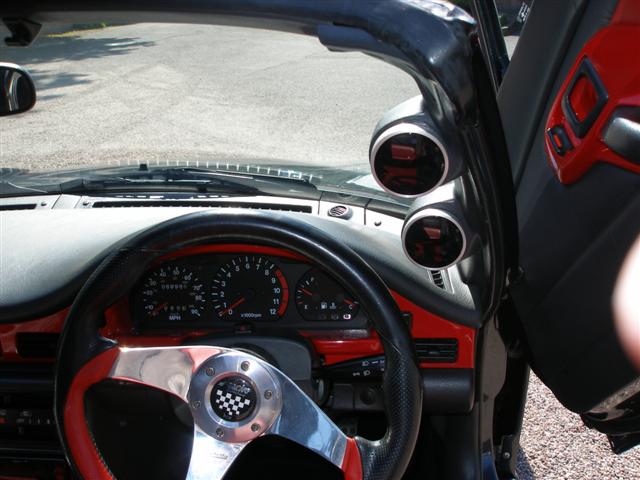
Ahhhh - a nice sunny day to play with the car...
Finally put the pods in to make sure they fit and how they look.
The gauges fit like a dream, just got to find some cash now to get them wired up! |
 |
|
| Logged |
|
|
|
Reply: 69 - 79 |
|
|
| george |
Posted on: Monday, August 16th, 2010, 6:17:07pm
Attachment: p1010571_small.jpg - 53.70 KB (369 views) |
|
|
|
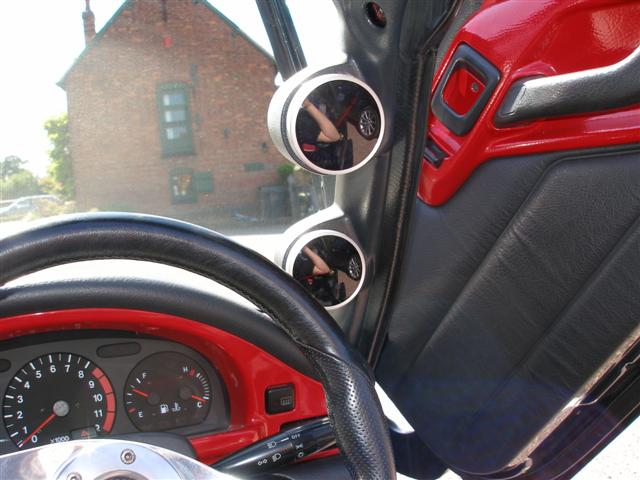
Just got to decide which gauges to go where?
Got:
Boost gauge,
Water temp,
Oil Presure,
Oil temp,
|
 |
|
| Logged |
|
|
|
Reply: 70 - 79 |
|
|
| george |
Posted on: Monday, August 16th, 2010, 6:18:09pm
Attachment: p1010572_small.jpg - 53.67 KB (370 views) |
|
|
|
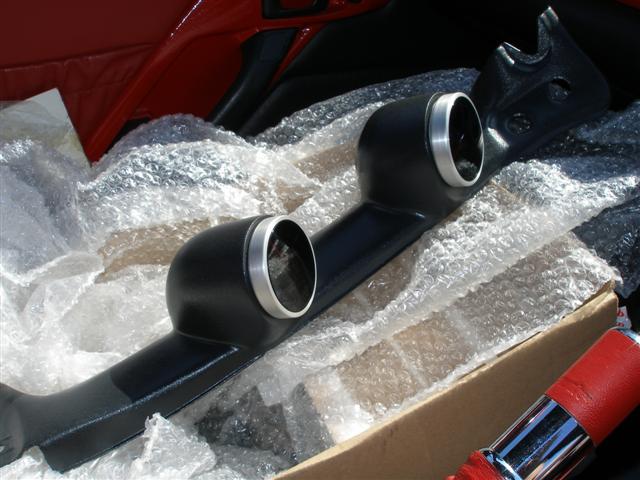
| Check out the shine in those pics!!! |
 |
|
| Logged |
|
|
|
Reply: 71 - 79 |
|
|
| george |
Posted on: Monday, August 16th, 2010, 6:19:14pm
Attachment: p1010573_small.jpg - 54.46 KB (368 views) |
|
|
|
| And another... |
 |
|
| Logged |
|
|
|
Reply: 72 - 79 |
|
|
| george |
Posted on: Monday, August 16th, 2010, 6:19:57pm
Attachment: p1010574_small.jpg - 51.91 KB (367 views) |
|
|
|
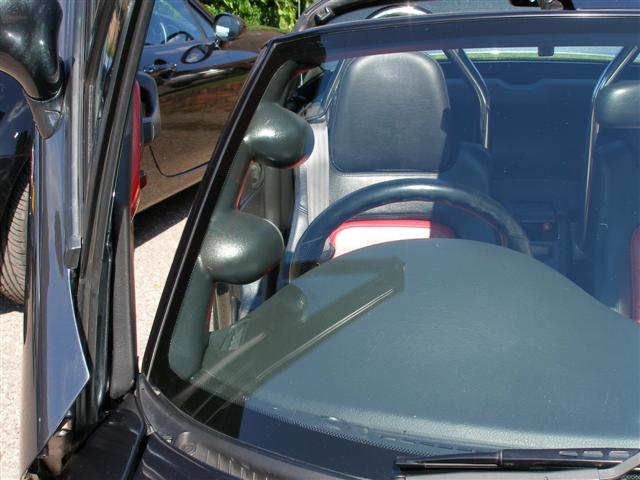
| And finally one more from the outside... |
 |
|
| Logged |
|
|
|
Reply: 73 - 79 |
|
|
| george |
| Posted on: Monday, August 16th, 2010, 6:22:10pm |
|
|
|
I'm very pleased, but I think my fibre-glassing days are done for now! As it took two years to find time to complete these! And I still need to get them wired up. But it is certainly satisfying to see them done now.  |
|
| Logged |
|
|
|
Reply: 74 - 79 |
|
|
| george |
Posted on: Monday, August 16th, 2010, 6:24:38pm
Attachment: p1010575_small.jpg - 73.20 KB (364 views) |
|
|
|
| Ahhh, one more because the sun is so rare! |
 |
|
| Logged |
|
|
|
Reply: 75 - 79 |
|
|
| Badger |
| Posted on: Sunday, August 22nd, 2010, 3:53:52pm |
|
|
|
|
| Logged |
|
|
|
Reply: 76 - 79 |
|
|
| badcat |
| Posted on: Friday, July 1st, 2011, 7:57:38am |
|
|
|
Nice work George! I'm thinking of puttin' some gauges somewhere, already got a boost gauge, contemplating two more, wondered what your order of importance would be, I fancy....
Boost
Oil pressure
Coolant temp
????
Tom |
|
| Logged |
|
|
|
Reply: 77 - 79 |
|
|
| tiggz |
| Posted on: Friday, July 1st, 2011, 10:29:49am |
|
|
|
| Hey George great looking pods just wondering what body kit you have on your Cappo and how much you got it for? |
|
| Logged |
|
|
|
Reply: 78 - 79 |
|
|
| verygood |
| Posted on: Friday, July 8th, 2011, 10:32:35pm |
|
|
|
| fantastic looking car!! what did you do to the doors? |
|
| Logged |
|
|
|
Reply: 79 - 79 |
|
|
|
 Cappuccino Owners Club › FAQ › How to... › Gauge pods (Moderators: )


 Locked Board