|
|
 Author Author |
 LAT33 (currently 1450 views) LAT33 (currently 1450 views) |
| grant4561 |
Posted on: Friday, March 4th, 2011, 12:09:14pm
 Attachment: lat33reg.bmp - 37.38 KB (742 views) Attachment: lat33reg.bmp - 37.38 KB (742 views) |
  |
|
Maximum Member

Posts: 1719
Posts Per Day: 0.98 |
|
| It's official. |
 |
|
 Logged Logged |
|
|
|
|
| Streeter |
| Posted on: Friday, March 4th, 2011, 6:13:23pm |
|
|
|
| LOL the misses wishes we could get custom plates here and says she loves it :p |
|
| Logged |
|
|
 |
Reply: 1 - 85 |
|
|
| Badger |
| Posted on: Saturday, March 5th, 2011, 7:31:23pm |
|
|
|
|
| Logged |
|
|
|
Reply: 2 - 85 |
|
|
| grant4561 |
Posted on: Sunday, March 6th, 2011, 10:23:41am
Attachment: eng_d.jpg - 111.39 KB (704 views) |
|
|
Maximum Member
Posts: 1719
Posts Per Day: 0.98 |
|
OK so now the work begins.
First job was to strip a few things and search for any of that dreaded rust.
Drivers side engine bay, all cleaned but no rust. |
 |
|
| Logged |
|
|
 |
Reply: 3 - 85 |
|
|
| grant4561 |
Posted on: Sunday, March 6th, 2011, 10:24:45am
Attachment: engp.jpg - 129.79 KB (704 views) |
|
|
Maximum Member
Posts: 1719
Posts Per Day: 0.98 |
|
Passenger side engine bay.
There must be some somewhere? |
 |
|
| Logged |
|
|
| |
Reply: 4 - 85 |
|
|
| grant4561 |
Posted on: Sunday, March 6th, 2011, 10:28:10am
Attachment: wing.jpg - 73.51 KB (706 views) |
|
|
Maximum Member
Posts: 1719
Posts Per Day: 0.98 |
|
Bummer, I'll keep looking.
I know under the aluminium front lower mudgard wings.
There has to be some.
Apart from the usual wheelbarrow ful of road crap this is what I found. |
 |
Last modified Sunday, March 6th, 2011, 10:33:49am by grant4561 |
|
| Logged |
|
|
| |
Reply: 5 - 85 |
|
|
| grant4561 |
Posted on: Sunday, March 6th, 2011, 10:29:52am
Attachment: rear_int.jpg - 105.12 KB (696 views) |
|
|
Maximum Member
Posts: 1719
Posts Per Day: 0.98 |
|
b*gger, still cant fine any?
OK time to check the interior.
Heres the rear. |
 |
|
| Logged |
|
|
| |
Reply: 6 - 85 |
|
|
| grant4561 |
Posted on: Sunday, March 6th, 2011, 10:31:35am
Attachment: front_int.jpg - 62.52 KB (699 views) |
|
|
Maximum Member
Posts: 1719
Posts Per Day: 0.98 |
|
And finally at last, I am so happy I found some.
A small bit of surface rust in the drivers floor well.
Hooray! |
 |
Last modified Sunday, March 6th, 2011, 10:33:13am by grant4561 |
|
| Logged |
|
|
| |
Reply: 7 - 85 |
|
|
| grant4561 |
Posted on: Sunday, March 6th, 2011, 10:36:57am
Attachment: immob_rem.jpg - 94.40 KB (694 views) |
|
|
Maximum Member
Posts: 1719
Posts Per Day: 0.98 |
|
Yes, I am treating the rust spot but next job was to remove the old immobiliser and start installing central locking with a new immobiliser.
Not to hard and heres the old immobiliser. |
 |
|
| Logged |
|
|
| |
Reply: 8 - 85 |
|
|
| grant4561 |
Posted on: Sunday, March 6th, 2011, 10:38:11am
Attachment: c_lock_door.jpg - 62.93 KB (692 views) |
|
|
Maximum Member
Posts: 1719
Posts Per Day: 0.98 |
|
| Central lockin unit installed in the door. |
 |
|
| Logged |
|
|
| |
Reply: 9 - 85 |
|
|
| grant4561 |
Posted on: Sunday, March 6th, 2011, 10:38:59am
Attachment: c_lock_boot.jpg - 57.53 KB (694 views) |
|
|
Maximum Member
Posts: 1719
Posts Per Day: 0.98 |
|
| And of course you have to have a remote boot switch. |
 |
|
| Logged |
|
|
| |
Reply: 10 - 85 |
|
|
| Badger |
| Posted on: Sunday, March 6th, 2011, 11:43:29pm |
|
|
|
| Have a look under the Washer Bottle......when you've finished yours you can come and install mine...lol. Any choice on the coloour yet...Kandy Apple Red...??? |
|
| Logged |
|
|
|
Reply: 11 - 85 |
|
|
| grant4561 |
| Posted on: Monday, March 7th, 2011, 12:07:00am |
|
|
Maximum Member
Posts: 1719
Posts Per Day: 0.98 |
|
Done the washer bottle check thing and all is good. Just removed the usual crap from under there.
LAT33 will be restored to stock apart from a couple of extra's like the central locking and immobilliser.
Colour will be stock "Cordoba Red" |
|
| Logged |
|
|
| |
Reply: 12 - 85 |
|
|
| lord |
| Posted on: Monday, March 7th, 2011, 1:44:04am |
|
|
|
| man thats a mint cappo ha ha... wow!!! |
|
| Logged |
|
|
|
Reply: 13 - 85 |
|
|
| ThePorko |
| Posted on: Tuesday, March 8th, 2011, 2:50:17am |
|
|
|
| Whats the plan for this one Grant? |
|
| Logged |
|
|
|
Reply: 14 - 85 |
|
|
| Ricou |
| Posted on: Wednesday, March 9th, 2011, 11:30:59am |
|
|
Maximum Member
Posts: 1110
Posts Per Day: 0.65 |
|
Good job ! Glad you could at least find some rust  |
|
| Logged |
|
|
| |
Reply: 15 - 85 |
|
|
| Cappo |
| Posted on: Wednesday, March 9th, 2011, 1:45:49pm |
|
|
|
Hunt the rust game! Looks like you made life difficult for yourself with that one! (Lucky thing)
Nice hose reel too!
|
|
| Logged |
|
|
|
Reply: 16 - 85 |
|
|
| grant4561 |
| Posted on: Thursday, March 10th, 2011, 1:17:58am |
|
|
Maximum Member
Posts: 1719
Posts Per Day: 0.98 |
|
“ |
Quoted from ThePorko, posted Tuesday, March 8th, 2011, 2:50:17am at here |
” |
Whats the plan for this one Grant?
|
|
I am going to restore this one basically to comepletly stock apart from a couple of luxuries, like central door locking, decent speakers, etc. The wife will basically use it as a daily driver as long as she is careful or she will be banished!
So far I have stripped the car even further right down to removing the door handle/locks and pulling them apart for painting along with the boot lid, mirrors wiper blades and plastic surround things.
There are a few Car Park or shopping trolley dents/scratches (hardly noticeable) in the doors and guards whcich will all be repaired and repainted.
It will be all original colours.
As far as all of the upgrade bits I aquired watch the KOF33 album soon as she is about to grow some more muscles.
I will probably have some upgrade parts for sale in time that I wont be using but will posy them up when I make some final decisions. |
|
| Logged |
|
|
| |
Reply: 17 - 85 |
|
|
| ThePorko |
| Posted on: Thursday, March 10th, 2011, 5:39:15am |
|
|
|
|
| Logged |
|
|
|
Reply: 18 - 85 |
|
|
| grant4561 |
Posted on: Wednesday, March 23rd, 2011, 6:52:40am
Attachment: rwhr.jpg - 111.80 KB (558 views) |
|
|
Maximum Member
Posts: 1719
Posts Per Day: 0.98 |
|
| She came with 2 sets of wheels, heres one of the sets having a test fit on KOF33. |
 |
|
| Logged |
|
|
| |
Reply: 19 - 85 |
|
|
| grant4561 |
Posted on: Wednesday, March 23rd, 2011, 6:54:41am
Attachment: bootprep.jpg - 54.50 KB (558 views) |
|
|
Maximum Member
Posts: 1719
Posts Per Day: 0.98 |
|
| Anyway, back to work. Been doing lots of little things before I tackle the mechanical side of things like any body work that needs a tidy up. Heres the boot all prepared nearly ready for paint. |
 |
|
| Logged |
|
|
| |
Reply: 20 - 85 |
|
|
| grant4561 |
Posted on: Wednesday, March 23rd, 2011, 6:57:01am
Attachment: wingprep.jpg - 74.95 KB (553 views) |
|
|
Maximum Member
Posts: 1719
Posts Per Day: 0.98 |
|
The lower aluminium guard section as well.
Most other small trims, door handles, windscreen wiper panel, etc, etc has also been done as well. |
 |
|
| Logged |
|
|
| |
Reply: 21 - 85 |
|
|
| grant4561 |
Posted on: Wednesday, March 23rd, 2011, 6:59:29am
Attachment: lsd1.jpg - 84.57 KB (556 views) |
|
|
Maximum Member
Posts: 1719
Posts Per Day: 0.98 |
|
I started to put the final coats of paint on and b*gger they blushed. It's been raining off and on here for months and the humidity is sky high so the painting has had to be put aside for the moment.
Oh well time to start some mechanical I gauess. Heres the LSD reasembled and checked ready to go itno KOF33. |
 |
|
| Logged |
|
|
| |
Reply: 22 - 85 |
|
|
| grant4561 |
Posted on: Wednesday, March 23rd, 2011, 7:00:29am
Attachment: rrinnerp.jpg - 90.17 KB (551 views) |
|
|
Maximum Member
Posts: 1719
Posts Per Day: 0.98 |
|
| Managed to do some underbody painting like the inner rear guards. |
 |
|
| Logged |
|
|
| |
Reply: 23 - 85 |
|
|
| grant4561 |
Posted on: Wednesday, March 23rd, 2011, 7:01:13am
Attachment: bootlight.jpg - 51.32 KB (556 views) |
|
|
Maximum Member
Posts: 1719
Posts Per Day: 0.98 |
|
| Had a spare interior light so it's now installed in the boot. |
 |
|
| Logged |
|
|
| |
Reply: 24 - 85 |
|
|
| grant4561 |
Posted on: Wednesday, March 23rd, 2011, 7:08:23am
Attachment: block1.jpg - 73.58 KB (551 views) |
|
|
Maximum Member
Posts: 1719
Posts Per Day: 0.98 |
|
| Engine block mounted up ready to attack. |
 |
|
| Logged |
|
|
| |
Reply: 25 - 85 |
|
|
| grant4561 |
Posted on: Wednesday, March 23rd, 2011, 7:09:49am
Attachment: bolts1.jpg - 57.69 KB (550 views) |
|
|
Maximum Member
Posts: 1719
Posts Per Day: 0.98 |
|
| The previous owner labelled all of the bolts and fixings as the car was dismantled like this. |
 |
Last modified Wednesday, March 23rd, 2011, 7:10:06am by grant4561 |
|
| Logged |
|
|
| |
Reply: 26 - 85 |
|
|
| grant4561 |
Posted on: Wednesday, March 23rd, 2011, 7:11:19am
Attachment: bolts2.jpg - 64.61 KB (546 views) |
|
|
Maximum Member
Posts: 1719
Posts Per Day: 0.98 |
|
| I have a few boxes of them like this which is great but even with a fairly good knowledge of Cappo's I still have to hunt around a bit to find the ones I want. |
 |
|
| Logged |
|
|
| |
Reply: 27 - 85 |
|
|
| djmichie |
| Posted on: Wednesday, March 23rd, 2011, 2:00:43pm |
|
|
|
| this is awesome, wish i had the time and ability to do this to mine, im looking to install an alarm but would love central locking and boot release? was this a kit? if so where can i get it? or any type of guide? |
|
| Logged |
|
|
|
Reply: 28 - 85 |
|
|
| Ricou |
| Posted on: Wednesday, March 23rd, 2011, 3:26:55pm |
|
|
Maximum Member
Posts: 1110
Posts Per Day: 0.65 |
|
|
| Logged |
|
|
| |
Reply: 29 - 85 |
|
|
| grant4561 |
| Posted on: Thursday, March 24th, 2011, 12:17:24am |
|
|
Maximum Member
Posts: 1719
Posts Per Day: 0.98 |
|
^1 Most alarm kits have outputs for central locking either to a locking kit module or you can just by the actuators from places like Jaycar Electronics and fit them yourself. I bought the lot from Jaycar.
The door actuators are a little tricky to fit as there is not much space in the door for them. I have done 3 cappo's now and have found that you need to mount the actuator at right angles to the door locking rod and make a right angle pivot point for the linkages in between. (See the pic above)
The boot one is easy to fit and it will be operated by a second button on the alarm kit remote and also has a button on the dash to release it from the cabin.
^2 This engine wont be stock. It will be rebuilt with a few tricky parts and put in my silver cappo KOF33. The motor from KOF33 will go in LAT33. |
|
| Logged |
|
|
| |
Reply: 30 - 85 |
|
|
| grant4561 |
Posted on: Monday, April 4th, 2011, 7:16:46am
Attachment: fsfsr.jpg - 72.93 KB (466 views) |
|
|
Maximum Member
Posts: 1719
Posts Per Day: 0.98 |
|
Time for an update.
With the weather being wet I managed to fit the rear and front sub frame along with the steering rack (new boots). |
 |
|
| Logged |
|
|
| |
Reply: 31 - 85 |
|
|
| grant4561 |
Posted on: Monday, April 4th, 2011, 7:20:18am
Attachment: ppan.jpg - 103.08 KB (467 views) |
|
|
Maximum Member
Posts: 1719
Posts Per Day: 0.98 |
|
The rain stopped and the humidity dropped so back to painting.
Here's an array of panels and various parts in the process.
Lesson number 1,000 - Don't renovate a bathroom with timber floors directly above where you are painting at the same time as the paint is drying or you have to start again. b*gger! |
 |
|
| Logged |
|
|
| |
Reply: 32 - 85 |
|
|
| grant4561 |
Posted on: Monday, April 4th, 2011, 7:21:14am
Attachment: ppart.jpg - 91.41 KB (464 views) |
|
|
Maximum Member
Posts: 1719
Posts Per Day: 0.98 |
|
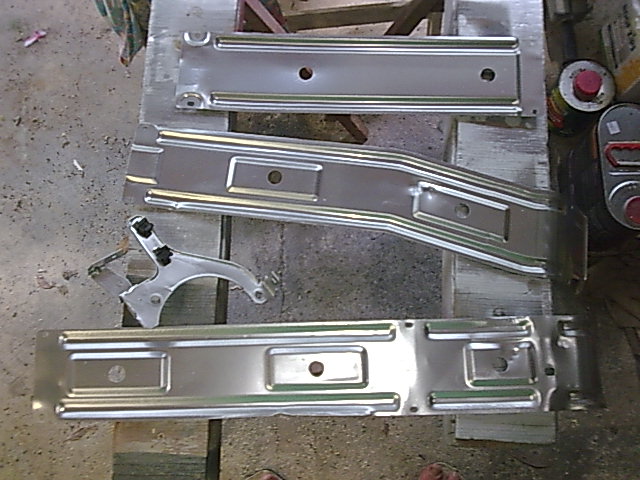
| Front tow and other brackets ready to refit. |
 |
|
| Logged |
|
|
| |
Reply: 33 - 85 |
|
|
| grant4561 |
Posted on: Monday, April 4th, 2011, 7:22:13am
Attachment: fpcb.jpg - 84.74 KB (462 views) |
|
|
Maximum Member
Posts: 1719
Posts Per Day: 0.98 |
|
| Might as well do the under car fuel pipe covers and any other brackets that need silver as well. |
 |
|
| Logged |
|
|
| |
Reply: 34 - 85 |
|
|
| grant4561 |
Posted on: Monday, April 4th, 2011, 7:23:06am
Attachment: fpcur.jpg - 61.91 KB (463 views) |
|
|
Maximum Member
Posts: 1719
Posts Per Day: 0.98 |
|
Cant fit them back on without painting the underside of the car.
Heres towards the rear. |
 |
Last modified Monday, April 4th, 2011, 7:24:01am by grant4561 |
|
| Logged |
|
|
| |
Reply: 35 - 85 |
|
|
| grant4561 |
Posted on: Monday, April 4th, 2011, 7:24:31am
Attachment: fpcuf.jpg - 77.50 KB (460 views) |
|
|
Maximum Member
Posts: 1719
Posts Per Day: 0.98 |
|
| And the front. |
 |
|
| Logged |
|
|
| |
Reply: 36 - 85 |
|
|
| lord |
| Posted on: Monday, April 4th, 2011, 10:44:28am |
|
|
|
| That car looks bloody new ha ha |
|
| Logged |
|
|
|
Reply: 37 - 85 |
|
|
| grant4561 |
Posted on: Tuesday, May 3rd, 2011, 5:49:06am
Attachment: crank429.jpg - 52.60 KB (412 views) |
|
|
Maximum Member
Posts: 1719
Posts Per Day: 0.98 |
|
Time for an update.
While waiting for paint to dry I decided to strip the motor ready to rebuild and found that the crank pulley's had been loose at some stage and flogged out the keyway and the end of the crank.
It had been bogged up with some sort of liquid metal stuff and without a bit of digging I may not have even found out.
I could get it rebuilt and remachined but have managed to source another one. |
 |
|
| Logged |
|
|
| |
Reply: 38 - 85 |
|
|
| grant4561 |
Posted on: Tuesday, May 3rd, 2011, 5:50:23am
Attachment: blockp431.jpg - 123.63 KB (418 views) |
|
|
Maximum Member
Posts: 1719
Posts Per Day: 0.98 |
|
| Anyway while waiting for the crank to arrive it was time to clean up the block. |
 |
|
| Logged |
|
|
| |
Reply: 39 - 85 |
|
|
|
 Cappuccino Owners Club › Gallery › Cappo Related Album › LAT33 (Moderators: )


 Locked Board