|
|
 Author Author |
 Caz-a-ccino (currently 511 views) Caz-a-ccino (currently 511 views) |
| Wh1teLeopard |
| Posted on: Saturday, April 23rd, 2011, 6:34:03pm |
  |
|
|
OK so I'm not allowed to spend any money on Caz-a-ccino until the wedding is paid for and the Beat is finished.... but I figured I'll probably loose the pictures by then, so thought I'd start a thread here.
We borrowed Mom and Dads 'Molly' and hired a trailer to go collect caz-a-ccino from Caz.

Once home I thought it best to check all the fluids and see what under the bonnet was like for rust.
So after much arguing with caz-a-ccino to get the air filter out, I found the filter needed replacing but didn't have another one lying around. So decided to use the 'universal' one I had lying around for now. Seems to suit it quite nicely actually.

Then checked to see what was in the car

Honey kept watch while we worked

I then insured caz-a-ccino and took her for another MOT to see what the damage was like.
There's a lot of holes under there, and most of the sills are falling apart... to quote the tester
"knock, knock, knock... oh I found a solid bit!"
lol
So we'll need new sills, rear panels, inner arches and a new floor.
Today we removed the trim, seat and carpet from the driver's side to see if the rust came all the way through.

Could be worse I guess haha

Andy informed me you can't get the floors any more, so looks like we'll be cutting out the floor and fabricating a new one
Many thanks to Wayne2105 for the advice on that one.

Caz gave me some lights she bought, so I fitted the reverse light (doesn't work though - so need to investigate that one).

Andy politely informs me it's in the wrong place, but the grill needs replacing. It's all rotten and deformed, with a HUWGE hole in the middle. |
Last modified Saturday, April 23rd, 2011, 6:42:10pm by Wh1teLeopard |
|
 Logged Logged |
|
|
|
|
| Andy |
| Posted on: Saturday, April 23rd, 2011, 7:00:18pm |
|
|
Official C.O.C Contributor


Gender:  Male Male
Posts: 23604
Posts Per Day: 3.47 |
|
Pics are better on here than on Facebook!
So is it just black paint under the bacofoil?  Wonder if it is some sort of rust preventer with foil over the top to stop it sticking to the carpet. Wonder if it is some sort of rust preventer with foil over the top to stop it sticking to the carpet. |
Drop me a PM if you would like to be added to the ClubCappo Member Map. More details can be found here.
We now have an official Facebook group as well as a page! See here |
|
| Logged |
|
|
  |
Reply: 1 - 21 |
|
|
| Wh1teLeopard |
| Posted on: Saturday, April 23rd, 2011, 7:04:56pm |
|
|
|
| It's sticky, like under seal, or glue. Some kind of rust treatment I think. |
|
| Logged |
|
|
|
Reply: 2 - 21 |
|
|
| adycap |
| Posted on: Saturday, April 23rd, 2011, 8:29:00pm |
|
|
|
| dont look too bad .will be interested in pics once you start to remove rotten steel.i could see 12" holes in mine no floors to sills at all and a long piece of 3x2 wood supporting seat up.lol good luck . |
|
| Logged |
|
|
|
Reply: 3 - 21 |
|
|
| Andy |
| Posted on: Saturday, April 23rd, 2011, 8:33:18pm |
|
|
Official C.O.C Contributor
Gender: Male
Posts: 23604
Posts Per Day: 3.47 |
|
I'd forgotten how bad you said yours was. You might be able to give Emily so useful pointers  |
Drop me a PM if you would like to be added to the ClubCappo Member Map. More details can be found here.
We now have an official Facebook group as well as a page! See here |
|
| Logged |
|
|
| |
Reply: 4 - 21 |
|
|
| Wh1teLeopard |
| Posted on: Saturday, April 23rd, 2011, 10:07:13pm |
|
|
|
Wood! Oh my!
I was pleased there weren't any holes. I think i'm talking Jay around to letting me do caz before the beat so I have one road worthy car, instead of two off the road. |
|
| Logged |
|
|
|
Reply: 5 - 21 |
|
|
| Wh1teLeopard |
| Posted on: Monday, April 25th, 2011, 12:30:46pm |
|
|
|
Today's update, I thought the boot was probably the straightest most rust-free panel so decided to see what damage if any was present.
So out comes the blue T-Cut to sink in and show any scrapes, holes or other problems not visible under normal conditions. Sure enough there were a few surprises, nothing too major. Some lacquer damage on the right, some chips and minor dents, and a nice long scrape by the passenger side rear light.
It's difficult to see in the pictures, but hey, why not? haha, below there are two blue spot in the top right-ish corner of the boot.

Scrape!

Quite a long scrape on the rear

Rear bumper bump

Next on to the rust/rot!
Here's the biggest problem apart from the sills (the yellow chalk marks out where it failed the MOT)

Corners either side of the transmission/exhaust tunnel are rotten

The yellow square drawn out left of the hole is the mount for the exhaust I think, that's in danger of falling off if the rot continues.

Rot aside, I need a new seal for the passenger side window, the one that runs up the front of the window and meet the roof panel.

Decided to tackle the big folder full of receipts and there's a lot of stuff in there

I've never seen so many red MOTs before!

Found this though, which I think is really nice

There's a lot of history in that folder, everything from MOTs, purchase histories (including the car each time it changed hands), I know how much it sold for each time and so on... but there was one that nearly made me cry a little bit (I am a girl after all).
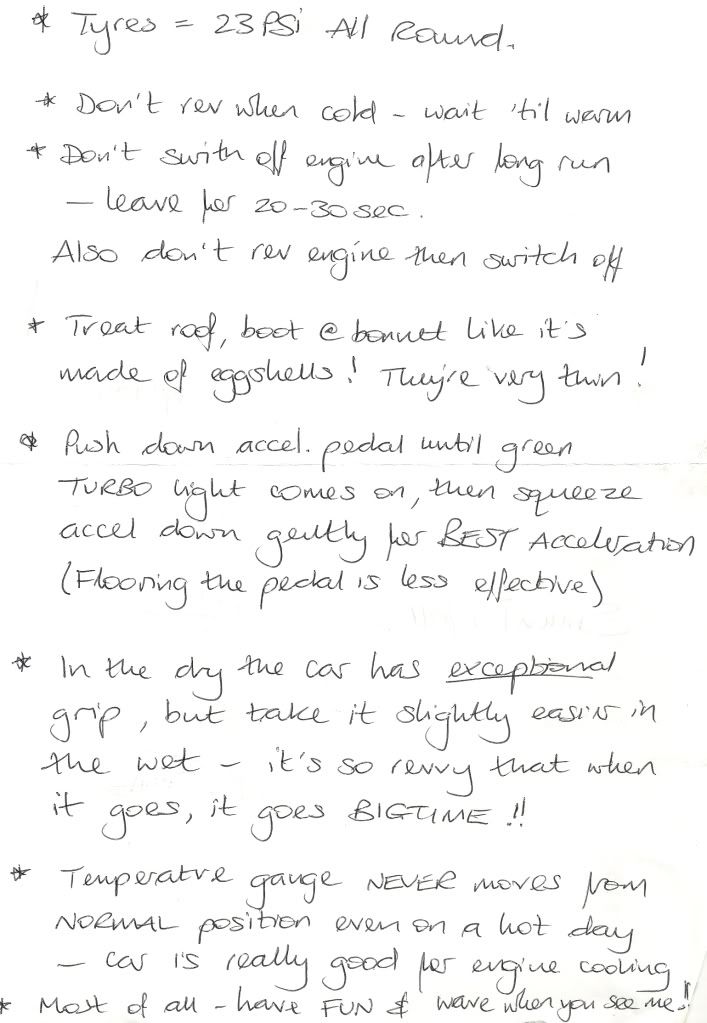
Now I've never been so determined to fix caz-a-ccino up! Someone obviously loved this little car A LOT! To bring her back to tip-top condition is the least I can do. |
|
| Logged |
|
|
|
Reply: 6 - 21 |
|
|
| Andy |
| Posted on: Monday, April 25th, 2011, 12:42:57pm |
|
|
Official C.O.C Contributor
Gender: Male
Posts: 23604
Posts Per Day: 3.47 |
|
|
Drop me a PM if you would like to be added to the ClubCappo Member Map. More details can be found here.
We now have an official Facebook group as well as a page! See here |
|
| Logged |
|
|
| |
Reply: 7 - 21 |
|
|
| Wh1teLeopard |
| Posted on: Monday, April 25th, 2011, 1:05:24pm |
|
|
|
What I found to be the most strange were the failed MOTs.
Because they all said the same thing... just with a bit more added each year. So how come this cappo was getting MOTs when clearly the things it failed on weren't been rectified????
Also the folder had lots of 'score' stuff in it... membership details, tax disc holders etc, but thought it best not to mention that one
 |
Last modified Monday, April 25th, 2011, 1:06:24pm by Wh1teLeopard |
|
| Logged |
|
|
|
Reply: 8 - 21 |
|
|
| adycap |
| Posted on: Monday, April 25th, 2011, 5:54:13pm |
|
|
|
shes obviously been loved at somepoint.bet you cant wait to start restoring her.its horrible to see cars like this in states of disrepair.mine was just repaired to getit through mot .wants doing properly really but thought id have this summer in it b4 full resto.really needs both floor pans .inner ,centre and outer sills (both sides) and rear bulk head (both sides)also suspension tops have hads previously bodged repairs.where do you start.might just save up for a good one .lol  |
|
| Logged |
|
|
|
Reply: 9 - 21 |
|
|
| lord |
| Posted on: Monday, April 25th, 2011, 6:22:03pm |
|
|
|
i'm doing mine at the mo and if you're going to do it fully. You're going to need deep pocket!! See my thread! For list of panels ive bought and what you need lol. It's a shame cappo sport have gone under. they WERE very handy! lol
Where you gonna get r floors from?? Ive heard MX5's are the same type of floors. |
|
| Logged |
|
|
|
Reply: 10 - 21 |
|
|
| adycap |
| Posted on: Monday, April 25th, 2011, 6:35:54pm |
|
|
|
| think last idea was best ,(run this one and save up for one that has a good shell.) still its on the road with full mot for £570 (not including my time)so dont really matter what happens to it .always be a good source of spares if i get another.just going to enjoy driving it for now. |
|
| Logged |
|
|
|
Reply: 11 - 21 |
|
|
| alliballi |
| Posted on: Tuesday, April 26th, 2011, 12:58:16am |
|
|
|
so so worth restoring though in my opinion, they are getting rarer and rarer every year  worth saving and spending money on as and when you can I look apon Suzi as a good investment not that I EVER plan to part with her I have promised her to my 1 year old grandaughter and if she doesnt want her in another 20 years I may be burried in her, yep I love my Suzi feels good to have saved her have fun and enjoy worth saving and spending money on as and when you can I look apon Suzi as a good investment not that I EVER plan to part with her I have promised her to my 1 year old grandaughter and if she doesnt want her in another 20 years I may be burried in her, yep I love my Suzi feels good to have saved her have fun and enjoy |
|
| Logged |
|
|
|
Reply: 12 - 21 |
|
|
| Wh1teLeopard |
| Posted on: Sunday, July 24th, 2011, 8:06:31pm |
|
|
|
Whilst waiting to start on the bodywork, I've been collecting parts.
Have a rear quarter, a sill, a rear spring and some clear side repeaters as well as the round fog light that came with the car to match the reverse light I already fitted (doesn't work mind haha).
So decided to take the orange out of the indicators:

How I did it:
http://www.clubcappo.co.uk/board/Blah/Blah.cgi?b=HT,m=1311528442
Will complete a few more little jobs until we're in a position to do the bodywork. |
Last modified Sunday, July 24th, 2011, 8:12:51pm by Wh1teLeopard |
|
| Logged |
|
|
|
Reply: 13 - 21 |
|
|
| kayfour |
| Posted on: Monday, July 25th, 2011, 12:20:42pm |
|
|
|
Looking good! I like the look without the orange at the front
are you planning make the repeaters (side indicators) clear too? |
|
| Logged |
|
|
|
Reply: 14 - 21 |
|
|
| Wh1teLeopard |
| Posted on: Monday, July 25th, 2011, 1:14:21pm |
|
|
|
I am indeed. I have them waiting in a box, just thought I might as well wait until the new panels are on and painted, in case they get damaged in the process
Don't want to change the exterior too much apart from removing the orange. Quite like the look of the cappos as they are. |
|
| Logged |
|
|
|
Reply: 15 - 21 |
|
|
| muggle3000 |
| Posted on: Monday, July 25th, 2011, 9:14:09pm |
|
|
|
It does look a lot better without the orange.
Well done opening a can of worms too. |
|
| Logged |
|
|
|
Reply: 16 - 21 |
|
|
| Wh1teLeopard |
| Posted on: Tuesday, July 26th, 2011, 9:23:58am |
|
|
|
I didn't mean to  |
|
| Logged |
|
|
|
Reply: 17 - 21 |
|
|
| muggle3000 |
| Posted on: Tuesday, July 26th, 2011, 7:16:10pm |
|
|
|
| Nevermind. It was funny though. |
|
| Logged |
|
|
|
Reply: 18 - 21 |
|
|
| Wh1teLeopard |
| Posted on: Sunday, August 28th, 2011, 8:08:04pm |
|
|
|
So decided to do some more work on the cazaccino over the last couple of nights now that I'm getting used to working a normal job again hehe
Decided to see whether the crease in the boot was just an optical illusion or actual damage...
First job was to undo the hinges and springs (without taking my eye out) and put a sheet under it. I also used towels to protect the lights.
After that it was time for some elbow grease!

I started by removing the wrongly positioned cappuccino badge using a hairdryer, a plastic spoon and some of this stuff:

Fantastic stuff for getting glue and adhesives off, as you can see:

Then time for sanding.

Had to work really hard in the middle to try and smooth out the boot. I had to be careful though as I nearly made it down to the metal at one point!
Then set about it with the primer

Sanded it down, and added another layer

Sanded it down again and started with the colour (can you call white a colour?)

Lots of cans of paint later:

There's also a 'FX layer' in there too... but I'll see if anyone can work that one out when it's finally back on the road.

The only thing left is to lacquer it. Which I'm not doing, because I spent a lot of time and effort up to this point and I always mess up the lacquer layer. So I'm gonna pay Jay's friend to do that bit and watch how he does it... then maybe practice on the garage wall (don't tell the landlord hahahaha) |
|
| Logged |
|
|
|
Reply: 19 - 21 |
|
|
| Wh1teLeopard |
| Posted on: Wednesday, October 12th, 2011, 10:22:34pm |
|
|
|
Just and update really... the finished lacquered colour:


Those are flakes of silver under the lacquer (which hasn't been mopped yet, leaving that until the whole car is done in case I damage anything) |
Last modified Wednesday, October 12th, 2011, 10:23:43pm by Wh1teLeopard |
|
| Logged |
|
|
|
Reply: 20 - 21 |
|
|
| Andy |
| Posted on: Wednesday, October 12th, 2011, 10:28:42pm |
|
|
Official C.O.C Contributor
Gender: Male
Posts: 23604
Posts Per Day: 3.47 |
|
Nice!  |
Drop me a PM if you would like to be added to the ClubCappo Member Map. More details can be found here.
We now have an official Facebook group as well as a page! See here |
|
| Logged |
|
|
| |
Reply: 21 - 21 |
|
|
|
 Cappuccino Owners Club › Gallery › Cappo Related Album › Caz-a-ccino (Moderators: )


 Locked Board