|
|
 Author Author |
 To restore or not to restore (currently 1740 views) To restore or not to restore (currently 1740 views) |
| Andy |
| Posted on: Sunday, November 20th, 2011, 9:02:54pm |
  |
|
Official C.O.C Contributor


Gender:  Male Male
Posts: 23604
Posts Per Day: 3.47 |
|
Those lower wings always seem to go like that eventually 
If the AC still has gas and pressure in it then it really should be emptied using specialised machines. Chances are though that all the gas is long since gone so you should be ok. You certainly don't want to get a face/lung full of it though. |
Drop me a PM if you would like to be added to the ClubCappo Member Map. More details can be found here.
We now have an official Facebook group as well as a page! See here |
|
 Logged Logged |
|
|
  |
Reply: 40 - 91 |
|
|
| Erik |
| Posted on: Monday, November 21st, 2011, 9:41:39pm |
|
|
|
| Thanks for the comments and advice Andy. The past months I have frequently thought of quitting this mess, throwing the remains away and trying to keep the other one going. I have seriously doubted if what I'm doing is really intelligent and I'm sure people will doubt my good judgment in this, to put it mildly. But what the heck, my spirits are up again and if I can, as you say, work away at it when time allows maybe I'll end up with one rust free frame, to decide afterwards to rebuild as is or to make one out of the two. We'll see. |
|
| Logged |
|
|
|
Reply: 41 - 91 |
|
|
| Erik |
| Posted on: Saturday, November 26th, 2011, 9:38:14pm |
|
|
|
Disassembled the air conditioning radiator today to find to my astonishment the remains of the engine radiator. Next time you wonder why the fan is cutting in so early you might want to have a look at your radiator, maybe it resembles mine 
I hope you can see it from the picture but I guess about 20% of the metal blades between the cooling tubes is simply gone! |
|
| Logged |
|
|
|
Reply: 42 - 91 |
|
|
| Erik |
Posted on: Saturday, November 26th, 2011, 9:38:58pm
 Attachment: dsc00140bis.jpg - 122.66 KB (527 views) Attachment: dsc00140bis.jpg - 122.66 KB (527 views) |
|
|
|
| .. oops. |
 |
|
| Logged |
|
|
|
Reply: 43 - 91 |
|
|
| Erik |
Posted on: Monday, January 2nd, 2012, 5:49:23pm
Attachment: dsc00159bis.jpg - 124.09 KB (498 views) |
|
|
|
I haven't spend as much time as I would have liked on the car but I'm advancing bit by bit and the engine bay is looking more and more empty. I am worried however about the number of parts which break or get damaged by the disassembly process. If I count all those together with the rusted or non-re-useable parts and looking at parts prices I'm pretty sure this can never become a cost effective operation  |
 |
|
| Logged |
|
|
|
Reply: 44 - 91 |
|
|
| Erik |
Posted on: Sunday, January 8th, 2012, 8:57:39pm
Attachment: 20120109_025bis.jpg - 72.80 KB (466 views) |
|
|
|
| Removed all stuff around engine so almost ready to lift body up. |
 |
|
| Logged |
|
|
|
Reply: 45 - 91 |
|
|
| Erik |
Posted on: Sunday, January 8th, 2012, 9:00:27pm
Attachment: 20120109_026bis.jpg - 71.92 KB (463 views) |
|
|
|
| Disassembled the rest of the interior, removed the drive shaft underneath and disconnected the shift gear mechanism from the gearbox. |
 |
|
| Logged |
|
|
|
Reply: 46 - 91 |
|
|
| Erik |
Posted on: Sunday, January 8th, 2012, 9:03:07pm
Attachment: 20120109_030bis.jpg - 77.22 KB (462 views) |
|
|
|
Thanks to Nick Sawyer whose pictures showed me how to lift up the body and thus create an nice movable cart with enigne, front suspension and gearbox.
I must say that I'm very happy with the progress I've made . |
 |
|
| Logged |
|
|
|
Reply: 47 - 91 |
|
|
| Ricou |
| Posted on: Monday, January 9th, 2012, 8:38:58pm |
|
|
Maximum Member
Posts: 1110
Posts Per Day: 0.65 |
|
| Good job ! |
|
| Logged |
|
|
| |
Reply: 48 - 91 |
|
|
| Erik |
| Posted on: Thursday, January 12th, 2012, 9:56:44pm |
|
|
|
| Thanks Ricou, or should I say 'un grand merci!' |
|
| Logged |
|
|
|
Reply: 49 - 91 |
|
|
| mitogeri |
| Posted on: Friday, January 13th, 2012, 1:08:47am |
|
|
Big Member

Posts: 192
Posts Per Day: 0.12 |
|
wow looks like lego technik
Good job,and nice pictures |
|
| Logged |
|
|
| |
Reply: 50 - 91 |
|
|
| Erik |
|
|
| I haven't worked on the car for months. What kept me stalled was the fact that on the LH side I had disassembled the brakes so I could not remove the drive axle nut anymore because I had nothing to keep it from turning. I finally removed the whole lot togheter with the rear subfrmae, I'll figure out later how to take it apart. |
 |
|
| Logged |
|
|
|
Reply: 51 - 91 |
|
|
| Erik |
|
|
| Then it went all very quickly, the fuel tank... |
 |
|
| Logged |
|
|
|
Reply: 52 - 91 |
|
|
| Erik |
|
|
| ... with all fixings in the trunk... |
 |
|
| Logged |
|
|
|
Reply: 53 - 91 |
|
|
| Erik |
|
|
| ...removed the RH door and fender... |
 |
|
| Logged |
|
|
|
Reply: 54 - 91 |
|
|
| Erik |
|
|
| ... and the LH fender. |
 |
|
| Logged |
|
|
|
Reply: 55 - 91 |
|
|
| Erik |
|
|
The right hand rust hole is copied by the the other side  |
 |
|
| Logged |
|
|
|
Reply: 56 - 91 |
|
|
| Erik |
|
|
All this brings forward the million dollar question, will I simply throw this body away and keep the parts to keep the silver one alive or will I restore it (e.g. sandblast, have it welded up etc.) to start up a perfect Cappuccino?
In the meae time the silver one has to stay outside, needing attention and starting to go bubbly again |
 |
|
| Logged |
|
|
|
Reply: 57 - 91 |
|
|
| lord |
| Posted on: Saturday, November 3rd, 2012, 2:26:02am |
|
|
|
| You need to weigh it up. I got rid of my old shell because it was am import. The UK car i had instead had more rust. The UK car had 27k and full history and would be cheaper to insure. So i thought id go with the UK car instead. |
|
| Logged |
|
|
|
Reply: 58 - 91 |
|
|
| Ricou |
| Posted on: Saturday, November 3rd, 2012, 3:06:39am |
|
|
Maximum Member
Posts: 1110
Posts Per Day: 0.65 |
|
| Sorry to ask this, especially since you've got quite a dilemma to solve, but could you describe how to remove a front fender ? I've had a quick look on my car but it didn't seem very straightforward. |
|
| Logged |
|
|
| |
Reply: 59 - 91 |
|
|
| Hans |
| Posted on: Sunday, November 4th, 2012, 7:48:43pm |
|
|
Minimum Member

Posts: 46
Posts Per Day: 0.03 |
|
|
| Logged |
|
|
| |
Reply: 60 - 91 |
|
|
| Erik |
| Posted on: Sunday, November 4th, 2012, 9:33:17pm |
|
|
|
@Ricou
The front fender is fixed with only seven bolts all easy to remove but maybe not always visible when everything is assembled. Three bolts on top are easily visible, then there is one in front near the headlight (watch out, the bolt here easily corrodes, on mine the RH fender front bolt broke off), one at the rear, visible when you open the door and then there are two more but they are covered by the aluminium lower panel. They are visible in the picture of the 20th november in this series. If you want pictures of these positions just let me know. |
|
| Logged |
|
|
|
Reply: 61 - 91 |
|
|
| Ricou |
| Posted on: Monday, November 5th, 2012, 2:08:42am |
|
|
Maximum Member
Posts: 1110
Posts Per Day: 0.65 |
|
Merci beaucoup 
I think I got it, no need for more pics, thanks.
By the way, I'm not having an easy time just dismantling my Cappuccino's front subframe, so I take my hat off to you for dismantling a whole (rusty) car. Congrats mate. |
|
| Logged |
|
|
| |
Reply: 62 - 91 |
|
|
| Erik |
Posted on: Sunday, December 16th, 2012, 9:20:05pm
Attachment: dsc00277bis.jpg - 119.94 KB (264 views) |
|
|
|
Some more pictures as I'm getting more and more towards a completely naked Cappuccino...
Getting the interior completely removed, with the wiring, is not easy, I can assure you. |
 |
|
| Logged |
|
|
|
Reply: 63 - 91 |
|
|
| Erik |
Posted on: Sunday, December 16th, 2012, 9:21:17pm
Attachment: dsc00282bis.jpg - 79.38 KB (263 views) |
|
|
|
| .. found a new rust hole at the front LH side... |
 |
|
| Logged |
|
|
|
Reply: 64 - 91 |
|
|
| Erik |
Posted on: Sunday, December 16th, 2012, 9:22:05pm
Attachment: dsc00280bis.jpg - 55.15 KB (261 views) |
|
|
|
| ... and of course also at the underside... |
 |
|
| Logged |
|
|
|
Reply: 65 - 91 |
|
|
| Erik |
Posted on: Sunday, December 16th, 2012, 9:24:00pm
Attachment: dsc00289bis.jpg - 72.73 KB (264 views) |
|
|
|
| ... at the rear, LH and RH side, the sills are simply rusted open, on one side there is light at the end of the tunnel but this is not a good sign! |
 |
|
| Logged |
|
|
|
Reply: 66 - 91 |
|
|
| Erik |
Posted on: Wednesday, January 2nd, 2013, 7:56:11pm
Attachment: dsc00291bis.jpg - 121.23 KB (227 views) |
|
|
|
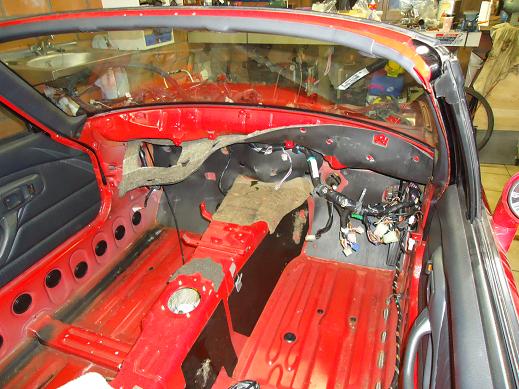
| After removal of the sound deadening and the wiring the interior looks like this. |
 |
|
| Logged |
|
|
|
Reply: 67 - 91 |
|
|
| Erik |
Posted on: Wednesday, January 2nd, 2013, 7:57:28pm
Attachment: dsc00301bis.jpg - 114.03 KB (227 views) |
|
|
|
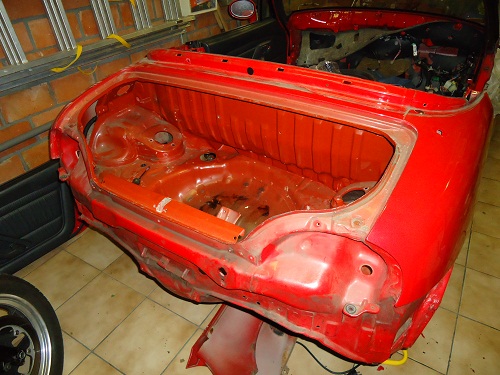
| I still keep finding previously unnoticed rust spots, like this one in the rear RH side. |
 |
|
| Logged |
|
|
|
Reply: 68 - 91 |
|
|
| Erik |
Posted on: Wednesday, January 2nd, 2013, 8:03:07pm
Attachment: dsc00298bis.jpg - 87.69 KB (223 views) |
|
|
|
| On the other side it's the common rust spot normally found under the carpet behind the passenger seat. I seem to have read here on the forum about the drain passages (which I will show next) emptying out in both chassis outriggers which are hollow, and this moisture causes the outbreak of rust. ls this correct, can someone confirm this? |
 |
|
| Logged |
|
|
|
Reply: 69 - 91 |
|
|
| Erik |
Posted on: Wednesday, January 2nd, 2013, 8:04:54pm
Attachment: dsc00296bis.jpg - 93.79 KB (222 views) |
|
|
|
| These drain passages can be found on both sides, and drain straight onto both rust spots. |
 |
|
| Logged |
|
|
|
Reply: 70 - 91 |
|
|
| Erik |
Posted on: Wednesday, January 2nd, 2013, 8:07:26pm
Attachment: dsc00297bis.jpg - 62.02 KB (222 views) |
|
|
|
| At the rear you cab find on both sides rectangular openings behind which rsut also forms, in this picture you can see the grey from the repair panel which has been welded in. |
 |
|
| Logged |
|
|
|
Reply: 71 - 91 |
|
|
| Erik |
Posted on: Wednesday, January 2nd, 2013, 8:08:18pm
Attachment: dsc00299bis.jpg - 94.46 KB (219 views) |
|
|
|
| ... and this is how it looks from the underside. |
 |
|
| Logged |
|
|
|
Reply: 72 - 91 |
|
|
| Erik |
Posted on: Wednesday, January 2nd, 2013, 8:08:58pm
Attachment: dsc00300bis.jpg - 102.87 KB (219 views) |
|
|
|
| ... the other side, not repaired. |
 |
|
| Logged |
|
|
|
Reply: 73 - 91 |
|
|
| Erik |
| Posted on: Wednesday, January 2nd, 2013, 8:19:08pm |
|
|
|
| The only things left: windshield, fuel line and brake linings (I have never been able to remove a single brake line ever in my life, so I think I'll simply destroy them taking them off), both rear suspension arms (the RH side refuses to give in, even after all my efforts). The next step will be to go talk to a body workshop which a friend of mine recommended to get a quote for the welding, on which I will be able to base my decision to throw it away or to continue... |
|
| Logged |
|
|
|
Reply: 74 - 91 |
|
|
| Avar |
| Posted on: Wednesday, January 2nd, 2013, 10:24:05pm |
|
|
|
The windscreen is easy if you use a retractable / snap off craft knife the large bladed ones (there's three sizes small. medium and large((rare)), windscreen fitters use the large variety). Just keep scoring the black silicone along the top, until the knife blade runs right through upto each of the corners, then do the same for the sides working up to the corners, then last of all attack the corners (you might need an assistant to hold the screen in place while you losen it).
When you know its clear down the three sides and at the corners, lightly push the screen forward ensuring the glass doesn't fall out to check for any bits of silicone you've missed and to possibly score along the bottom of the screen if the fitter has stuck it down there. You can then clean the surrounds up ready for a total respray i you chose to restore. Dont worry about damaging the felt strips along the bottom of the screen i have quite a few available very cheap.
Brake and fuel lines are a doddle as they're clipped in place, all you need to use is a small screwdriver to release the pressure of the clip and the line pops out. |
|
| Logged |
|
|
|
Reply: 75 - 91 |
|
|
| lord |
| Posted on: Wednesday, January 2nd, 2013, 10:55:32pm |
|
|
|
I personally don't think its that bad at all....
I do think that this is salvagable...
I've seen people try and restore much worse. |
|
| Logged |
|
|
|
Reply: 76 - 91 |
|
|
| Erik |
| Posted on: Thursday, January 3rd, 2013, 9:37:12pm |
|
|
|
Thanks for the reactions and advice, especially for the removal of the windscreen.
Regarding the brake lines, clipping them out is indeed easy, unbolting the lines from the splitter or removing the splitter from the frame (in the lower RH corner) proves to be impossible until now. I don't have the possibility to heat it up neither.
The good Lord knows how to motivate people!
Still a bit in doubt how anyone could ever rescue the upper frame outriggers, they're hollow and I can only imagine that the insides are also attacked.
We'll see.
|
|
| Logged |
|
|
|
Reply: 77 - 91 |
|
|
| Avar |
| Posted on: Thursday, January 3rd, 2013, 10:24:56pm |
|
|
|
Untill a few months ago i used to struggle with the brake line fittings, but recently purchased a 11mm and 10mm brake line spanner, this made life so much easier and only cost a few quid. Obviously re the other bolts a good hex socket, plenty of plusgas and good leverage.
|
|
| Logged |
|
|
|
Reply: 78 - 91 |
|
|
| Erik |
| Posted on: Wednesday, March 6th, 2013, 8:45:28pm |
|
|
|
It's been a while since I wrote.
I have been contemplating what to do, looking at my options.
However, the fact that I really would like to buy another youngtimer motorcycle has prompted me to take the final decision not to restore the Cappuccino.
This final decision has been taken mainly because I was really surprised by the amount of rust on the chassis outriggers above the fuel tank.
I feel that, unless the repaired bodywork would be taken through a bath to de-rust and afterwards another bath to paint, the rust would always come back. The cost of this repair and treatment is prohibitive, certainly for me.
I've also taken into account that I like to drive my Cappuccino, but I'm not completely and madly in love with the car, as some of you are.
This means that the bodywork, unless there are any takers, will be scrapped. 
A big thanks to all the followers and the contributors of this thread! |
|
| Logged |
|
|
|
Reply: 79 - 91 |
|
|
|
 Cappuccino Owners Club › Gallery › Cappo Related Album › To restore or not to restore (Moderators: )


 Locked Board