|
|
 Author Author |
 KOF 33 Mod's (currently 6599 views) KOF 33 Mod's (currently 6599 views) |
| grant4561 |
| Posted on: Sunday, September 14th, 2008, 1:36:25am |
  |
|
Maximum Member

Posts: 1719
Posts Per Day: 0.98 |
|
| If you strip them yourself they will probably cost between 150-200 bucks |
|
 Logged Logged |
|
|
  |
Reply: 120 - 294 |
|
|
| Chris S |
| Posted on: Tuesday, September 16th, 2008, 5:00:53pm |
|
|
Big Member

Posts: 193
Posts Per Day: 0.15 |
|
“ |
Quoted from grant4561, posted Saturday, September 13th, 2008, 10:09:51am at here |
” |
Side panel.
Lucky I cut my toe nails this morning 
|
|
Lucky you were weren't in your "birthday suit"!
|
|
| Logged |
|
|
| |
Reply: 121 - 294 |
|
|
| grant4561 |
| Posted on: Saturday, October 4th, 2008, 10:48:16am |
|
|
Maximum Member
Posts: 1719
Posts Per Day: 0.98 |
|
How did you know?
Oh yeah, you would have seen a lump beetwen the toes in the picks. |
|
| Logged |
|
|
| |
Reply: 122 - 294 |
|
|
| Badger |
| Posted on: Saturday, October 4th, 2008, 5:14:30pm |
|
|
|
| Ha Ha Ha.....you wish..... |
|
| Logged |
|
|
|
Reply: 123 - 294 |
|
|
| grant4561 |
Posted on: Thursday, October 9th, 2008, 10:36:35am
 Attachment: 1_test_fit.jpg - 62.26 KB (661 views) Attachment: 1_test_fit.jpg - 62.26 KB (661 views) |
|
|
Maximum Member
Posts: 1719
Posts Per Day: 0.98 |
|
The "Garage Sneaza" rear strut brace arrived last week so I got to fitting it on Monday.
Heres a pick of the first test fit. |
 |
|
| Logged |
|
|
| |
Reply: 124 - 294 |
|
|
| grant4561 |
Posted on: Thursday, October 9th, 2008, 10:38:50am
Attachment: 2_spare_check.jpg - 56.41 KB (657 views) |
|
|
Maximum Member
Posts: 1719
Posts Per Day: 0.98 |
|
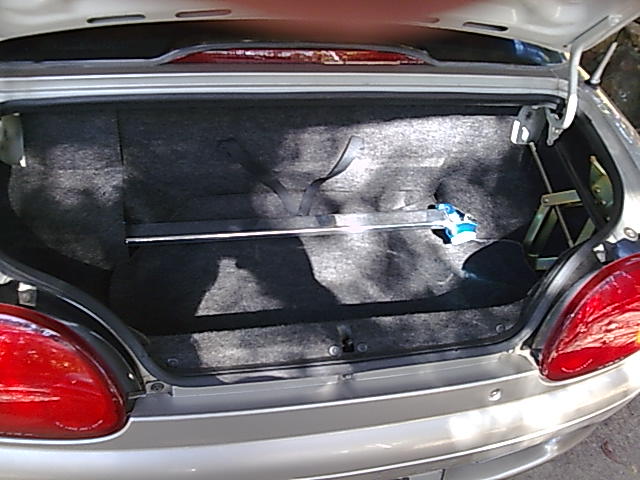
Now to see if the spare fits, which it didnt....then idea.
Add one 8mm allan key to the tool kit so the brace can be pivoted up to remove the spare like this. |
 |
|
| Logged |
|
|
| |
Reply: 125 - 294 |
|
|
| grant4561 |
Posted on: Thursday, October 9th, 2008, 10:42:04am
Attachment: 3_finished.jpg - 62.09 KB (656 views) |
|
|
Maximum Member
Posts: 1719
Posts Per Day: 0.98 |
|
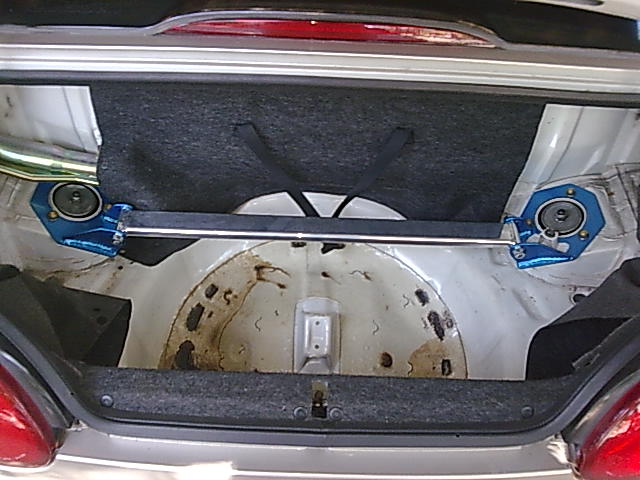
All finished now with the carpet back in place. The hole where the jack bracket fits thorugh on in the right carpet had to have 2 slits cut in it to allow the brace bracket to fit.
The left side was fine.
Also found a new home for the jack, but I might find a better one yet. |
 |
|
| Logged |
|
|
| |
Reply: 126 - 294 |
|
|
| capgun |
| Posted on: Thursday, October 9th, 2008, 10:45:28am |
|
|
|
Big question is how much difference did it make to driving?  |
|
| Logged |
|
|
|
Reply: 127 - 294 |
|
|
| Youichi |
| Posted on: Thursday, October 9th, 2008, 9:15:22pm |
|
|
Big Member
Posts: 257
Posts Per Day: 0.15 |
|
“ |
Quoted from capgun, posted Thursday, October 9th, 2008, 10:45:28am at here |
” |
Big question is how much difference did it make to driving?
|
|
No the big question is, do the roof panels still fit in the boot ?
|
|
| Logged |
|
|
| |
Reply: 128 - 294 |
|
|
| nc30pete |
| Posted on: Thursday, October 9th, 2008, 9:55:54pm |
|
|
Maximum Member
Posts: 504
Posts Per Day: 0.29 |
|
that was the first thing on my mind too Youichi  |
|
| Logged |
|
|
| |
Reply: 129 - 294 |
|
|
| grant4561 |
| Posted on: Friday, October 10th, 2008, 12:19:30am |
|
|
Maximum Member
Posts: 1719
Posts Per Day: 0.98 |
|
Yes the roof panels fit in fine. I have even added extra padding in each bag to protect them as I have just repainted them. A piece of 6mm closed cell insulation used in the HVAC (Air Conditioning) industry.
It comes in a 1200x900mm sheet and is available in various thickneses but 6mm thick is all you need. You can cut the three pieces from one sheet and its quite cheap. |
|
| Logged |
|
|
| |
Reply: 130 - 294 |
|
|
| grant4561 |
Posted on: Monday, December 8th, 2008, 7:34:01am
Attachment: image096.jpg - 51.34 KB (596 views) |
|
|
Maximum Member
Posts: 1719
Posts Per Day: 0.98 |
|
Havent updated things for a while as we have been working on the new cappo Little Green Devil.
Changed all the normal maintenace items, oils, filters etc, but had a persistant oil leak from around the turbo area but only with the motor running. Just a slight drip.
Finally removed the cat pipe and turbo and found it was missing one copper washer on the turbo oil feed line. All fixed now and good.
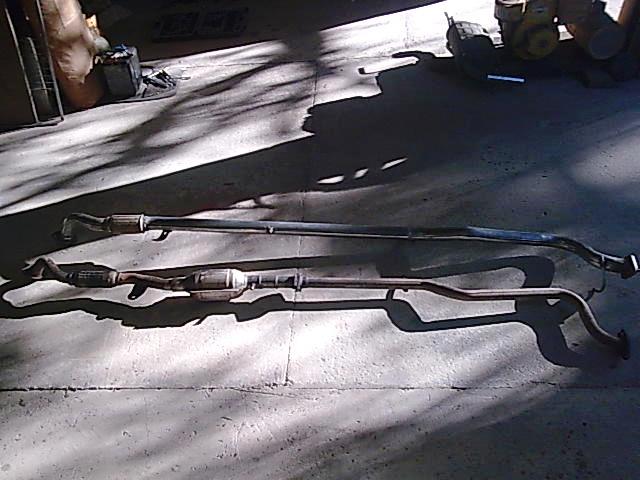
However we took the opportunity to decat it and make a new exhaust. Heres a pic of the new centre & mid section. Made in one piece with 2 inch pipe. |
 |
|
| Logged |
|
|
| |
Reply: 131 - 294 |
|
|
| grant4561 |
Posted on: Monday, December 8th, 2008, 7:35:08am
Attachment: image099.jpg - 73.93 KB (594 views) |
|
|
Maximum Member
Posts: 1719
Posts Per Day: 0.98 |
|
| The new rear section 3 inch st/steel straight through cannon with 3 inch st/steel bend out the rear. |
 |
|
| Logged |
|
|
| |
Reply: 132 - 294 |
|
|
| grant4561 |
Posted on: Monday, December 8th, 2008, 7:36:32am
Attachment: image100.jpg - 52.99 KB (595 views) |
|
|
Maximum Member
Posts: 1719
Posts Per Day: 0.98 |
|
How its looks from the rear. Really nice sound as well  |
 |
|
| Logged |
|
|
| |
Reply: 133 - 294 |
|
|
| grant4561 |
Posted on: Monday, December 8th, 2008, 7:40:58am
Attachment: record007.amr - 33.76 KB (61 downloads) |
|
|
Maximum Member
Posts: 1719
Posts Per Day: 0.98 |
|
Heres how the LGD sounds now (If I load this correctly)
Plays with quicktime I think. |
|
| Logged |
|
|
| |
Reply: 134 - 294 |
|
|
| capgun |
| Posted on: Monday, December 8th, 2008, 9:15:22am |
|
|
|
| Nice work Sounds throaty! |
|
| Logged |
|
|
|
Reply: 135 - 294 |
|
|
| Andy |
| Posted on: Monday, December 8th, 2008, 7:32:00pm |
|
|
Official C.O.C Contributor

Gender:  Male Male
Posts: 23604
Posts Per Day: 3.48 |
|
| Very nice indeed. Sounds like it will pop and burble with the best of them. |
Drop me a PM if you would like to be added to the ClubCappo Member Map. More details can be found here.
We now have an official Facebook group as well as a page! See here |
|
| Logged |
|
|
| |
Reply: 136 - 294 |
|
|
| grant4561 |
| Posted on: Tuesday, December 9th, 2008, 12:11:10am |
|
|
Maximum Member
Posts: 1719
Posts Per Day: 0.98 |
|
| The LGD was my test car (very handy now) KOF33 is next, but probably after christmas now. |
|
| Logged |
|
|
| |
Reply: 137 - 294 |
|
|
| grant4561 |
Posted on: Thursday, December 11th, 2008, 1:12:35am
Attachment: image109.jpg - 54.61 KB (543 views) |
|
|
Maximum Member
Posts: 1719
Posts Per Day: 0.98 |
|
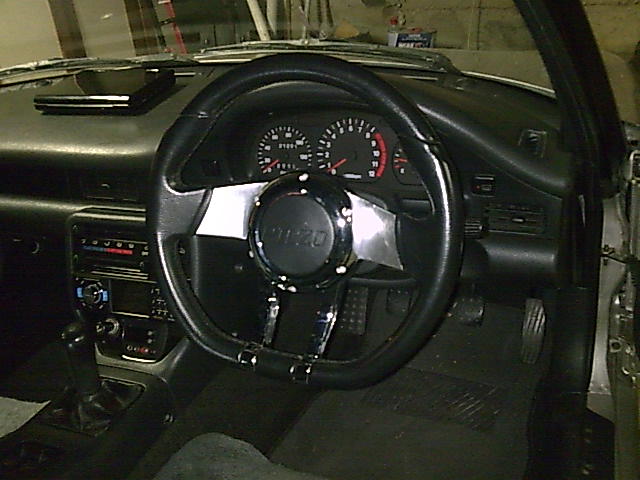
kOFF33 has been sulking a bit now that theres another cappo on the scene but I have managed to do a couple of minor bits & pieces.
Fitted an ENZO leather/chrome steering wheel a couple of weeks ago.
No need for a boss kit I just redrilled the mounting points in the steering wheel to suit as its got a large enough centre boss. |
 |
|
| Logged |
|
|
| |
Reply: 138 - 294 |
|
|
| grant4561 |
Posted on: Thursday, December 11th, 2008, 1:14:35am
Attachment: image110.jpg - 54.44 KB (543 views) |
|
|
Maximum Member
Posts: 1719
Posts Per Day: 0.98 |
|
Also been mucjing around with a 7 inch screen for the Vidigauge. Havent decided where to mount/place it yet as I want to try and conceal it if possible when not in use.
Maybe roof mounted or concealed in the dash, dont know yet still playing. |
 |
|
| Logged |
|
|
| |
Reply: 139 - 294 |
|
|
| grant4561 |
Posted on: Friday, January 2nd, 2009, 9:39:23am
Attachment: image041c.jpg - 41.59 KB (514 views) |
|
|
Maximum Member
Posts: 1719
Posts Per Day: 0.98 |
|
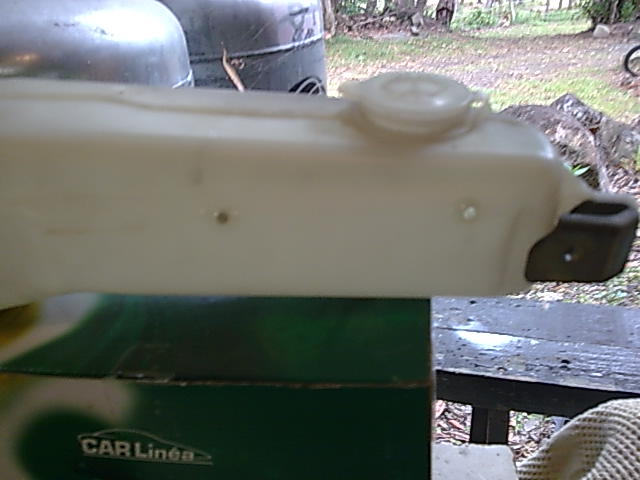
Now I am back on the internet its time for some updates of the fretsive seasons activities.
I always wondered why my windscreen washer bottle was always empty so took it out and found that 2 hole shad been drilled in it when the OZ compliance plate was fitted 
All fixed now with some epoxy. |
 |
|
| Logged |
|
|
| |
Reply: 140 - 294 |
|
|
| grant4561 |
Posted on: Friday, January 2nd, 2009, 9:43:12am
Attachment: image021c.jpg - 68.30 KB (513 views) |
|
|
Maximum Member
Posts: 1719
Posts Per Day: 0.98 |
|
Made a new exhaust from front to back.
The centre cat was nearly blocked when I checked it and its made a huge difference.
Front cat now no cat as well.
As No.1 son was working I had to make a jig to get it all together.
|
 |
|
| Logged |
|
|
| |
Reply: 141 - 294 |
|
|
| grant4561 |
Posted on: Friday, January 2nd, 2009, 9:44:29am
Attachment: image023c.jpg - 67.40 KB (513 views) |
|
|
Maximum Member
Posts: 1719
Posts Per Day: 0.98 |
|
| End view |
 |
|
| Logged |
|
|
| |
Reply: 142 - 294 |
|
|
| grant4561 |
Posted on: Friday, January 2nd, 2009, 9:46:44am
Attachment: image024c.jpg - 83.70 KB (513 views) |
|
|
Maximum Member
Posts: 1719
Posts Per Day: 0.98 |
|
| The Little Green Devil got a new stumpy aerial for christmas about 35cm high. |
 |
|
| Logged |
|
|
| |
Reply: 143 - 294 |
|
|
| grant4561 |
Posted on: Friday, January 2nd, 2009, 9:49:57am
Attachment: image027c.jpg - 57.60 KB (511 views) |
|
|
Maximum Member
Posts: 1719
Posts Per Day: 0.98 |
|
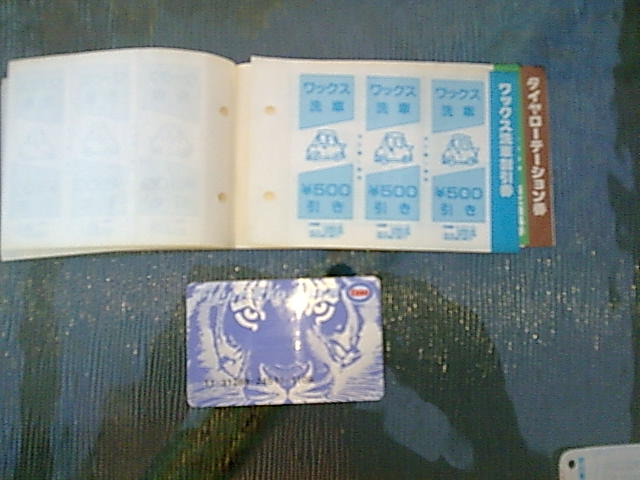
| The LGD also got a full imbolisser alarm central locking system fitted and when we pulled the dash apart we found an original Jap ESSO disount book of some kind with vouchers and a couple of coins. |
 |
|
| Logged |
|
|
| |
Reply: 144 - 294 |
|
|
| grant4561 |
Posted on: Friday, January 2nd, 2009, 9:51:40am
Attachment: image030c.jpg - 49.29 KB (511 views) |
|
|
Maximum Member
Posts: 1719
Posts Per Day: 0.98 |
|
| Another pic of a coupon, could be for smash repairs |
 |
|
| Logged |
|
|
| |
Reply: 145 - 294 |
|
|
| grant4561 |
| Posted on: Friday, January 2nd, 2009, 9:55:50am |
|
|
Maximum Member
Posts: 1719
Posts Per Day: 0.98 |
|
| KOFF33 got all the belts changed including the timing belt. All was fairly easy except for the crank pully bolt. Bastard of a job getting it undone, but I worked out a pretty easy way to lock up the motor so I will post that up in the technical thread. |
|
| Logged |
|
|
| |
Reply: 146 - 294 |
|
|
| grant4561 |
Posted on: Friday, January 2nd, 2009, 9:58:47am
Attachment: image036c.jpg - 56.98 KB (510 views) |
|
|
Maximum Member
Posts: 1719
Posts Per Day: 0.98 |
|
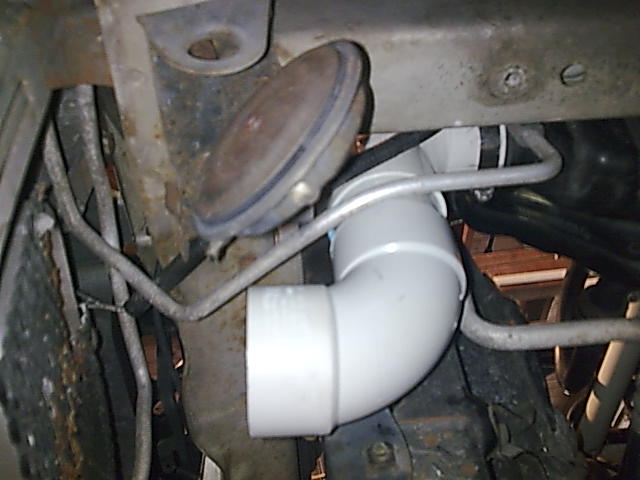
Last but not least I modified KOFF33's air intake and its pretty easy and cheap, just a few plumbing fittings.
Heres a pic from the top with the new intake pipe going down. |
 |
|
| Logged |
|
|
| |
Reply: 147 - 294 |
|
|
| grant4561 |
Posted on: Friday, January 2nd, 2009, 10:02:40am
Attachment: image038c.jpg - 45.31 KB (510 views) |
|
|
Maximum Member
Posts: 1719
Posts Per Day: 0.98 |
|
And from underneath. I have only to decide if I want to modify the underengine cover or keep it original , as all the other mods I have done I have kept the original parts so KOFF33 could be put back to origianl condition  |
 |
|
| Logged |
|
|
| |
Reply: 148 - 294 |
|
|
| grant4561 |
Posted on: Friday, January 2nd, 2009, 10:04:47am
Attachment: image039c.jpg - 37.33 KB (506 views) |
|
|
Maximum Member
Posts: 1719
Posts Per Day: 0.98 |
|
And from the front.
All I have to do now is source a suitable bell mouth inlet. |
 |
|
| Logged |
|
|
| |
Reply: 149 - 294 |
|
|
| grant4561 |
Posted on: Friday, January 2nd, 2009, 10:07:37am
Attachment: image040c.jpg - 39.52 KB (508 views) |
|
|
Maximum Member
Posts: 1719
Posts Per Day: 0.98 |
|
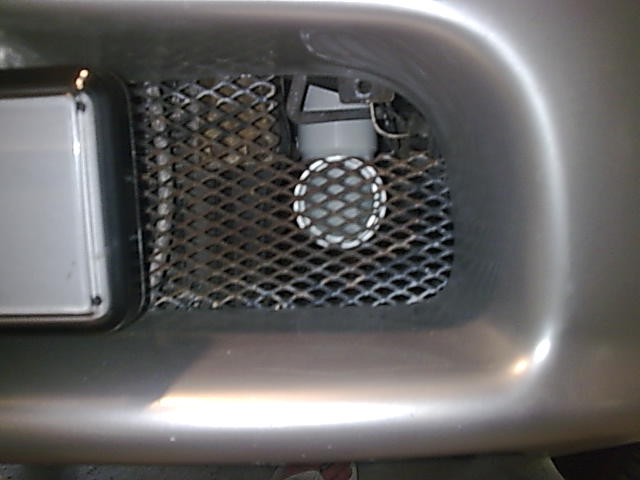
Heres a pic of the fiting and yes its about time I changed the mesh in the grille.  |
 |
|
| Logged |
|
|
| |
Reply: 150 - 294 |
|
|
| Badger |
| Posted on: Friday, January 2nd, 2009, 10:45:25am |
|
|
|
Looks good Grant, Great minds and all that.....Exactly what I used to do mine then, transferred the shape to metal, though I used a 45 at the bottom that's where the K & N Pod Filter attaches. Did same with intercooler piping when installed larger intercooler.....in beginning of Sneaza album I think...??? AHHH, Correct album...different site ...the OTHER PLACE....
|
Last modified Friday, January 2nd, 2009, 4:58:05pm by Badger |
|
| Logged |
|
|
|
Reply: 151 - 294 |
|
|
| capgun |
| Posted on: Friday, January 2nd, 2009, 3:24:10pm |
|
|
|
| I've done that eaxt same mod to the intake Grant but be aware - if you're using a pod filter on the end of it water gets into the engine! I had it happen to me and the car stalled while I was driving on the freeway! (talk about lucky though!). Your steering wheel looks like an almost exact replica of the Issota one I bought last year for Silvery too! |
|
| Logged |
|
|
|
Reply: 152 - 294 |
|
|
| grant4561 |
| Posted on: Saturday, January 3rd, 2009, 12:05:38am |
|
|
Maximum Member
Posts: 1719
Posts Per Day: 0.98 |
|
| Fitted a Wesfil panel air filter in the standard box which has lower pressure drop across it than the standard cappo air filter and drilled an extra drain hole at the lowest point in the bottom of the box. The standard drain hole in the filter box is not at the lowest point so would let water build up in there. |
|
| Logged |
|
|
| |
Reply: 153 - 294 |
|
|
| capgun |
| Posted on: Saturday, January 3rd, 2009, 6:13:51am |
|
|
|
| I didn't notice you had the airbox still! (Should be fine then!) |
|
| Logged |
|
|
|
Reply: 154 - 294 |
|
|
| grant4561 |
Posted on: Monday, January 12th, 2009, 7:46:57am
Attachment: imagek043.jpg - 78.51 KB (436 views) |
|
|
Maximum Member
Posts: 1719
Posts Per Day: 0.98 |
|
| Fitted a Knock Sensor and wired it into the Adaptronic over the weekend. set up was a breeze thanks to the program flixdien (Don) wrote. Its a common Nissan one that fits a heaps of different models 180, 200, 300Zx, etc. Hopefully my new analogue TPS will arrive this week. |
 |
|
| Logged |
|
|
| |
Reply: 155 - 294 |
|
|
| grant4561 |
Posted on: Monday, January 12th, 2009, 7:50:39am
Attachment: images046.jpg - 63.85 KB (435 views) |
|
|
Maximum Member
Posts: 1719
Posts Per Day: 0.98 |
|
Also decided to change the steering wheel as it seems to be too common a wheel on cappo's here in OZ
Also made the wife much happier again as I fitted it on the CRX for her.
Fitted this one an Autotechnica leather with extra horn buttons built into the thumb grips which I will probably wire up for some other purposes yet. |
 |
|
| Logged |
|
|
| |
Reply: 156 - 294 |
|
|
| grant4561 |
| Posted on: Monday, January 12th, 2009, 7:51:20am |
|
|
Maximum Member
Posts: 1719
Posts Per Day: 0.98 |
|
| Oh yeah KOF33 got a new SAS chrome gear knob for X-Mas also. |
|
| Logged |
|
|
| |
Reply: 157 - 294 |
|
|
| grant4561 |
Posted on: Monday, January 12th, 2009, 7:52:37am
Attachment: imagel047.jpg - 64.55 KB (433 views) |
|
|
Maximum Member
Posts: 1719
Posts Per Day: 0.98 |
|
| Had to keep the Little Green Devil happy as well so we fitted some Pioneer 4 way speaker pods off the seat belt bolts above the parcel shelf. |
 |
|
| Logged |
|
|
| |
Reply: 158 - 294 |
|
|
| Chernoby1 |
| Posted on: Monday, January 12th, 2009, 6:30:27pm |
|
|
|
“ |
Quoted from grant4561, posted Monday, January 12th, 2009, 7:46:57am at here |
” |
Fitted a Knock Sensor and wired it into the Adaptronic over the weekend. set up was a breeze thanks to the program flixdien (Don) wrote. Its a common Nissan one that fits a heaps of different models 180, 200, 300Zx, etc. Hopefully my new analogue TPS will arrive this week.
|
|
Good stuff with the knock sensor! Just wondering if there is any difference between a 'used' and new knock sensor? Also, who/where did you order the TPS from? ive been browsing around, but couldnt find anything compatible with the cappa :<
|
|
| Logged |
|
|
|
Reply: 159 - 294 |
|
|
|
 Cappuccino Owners Club › Gallery › Cappo Related Album › KOF 33 Mod's (Moderators: )


 Locked Board