|
|
 Author Author |
 KOF 33 Mod's (currently 6598 views) KOF 33 Mod's (currently 6598 views) |
| Andy |
| Posted on: Sunday, March 9th, 2008, 1:45:54pm |
  |
|
Official C.O.C Contributor


Gender:  Male Male
Posts: 23604
Posts Per Day: 3.48 |
|
| Very nice indeed! How does adding the breather filter change the sound of the ABV? |
Drop me a PM if you would like to be added to the ClubCappo Member Map. More details can be found here.
We now have an official Facebook group as well as a page! See here |
|
 Logged Logged |
|
|
  |
Reply: 40 - 294 |
|
|
| grant4561 |
| Posted on: Sunday, March 9th, 2008, 11:59:05pm |
|
|
Maximum Member
Posts: 1719
Posts Per Day: 0.98 |
|
| Makes quite a loud sort of "whoosh" sound. Could get annoying, but its obviously easy to put on or off. |
|
| Logged |
|
|
| |
Reply: 41 - 294 |
|
|
| Andy |
| Posted on: Monday, March 10th, 2008, 12:08:11am |
|
|
Official C.O.C Contributor
Gender: Male
Posts: 23604
Posts Per Day: 3.48 |
|
| But does adding the breather change the sound much? I already have the pipe disconnected and just wondered if the filter makes much of a difference. |
Drop me a PM if you would like to be added to the ClubCappo Member Map. More details can be found here.
We now have an official Facebook group as well as a page! See here |
|
| Logged |
|
|
| |
Reply: 42 - 294 |
|
|
| grant4561 |
| Posted on: Monday, March 10th, 2008, 12:27:44am |
|
|
Maximum Member
Posts: 1719
Posts Per Day: 0.98 |
|
| No not really, its about the same. The higher boost pressure makes it louder though. |
|
| Logged |
|
|
| |
Reply: 43 - 294 |
|
|
| Andy |
| Posted on: Monday, March 10th, 2008, 12:44:49am |
|
|
Official C.O.C Contributor
Gender: Male
Posts: 23604
Posts Per Day: 3.48 |
|
| One thing to watch is that it doesn't fill the fliter and then drip it onto the turbo. |
Drop me a PM if you would like to be added to the ClubCappo Member Map. More details can be found here.
We now have an official Facebook group as well as a page! See here |
|
| Logged |
|
|
| |
Reply: 44 - 294 |
|
|
| grant4561 |
| Posted on: Monday, March 10th, 2008, 4:24:49am |
|
|
Maximum Member
Posts: 1719
Posts Per Day: 0.98 |
|
| Just a regular maintenance issue I suppose, but it will keep any foreign objects from entering the pipe. |
|
| Logged |
|
|
| |
Reply: 45 - 294 |
|
|
| grant4561 |
| Posted on: Monday, March 17th, 2008, 12:16:26am |
|
|
Maximum Member
Posts: 1719
Posts Per Day: 0.98 |
|
Finally got around to connecting the rising rate fuel pressure regulator over the weekend.
At standard fuel pressure it was starting to lean out around the 16 PSI mark but with the fuel regulator I took it up to about 18PSI with no problems.
Also upped the standard fuel pressure from 32 PSI to 40 PSI for better atomisation. |
|
| Logged |
|
|
| |
Reply: 46 - 294 |
|
|
| capgun |
| Posted on: Monday, March 17th, 2008, 3:20:05am |
|
|
|
Sounds like it is going really well  |
|
| Logged |
|
|
|
Reply: 47 - 294 |
|
|
| grant4561 |
| Posted on: Monday, March 17th, 2008, 7:09:49am |
|
|
Maximum Member
Posts: 1719
Posts Per Day: 0.98 |
|
Yep, quite a big difference now in HP.
Should have mentioned that when setting up the fuel pressure regulator I raised the standard pressure (just to see what it would do) in steps until it was 45 to 46 PSI and it started to run rich. The fuel injectors hit their minimum duty cycle so I backed the pressure of to 40 PSI. |
|
| Logged |
|
|
| |
Reply: 48 - 294 |
|
|
| capgun |
| Posted on: Monday, March 17th, 2008, 4:43:53pm |
|
|
|
I took mine down the quarter with a slipping clutch and it did low 17's  Still beat a 'done up' kombivan with a WRX motor in it though! Still beat a 'done up' kombivan with a WRX motor in it though! |
|
| Logged |
|
|
|
Reply: 49 - 294 |
|
|
| grant4561 |
Posted on: Monday, April 14th, 2008, 11:20:22am
 Attachment: dsc01673c.jpg - 53.12 KB (703 views) Attachment: dsc01673c.jpg - 53.12 KB (703 views) |
|
|
Maximum Member
Posts: 1719
Posts Per Day: 0.98 |
|
Been a bit slack lately on the web site as I have been on holidays but managed to spend a bit of time working a few things out on KOF33.
Done some interior mods which I will post when I've finished.
Thought I would work out the best position for an oil catch can. Heres the one I selected.
|
 |
|
| Logged |
|
|
| |
Reply: 50 - 294 |
|
|
| grant4561 |
Posted on: Monday, April 14th, 2008, 11:25:59am
Attachment: dsc01674c.jpg - 68.33 KB (702 views) |
|
|
Maximum Member
Posts: 1719
Posts Per Day: 0.98 |
|
Relocated the radiator overflow bottle to where the anti polution canister was and fitted the oil catch can in its original position.
Fabricated a bracket that bolted on to the existing bracket on the cross member that holds the radiator hose.
Just got to run the lines now to connect it up.
Heres a photo from the passemger side.
|
 |
|
| Logged |
|
|
| |
Reply: 51 - 294 |
|
|
| grant4561 |
Posted on: Monday, April 14th, 2008, 11:31:21am
Attachment: dsc01675c.jpg - 65.52 KB (702 views) |
|
|
Maximum Member
Posts: 1719
Posts Per Day: 0.98 |
|
Hers another one from the drivers side.
Oh yeh the pastic bottle where the old air intake pipe was is for water/metho injection when I get around to it and yes there are a few bits zipped tied in but brackets will be made to suit.
I have only had to drill holes inside the doors so far for central locking. |
 |
|
| Logged |
|
|
| |
Reply: 52 - 294 |
|
|
| capgun |
| Posted on: Monday, April 14th, 2008, 11:46:28am |
|
|
|
| Nice and neat Grant The ones with the liquid 'level' on the side look good. |
|
| Logged |
|
|
|
Reply: 53 - 294 |
|
|
| grant4561 |
| Posted on: Monday, April 14th, 2008, 12:12:03pm |
|
|
Maximum Member
Posts: 1719
Posts Per Day: 0.98 |
|
Not quite neat enough yet
I've just placed things to see how they fit. |
|
| Logged |
|
|
| |
Reply: 54 - 294 |
|
|
| grant4561 |
Posted on: Sunday, April 27th, 2008, 12:39:24pm
Attachment: dsc01681b.jpg - 115.61 KB (652 views) |
|
|
Maximum Member
Posts: 1719
Posts Per Day: 0.98 |
|
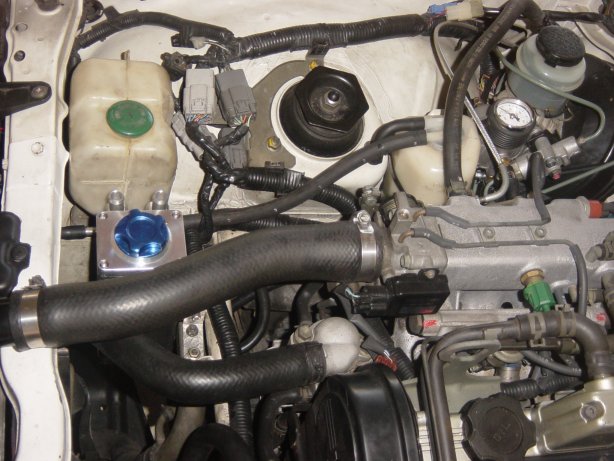
Ok I have the engine bay sorted now and s/steel brackets fitted to hold things in place.
New rising rate fuel pressure regulator as well in matching blue colour.
Why blue, because there are a lot more blue bits available. Oh yeh added a s/steel braided line on the right rocker cover as well.
|
 |
|
| Logged |
|
|
| |
Reply: 55 - 294 |
|
|
| grant4561 |
Posted on: Sunday, April 27th, 2008, 12:40:37pm
Attachment: dsc01682b.jpg - 156.15 KB (655 views) |
|
|
Maximum Member
Posts: 1719
Posts Per Day: 0.98 |
|
| Top view. |
 |
|
| Logged |
|
|
| |
Reply: 56 - 294 |
|
|
| chriskiejda |
| Posted on: Monday, April 28th, 2008, 9:25:11am |
|
|
|
looks good grant, but not so sure on the chromey bits  |
|
| Logged |
|
|
|
Reply: 57 - 294 |
|
|
| capgun |
| Posted on: Monday, April 28th, 2008, 11:38:41am |
|
|
|
| Everyone loves chrome (except Jaik!). |
|
| Logged |
|
|
|
Reply: 58 - 294 |
|
|
| ThePorko |
| Posted on: Monday, April 28th, 2008, 11:42:47am |
|
|
|
cg you can add me to that list jdm style tuning FTW
Car is looking good grant! |
|
| Logged |
|
|
|
Reply: 59 - 294 |
|
|
| grant4561 |
| Posted on: Tuesday, April 29th, 2008, 1:05:54am |
|
|
Maximum Member
Posts: 1719
Posts Per Day: 0.98 |
|
I dont mind the chrome and it saves a bit of room rather than running rubber hoses everywhere.
Its easier to bend the pipe to fit in quite neatly. Better than black pipe. |
|
| Logged |
|
|
| |
Reply: 60 - 294 |
|
|
| capgun |
| Posted on: Tuesday, April 29th, 2008, 4:46:18am |
|
|
|
| Chrome pipe replacing all the black pipe would look nice! |
|
| Logged |
|
|
|
Reply: 61 - 294 |
|
|
| ThePorko |
| Posted on: Tuesday, April 29th, 2008, 5:56:16am |
|
|
|
| I personally dont mind chrome in the engine, like cj said chrome intercooler pipes will look pretty shmick. |
|
| Logged |
|
|
|
Reply: 62 - 294 |
|
|
| grant4561 |
| Posted on: Tuesday, April 29th, 2008, 6:18:13am |
|
|
Maximum Member
Posts: 1719
Posts Per Day: 0.98 |
|
| Only the start, as I work on different areas I will be updating to the blue & chrome thing around the engine. |
|
| Logged |
|
|
| |
Reply: 63 - 294 |
|
|
| Badger |
| Posted on: Tuesday, April 29th, 2008, 8:44:24am |
|
|
|
| Looking good grant4561, Nowt wrong with a bit of Bling....just look at dave660's bay....yeh baby. Blue and Chrome.....hmmm, where have I seen that recently...lol. If they made the stuff in Orange, that would do me, but tell me, what is the 'Rising rate Fuel Press. reg.' for...??? completely ignorant with this kind of stuff and what is the extra bottle for, with the Green cap...??? |
|
| Logged |
|
|
|
Reply: 64 - 294 |
|
|
| grant4561 |
| Posted on: Wednesday, April 30th, 2008, 12:28:35am |
|
|
Maximum Member
Posts: 1719
Posts Per Day: 0.98 |
|
The rising rate fuel pressure regulator allopws me to increase boost safely up to around 18 to 20 PSI if the standard turbo will handle that much. (Already tested it to 18 PSI and had more in it)
They come in different ratios with the one I fitted being 1:1.
What this means is that I can set a normal fuel pressure which I have increased slightly over the standard 32 PSI to 38 PSI and as the boost cuts in it increases the fuel pressure over standard at a rate of 1:1. Say standard fuel pressure is set at 38 PSi at 1 PSI boost it will be 32 +1 = 39, at 2 PSi boost it will be 40 PSi, etc.
This gives better atomisation by the injectors and will prevent high boost lean out conditions occuring.
The small container added with the green cap on it is for Water/Metho injection which I have not connected as yet. The black turbo hoses from the intercooler will be replaced and the injection nozzle assembley fitted in them when I get around to it. I figure the Cappo intercooled is only good at higher speeds when it can get reasonable airflow over it and not at lower speeds. The water/metho injection will overcome this and I might even flkick the intercooler once I am happy with how its going. Water/metho injection has a positive effect at any speed or air temperatures. |
|
| Logged |
|
|
| |
Reply: 65 - 294 |
|
|
| grant4561 |
Posted on: Monday, June 2nd, 2008, 10:02:29am
Attachment: image015_small.jpg - 43.72 KB (544 views) |
|
|
Maximum Member
Posts: 1719
Posts Per Day: 0.98 |
|
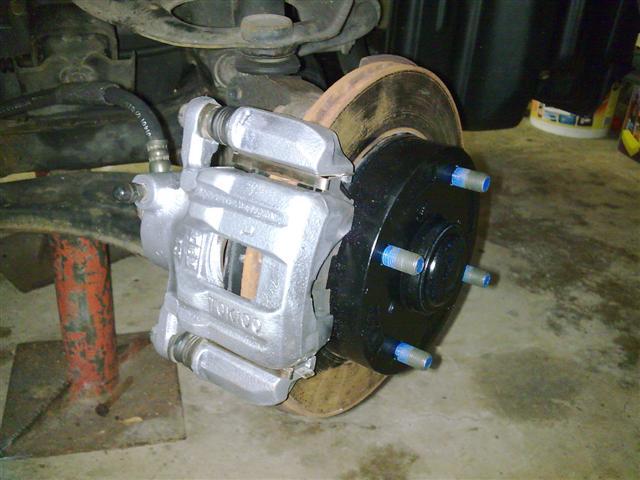
While you guys were on your "Fun drive in Sudney" I have been buy replacing all the brake pads.
Cleaned a heap of other bits up min the process and have refurbished the calipers silver.
Heres the back. |
 |
|
| Logged |
|
|
| |
Reply: 66 - 294 |
|
|
| grant4561 |
Posted on: Monday, June 2nd, 2008, 10:04:24am
Attachment: image017_small.jpg - 50.08 KB (545 views) |
|
|
Maximum Member
Posts: 1719
Posts Per Day: 0.98 |
|
| Heres the front. |
 |
|
| Logged |
|
|
| |
Reply: 67 - 294 |
|
|
| Badger |
| Posted on: Monday, June 2nd, 2008, 10:53:50am |
|
|
|
| Looks good. What kind of paint...??? brush/spray...??? Next on my list of things to do, just have to find the right colour......Not Red, Blue, Yellow etc....Silver won't work with my rims either. |
|
| Logged |
|
|
|
Reply: 68 - 294 |
|
|
| Andy |
| Posted on: Monday, June 2nd, 2008, 12:19:31pm |
|
|
Official C.O.C Contributor
Gender: Male
Posts: 23604
Posts Per Day: 3.48 |
|
Very nice - just like mine   |
Drop me a PM if you would like to be added to the ClubCappo Member Map. More details can be found here.
We now have an official Facebook group as well as a page! See here |
|
| Logged |
|
|
| |
Reply: 69 - 294 |
|
|
| grant4561 |
| Posted on: Tuesday, June 3rd, 2008, 1:24:47am |
|
|
Maximum Member
Posts: 1719
Posts Per Day: 0.98 |
|
| The paint was Septone "Chrome" enamel spray paint. Not quite chrome but still pretty shiny. |
|
| Logged |
|
|
| |
Reply: 70 - 294 |
|
|
| grant4561 |
Posted on: Sunday, June 8th, 2008, 10:07:23am
Attachment: image021_small.jpg - 47.47 KB (491 views) |
|
|
Maximum Member
Posts: 1719
Posts Per Day: 0.98 |
|
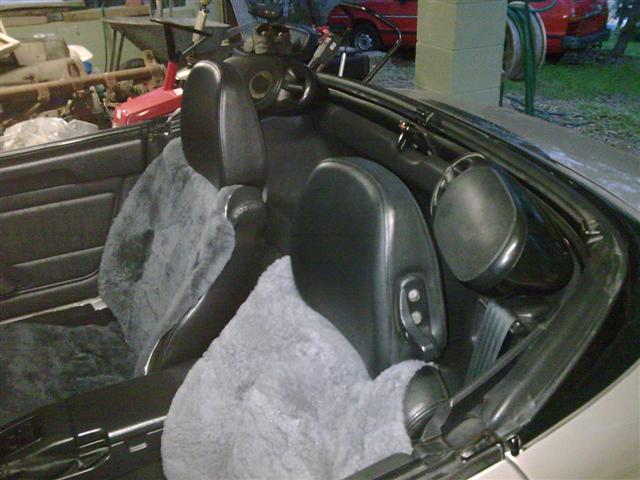
Upgrade the sound system now. About the best I can do without going crazy with modifing body parts.
Sony 4 way 6 1/2 inch 4 way front speakers.
4 inch 2 way splits, kevlar speakers with silk dome tweeters in the the rear.
Found some Kenwood speaker enclosures at a second hand place and ripped the guts out and repainted them and fitted the kevlar speakers.
Mounted on brackets off the seat belt bolts behind the seats. Quite amazing sound for relatively standard speakers. |
 |
|
| Logged |
|
|
| |
Reply: 71 - 294 |
|
|
| grant4561 |
Posted on: Sunday, June 8th, 2008, 10:08:48am
Attachment: image025_small.jpg - 52.90 KB (490 views) |
|
|
Maximum Member
Posts: 1719
Posts Per Day: 0.98 |
|
| Another one |
 |
|
| Logged |
|
|
| |
Reply: 72 - 294 |
|
|
| capgun |
| Posted on: Sunday, June 8th, 2008, 10:16:55am |
|
|
|
| They look almost factory, very nice |
|
| Logged |
|
|
|
Reply: 73 - 294 |
|
|
| grant4561 |
Posted on: Tuesday, July 22nd, 2008, 5:03:48am
Attachment: image022.jpg - 37.48 KB (450 views) |
|
|
Maximum Member
Posts: 1719
Posts Per Day: 0.98 |
|
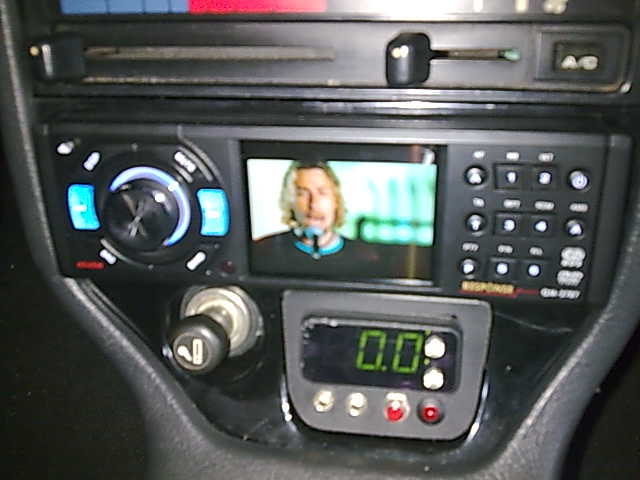
| Have a new DVD multi media player fitted now Response brand (JVC) from jaycar. it plays pretty well all types of media and has heaps of inputs & outputs and is digital radio ready. Apart from the screen being suprisingly clear the sound is amazing compared to the Pioneer CD player I had fitted before. I think it is a Digital unit by the clarity. |
 |
|
| Logged |
|
|
| |
Reply: 74 - 294 |
|
|
| grant4561 |
Posted on: Tuesday, July 22nd, 2008, 5:08:55am
Attachment: image019.jpg - 34.81 KB (448 views) |
|
|
Maximum Member
Posts: 1719
Posts Per Day: 0.98 |
|
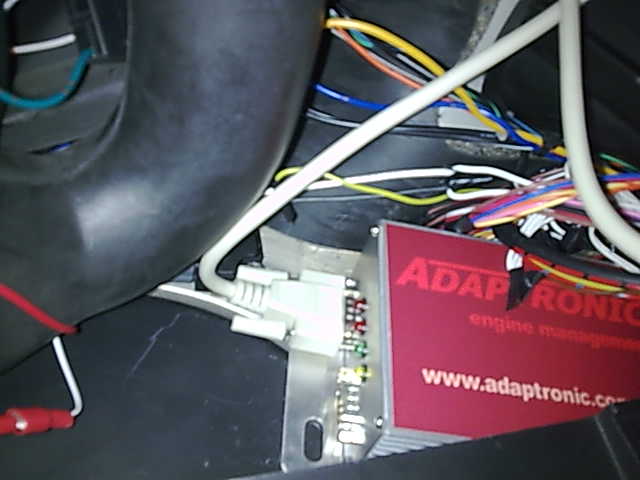
| As you may also be aware I now have the "Worlds First" Adaptronic ECU powered Cappuccino. |
 |
|
| Logged |
|
|
| |
Reply: 75 - 294 |
|
|
| grant4561 |
Posted on: Tuesday, July 22nd, 2008, 5:11:35am
Attachment: image029.jpg - 31.35 KB (447 views) |
|
|
Maximum Member
Posts: 1719
Posts Per Day: 0.98 |
|
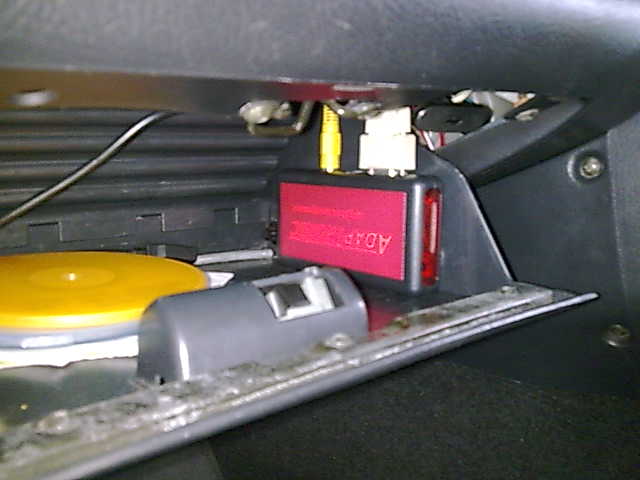
| Have now fitted the Adaptronic Vidigauge unit with velcro in the glovebox. Gives easy access to the serial cable and for operation/setting with its IR control. |
 |
|
| Logged |
|
|
| |
Reply: 76 - 294 |
|
|
| grant4561 |
Posted on: Tuesday, July 22nd, 2008, 5:14:54am
Attachment: image025.jpg - 20.24 KB (447 views) |
|
|
Maximum Member
Posts: 1719
Posts Per Day: 0.98 |
|
There are about seventeen different gauges you can pick from to display including speedo in km/hr. Up to seven can be displayed at once. This pick has three gauges up being MAP pressure, Air Fuel Ratio and Fuel Injector duty cycle in %.
The picture is pretty poor quality (got to practice more) as in reality it is extremely clear and easy to read. You could have a Cappuccino with a digital dash exept for fuel gauge and odometer. |
 |
|
| Logged |
|
|
| |
Reply: 77 - 294 |
|
|
| Andy |
| Posted on: Tuesday, July 22nd, 2008, 9:09:11am |
|
|
Official C.O.C Contributor
Gender: Male
Posts: 23604
Posts Per Day: 3.48 |
|
|
Drop me a PM if you would like to be added to the ClubCappo Member Map. More details can be found here.
We now have an official Facebook group as well as a page! See here |
|
| Logged |
|
|
| |
Reply: 78 - 294 |
|
|
| capgun |
| Posted on: Tuesday, July 22nd, 2008, 10:44:12am |
|
|
|
| Looks good Grant |
|
| Logged |
|
|
|
Reply: 79 - 294 |
|
|
|
 Cappuccino Owners Club › Gallery › Cappo Related Album › KOF 33 Mod's (Moderators: )


 Locked Board