 |
Pages: « 1, 2, 3, 4, 5, 6, 7, 8, 9, 10, 11, 12, 13 ... » |
  |
|
 Author Author |
 Sneaza 2...The RED One (currently 9731 views) Sneaza 2...The RED One (currently 9731 views) |
| Badger |
Posted on: Saturday, March 26th, 2011, 12:21:57pm
 Attachment: 100_2262.jpg - 40.10 KB (631 views) Attachment: 100_2262.jpg - 40.10 KB (631 views) |
  |
|
|
| Arches attached.......PERFECT.....now, because I removed that bit, which Joined the Inner and Outer Skins together at that point, it felt very flimsy, but when I attached the Arch, seemed to get the Strength back. I will need to remove the Arch again so I can Fibreglass over the Gap........ |
 |
|
 Logged Logged |
|
|
 |
Reply: 240 - 504 |
|
|
| Badger |
Posted on: Saturday, March 26th, 2011, 12:23:54pm
Attachment: 100_2261.jpg - 49.33 KB (632 views) |
|
|
|
| The Gap between the Lower Rear and Front Lips and Bottom of the Arches will be filled and smoothed so as to look like One piece.....similar to those on Georges' Cappo......... |
 |
Last modified Sunday, March 27th, 2011, 2:47:50am by Badger |
|
| Logged |
|
|
|
Reply: 241 - 504 |
|
|
| Badger |
Posted on: Saturday, March 26th, 2011, 12:26:33pm
Attachment: 100_2264.jpg - 34.87 KB (628 views) |
|
|
|
Here is the Gap as mentioned.....where the Inner and Outer now DON'T join and the Arch Lip.......this will be 'Glassed closed then will attach the Arch, then will glass from the Lip of the Arch to the Body....should be smoooooove   |
 |
Last modified Saturday, March 26th, 2011, 12:28:01pm by Badger |
|
| Logged |
|
|
|
Reply: 242 - 504 |
|
|
| Badger |
Posted on: Saturday, March 26th, 2011, 12:30:02pm
Attachment: 100_2263.jpg - 44.69 KB (626 views) |
|
|
|
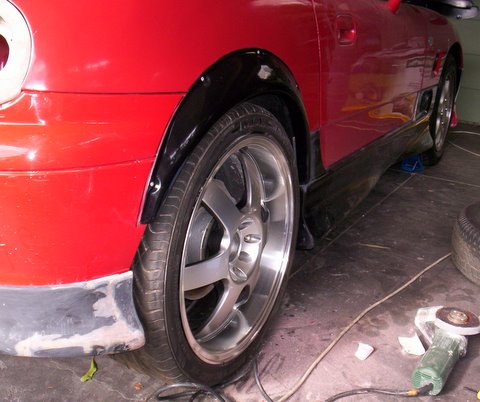
and now have enough Clearance for the tyres without rubbing, especially as this one is LOWER than Sneaza......  That's it for now..... That's it for now.....  |
 |
Last modified Friday, April 1st, 2011, 3:25:30am by Badger |
|
| Logged |
|
|
|
Reply: 243 - 504 |
|
|
| lord |
| Posted on: Saturday, March 26th, 2011, 12:49:51pm |
|
|
|
| this ones gonna be class.... I can tell! |
|
| Logged |
|
|
|
Reply: 244 - 504 |
|
|
| Badger |
Posted on: Sunday, March 27th, 2011, 4:37:34am
Attachment: 100_2265.jpg - 39.73 KB (603 views) |
|
|
|
Ha Ha, Cheers mate...doin' my best
So, NO WORK TODAY.......1st time since...............Can't remember that far back...lol, any way, got the Bodykit on and decided to bring it into the Light for better pics..... |
 |
|
| Logged |
|
|
|
Reply: 245 - 504 |
|
|
| Badger |
Posted on: Sunday, March 27th, 2011, 4:38:05am
Attachment: 100_2266.jpg - 29.89 KB (601 views) |
|
|
|
| Next..... |
 |
|
| Logged |
|
|
|
Reply: 246 - 504 |
|
|
| Badger |
Posted on: Sunday, March 27th, 2011, 4:39:25am
Attachment: 100_2267.jpg - 30.69 KB (599 views) |
|
|
|
| Nothing new about this Kit....except for the bits I will MODIFY....... |
 |
|
| Logged |
|
|
|
Reply: 247 - 504 |
|
|
| Badger |
Posted on: Sunday, March 27th, 2011, 4:41:25am
Attachment: 100_2268.jpg - 46.69 KB (597 views) |
|
|
|
| Need to cut down the Front Lip before I can mold in the Driving lights..... |
 |
|
| Logged |
|
|
|
Reply: 248 - 504 |
|
|
| Badger |
Posted on: Sunday, March 27th, 2011, 4:44:58am
Attachment: 100_2269.jpg - 31.79 KB (598 views) |
|
|
|
And then attack the 'Taped Area'.......Cut out the Vents in the 'Bulge' then the Bonnet for ventilation...obviously, then add NEW Washer Jets  . Now back to Sanding the Kit so I can attach the Fibreglass........... . Now back to Sanding the Kit so I can attach the Fibreglass...........  |
 |
|
| Logged |
|
|
|
Reply: 249 - 504 |
|
|
| Streeter |
| Posted on: Sunday, March 27th, 2011, 2:27:21pm |
|
|
|
Just did the same to my car today! *when you cut the inner and outer layers away from each other its usually best to tack them back together (with a welder) so give the fender some strength.
|
|
| Logged |
|
|
|
Reply: 250 - 504 |
|
|
| ggutnik |
| Posted on: Sunday, March 27th, 2011, 2:38:58pm |
|
|
|
| Sneaza where did you get the lip from? Looks awesome! |
|
| Logged |
|
|
|
Reply: 251 - 504 |
|
|
| Badger |
| Posted on: Sunday, March 27th, 2011, 10:56:16pm |
|
|
|
Streeter, Have you got pics up of yours yet...??? Hear what you're saying, but as I Cant weld, closest thing to welding for me is Pop Rivets followed by Fibreglass...lol.
GGutnick, 2nd hand from Yahoo Japan. I did make a mold of it, which is why it looks like it does...as I said earlier, but have yet to use the mold to make one as I'm trying to finish other things first. |
Last modified Sunday, March 27th, 2011, 10:58:06pm by Badger |
|
| Logged |
|
|
|
Reply: 252 - 504 |
|
|
| Badger |
Posted on: Tuesday, April 12th, 2011, 4:57:02am
Attachment: 100_2270.jpg - 49.42 KB (537 views) |
|
|
|
| Finally got around to Fibreglassing it on...Drivers Rear |
 |
|
| Logged |
|
|
|
Reply: 253 - 504 |
|
|
| Badger |
Posted on: Tuesday, April 12th, 2011, 4:57:43am
Attachment: 100_2271.jpg - 46.06 KB (535 views) |
|
|
|
| Drivers Front..... |
 |
|
| Logged |
|
|
|
Reply: 254 - 504 |
|
|
| Badger |
Posted on: Tuesday, April 12th, 2011, 4:58:20am
Attachment: 100_2272.jpg - 42.80 KB (536 views) |
|
|
|
| Pass. Front..... |
 |
|
| Logged |
|
|
|
Reply: 255 - 504 |
|
|
| Badger |
Posted on: Tuesday, April 12th, 2011, 4:59:16am
Attachment: 100_2273.jpg - 44.92 KB (533 views) |
|
|
|
| ....and Pass. Rear...Modifications and a LOT of sanding next..... |
 |
|
| Logged |
|
|
|
Reply: 256 - 504 |
|
|
| Streeter |
| Posted on: Tuesday, April 12th, 2011, 5:13:30am |
|
|
|
“ |
Quoted from Badger, posted Sunday, March 27th, 2011, 10:56:16pm at here |
” |
Streeter, Have you got pics up of yours yet...??? Hear what you're saying, but as I Cant weld, closest thing to welding for me is Pop Rivets followed by Fibreglass...lol.
GGutnick, 2nd hand from Yahoo Japan. I did make a mold of it, which is why it looks like it does...as I said earlier, but have yet to use the mold to make one as I'm trying to finish other things first.
|
|
Im slack with pics and keen to just get it done. pop rivets to hold the metal together will be fine. The welding can only be small tacks anyway as the metal is so light and also being moved up the line up of the 2 peices isnt perfect any more.
I just thought it was only a FRP fender on top keeping rigidity which might not be enough if some one leans on the wrong spot. If you have pop riveted it in a few places it will be fine
|
|
| Logged |
|
|
|
Reply: 257 - 504 |
|
|
| Badger |
| Posted on: Tuesday, April 12th, 2011, 5:26:07am |
|
|
|
Each one of the Cuts I made has a Rivet through BOTH Inner and Outer Pieces, then Trimmed the edge, Sanded under the Body Arch/Tub/Wheel Well....
Then Completely Fibreglassed the area....Also Glassed over the Cuts before attaching the Arch, then, Attached the Arch, then Fibreglassed that Underneath to the Body just mentioned, then the Top that you can see in the Pics.
There aint no way to bend it...lol
Just have to wait till I'm on Holidays in a couple of weeks to sand smooth and Fill any areas with filler....BEFORE making the Cuts so that they are seperate and can remove Bumpers and Sideskirts to finish them properly off the car, then ready for paint. |
|
| Logged |
|
|
|
Reply: 258 - 504 |
|
|
| capgun |
| Posted on: Wednesday, April 13th, 2011, 5:00:49am |
|
|
|
| It definately looks the part now Like how you've FGlassed the flares on |
|
| Logged |
|
|
|
Reply: 259 - 504 |
|
|
| Badger |
| Posted on: Wednesday, April 13th, 2011, 7:25:19am |
|
|
|
| Cheers CG, it's getting there.......... |
|
| Logged |
|
|
|
Reply: 260 - 504 |
|
|
| evening_kids |
| Posted on: Sunday, April 17th, 2011, 3:40:35pm |
|
|
|
|
| Logged |
|
|
|
Reply: 261 - 504 |
|
|
| Badger |
Posted on: Monday, April 18th, 2011, 6:43:29am
Attachment: 100_2275.jpg - 47.33 KB (439 views) |
|
|
|
| Thanx evening-kids, Sun was out and decided not to wait for Holidays, so made a start........Sanded down the Fibreglass, applied the Filler to Drivers Side Front and Rear |
 |
|
| Logged |
|
|
|
Reply: 262 - 504 |
|
|
| Badger |
Posted on: Monday, April 18th, 2011, 6:45:04am
Attachment: 100_2274.jpg - 45.38 KB (433 views) |
|
|
|
| Needed to Prime it so I could see the Lines properly..........Now I can see any imperfections/Highs/Lows etc......... |
 |
Last modified Monday, April 18th, 2011, 6:45:26am by Badger |
|
| Logged |
|
|
|
Reply: 263 - 504 |
|
|
| Badger |
Posted on: Monday, April 18th, 2011, 6:49:01am
Attachment: 100_2276.jpg - 43.23 KB (430 views) |
|
|
|
......and there are a few as you can see, but getting the Line correct and flowing is important, which is why I need to ADD to the Rear a little to form the Curves and get the Arch 'Thickness' correct, but it's getting there and I am pleased so far.
Fibreglassing the space for the Reverse Light is next, while I'm waiting............ |
 |
Last modified Monday, April 18th, 2011, 6:50:14am by Badger |
|
| Logged |
|
|
|
Reply: 264 - 504 |
|
|
| mitogeri |
| Posted on: Saturday, April 23rd, 2011, 12:04:41pm |
|
|
Big Member

Posts: 192
Posts Per Day: 0.12 |
|
| I hope you won`t have to take the rear bumper down anytime soon That would be a real pain now! |
|
| Logged |
|
|
 |
Reply: 265 - 504 |
|
|
| ggutnik |
| Posted on: Saturday, April 23rd, 2011, 2:15:40pm |
|
|
|
Sweet mother of god, that looks fantastic!!
It looks more OEM than i could of believed, im amazed by your skills!!! |
|
| Logged |
|
|
|
Reply: 266 - 504 |
|
|
| Badger |
| Posted on: Sunday, April 24th, 2011, 7:07:27am |
|
|
|
Mitogeri, By doing it this way, I will get the 'Lines and Spaces' perfect, then, make the Cuts to remove the Parts.........to finish them OFF THE CAR.......
Car wont be driven anywhere until it's ready for Paint.
ggutnik, thanx a lot. |
|
| Logged |
|
|
|
Reply: 267 - 504 |
|
|
| Badger |
Posted on: Sunday, April 24th, 2011, 7:19:28am
Attachment: 100_2277.jpg - 51.51 KB (385 views) |
|
|
|
| Changed the Lines......... |
 |
|
| Logged |
|
|
|
Reply: 268 - 504 |
|
|
| Badger |
Posted on: Sunday, April 24th, 2011, 7:20:14am
Attachment: 100_2281.jpg - 45.35 KB (385 views) |
|
|
|
| From behind......... |
 |
|
| Logged |
|
|
|
Reply: 269 - 504 |
|
|
| Badger |
Posted on: Sunday, April 24th, 2011, 7:20:52am
Attachment: 100_2279.jpg - 38.62 KB (383 views) |
|
|
|
| ......and the Front |
 |
|
| Logged |
|
|
|
Reply: 270 - 504 |
|
|
| Badger |
Posted on: Sunday, April 24th, 2011, 7:21:33am
Attachment: 100_2280.jpg - 52.68 KB (382 views) |
|
|
|
| More to come.............. |
 |
|
| Logged |
|
|
|
Reply: 271 - 504 |
|
|
| Ricou |
| Posted on: Sunday, April 24th, 2011, 11:37:55am |
|
|
Maximum Member

Posts: 1110
Posts Per Day: 0.65 |
|
I don't like what you're doing with your bonnet, but the wheel arches are looking great I have to say.
Good job ! |
|
| Logged |
|
|
| |
Reply: 272 - 504 |
|
|
| mitogeri |
| Posted on: Sunday, April 24th, 2011, 1:22:28pm |
|
|
Big Member
Posts: 192
Posts Per Day: 0.12 |
|
Alright I see Nice job anyway I really like the rear view
|
|
| Logged |
|
|
| |
Reply: 273 - 504 |
|
|
| tilou |
| Posted on: Sunday, April 24th, 2011, 2:49:52pm |
|
|
|
|
| Logged |
|
|
|
Reply: 274 - 504 |
|
|
| Badger |
Posted on: Saturday, April 30th, 2011, 4:47:31am
Attachment: 100_2283.jpg - 21.23 KB (331 views) |
|
|
|
Thanx Guys....Ricou, not sure yet if I like the Bonnet...lol, will be attaching it to the Spare one and then will make up my mind.
So, got the Drivers side to where I'm happy with it, then made a start on the Front and Rear........... |
 |
|
| Logged |
|
|
|
Reply: 275 - 504 |
|
|
| Badger |
Posted on: Saturday, April 30th, 2011, 4:48:27am
Attachment: 100_2284.jpg - 19.52 KB (333 views) |
|
|
|
| ........Nasty.......... |
 |
|
| Logged |
|
|
|
Reply: 276 - 504 |
|
|
| Badger |
Posted on: Saturday, April 30th, 2011, 4:49:04am
Attachment: 100_2285.jpg - 37.53 KB (329 views) |
|
|
|
| Rear Bar Mods............ |
 |
|
| Logged |
|
|
|
Reply: 277 - 504 |
|
|
| Badger |
Posted on: Saturday, April 30th, 2011, 4:51:10am
Attachment: 100_2286.jpg - 27.49 KB (333 views) |
|
|
|
Once smoothed and removed from the car for finishing, the Foam will be removed from the rear. The section in the Middle under the Number Plate, will house the NEW Reverse Light......... and some more body lines to be added.....
More to come..... |
 |
Last modified Saturday, April 30th, 2011, 4:52:29am by Badger |
|
| Logged |
|
|
|
Reply: 278 - 504 |
|
|
| Andy |
| Posted on: Saturday, April 30th, 2011, 11:32:27am |
|
|
Official C.O.C Contributor

Gender:  Male Male
Posts: 23604
Posts Per Day: 3.47 |
|
This is going to look amazing, but I think I might have to agree about the bonnet but I'll reserve judgement until it's completed  |
Drop me a PM if you would like to be added to the ClubCappo Member Map. More details can be found here.
We now have an official Facebook group as well as a page! See here |
|
| Logged |
|
|
| |
Reply: 279 - 504 |
|
|
Pages: « 1, 2, 3, 4, 5, 6, 7, 8, 9, 10, 11, 12, 13 ... » |
|
|
 Cappuccino Owners Club › Gallery › Cappo Related Album › Sneaza 2...The RED One (Moderators: )
 Locked Board