 |
Pages: « ... 2, 3, 4, 5, 6, 7, 8, 9, 10, 11, 12, 13 » |
  |
|
 Author Author |
 Sneaza 2...The RED One (currently 9726 views) Sneaza 2...The RED One (currently 9726 views) |
| Badger |
Posted on: Tuesday, May 17th, 2011, 7:07:08am
 Attachment: 100_2300.jpg - 39.64 KB (699 views) Attachment: 100_2300.jpg - 39.64 KB (699 views) |
  |
|
|
Few more mods to the Rear.....  |
 |
|
 Logged Logged |
|
|
 |
Reply: 280 - 504 |
|
|
| Badger |
Posted on: Tuesday, May 17th, 2011, 7:08:19am
Attachment: 100_2301.jpg - 34.53 KB (692 views) |
|
|
|
| Pass. Front......Guide coat to see the Faults. |
 |
|
| Logged |
|
|
|
Reply: 281 - 504 |
|
|
| Badger |
Posted on: Tuesday, May 17th, 2011, 7:09:17am
Attachment: 100_2302.jpg - 33.78 KB (692 views) |
|
|
|
Half of the Front...........  |
 |
|
| Logged |
|
|
|
Reply: 282 - 504 |
|
|
| Badger |
Posted on: Tuesday, May 17th, 2011, 7:10:22am
Attachment: 100_2292.jpg - 19.02 KB (689 views) |
|
|
|
And now for something completely different..............  |
 |
|
| Logged |
|
|
|
Reply: 283 - 504 |
|
|
| Badger |
Posted on: Tuesday, May 17th, 2011, 7:12:04am
Attachment: 100_2293.jpg - 16.78 KB (690 views) |
|
|
|
| Because I may need to remove this at some point....Paint maybe...??? I attached the Brackets and drilled holes for placement......... |
 |
Last modified Tuesday, May 17th, 2011, 7:12:23am by Badger |
|
| Logged |
|
|
|
Reply: 284 - 504 |
|
|
| Badger |
Posted on: Tuesday, May 17th, 2011, 7:15:04am
Attachment: 100_2294.jpg - 30.13 KB (685 views) |
|
|
|
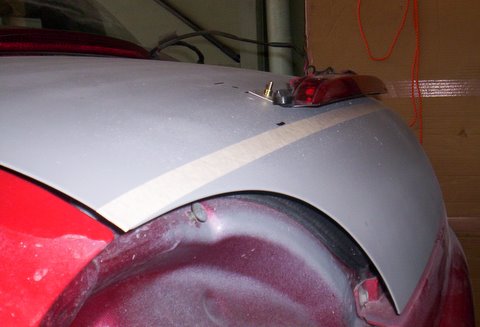
as you can see, the top holes are where the Original Holes on the Light attach, but when this is covered in Foam and Fibreglass, i could never get it out, hence the NEW brackets....The Tape line is where the Ducktail will come to.  |
 |
|
| Logged |
|
|
|
Reply: 285 - 504 |
|
|
| Badger |
Posted on: Tuesday, May 17th, 2011, 7:16:05am
Attachment: 100_2295.jpg - 22.72 KB (684 views) |
|
|
|
| Screw will be cut down and the Gaps filled, but it is straight........ |
 |
|
| Logged |
|
|
|
Reply: 286 - 504 |
|
|
| Badger |
Posted on: Tuesday, May 17th, 2011, 7:16:53am
Attachment: 100_2296.jpg - 19.74 KB (684 views) |
|
|
|
| Original Mounting points removed........ |
 |
|
| Logged |
|
|
|
Reply: 287 - 504 |
|
|
| Badger |
Posted on: Tuesday, May 17th, 2011, 7:18:14am
Attachment: 100_2297.jpg - 14.65 KB (683 views) |
|
|
|
| ........and Cover made to make it easier for removal once fully enclosed. Foam., shaping and Fibreglass next........... |
 |
|
| Logged |
|
|
|
Reply: 288 - 504 |
|
|
| Avar |
| Posted on: Wednesday, May 18th, 2011, 6:21:05am |
|
|
|
Fantastic idea for the brake light, what are the regs regarding high level brake lights where you are?
The zones over here i believe is the reason that the UK ones were never fitted working, as i think it was too low, do ya recon by placing there it brings it down into the main brake light zone? |
|
| Logged |
|
|
|
Reply: 289 - 504 |
|
|
| Badger |
| Posted on: Wednesday, May 18th, 2011, 7:27:42am |
|
|
|
| Thanx Kei, no idea to be honest...??? I do know that there are a few SMALL cars with them attached as standard on the Boot....MG, MX5 or IN THE SPOILER attached to the boot. Once I remove the Original and replace the Cover with a Fibreglass one, It should look OEM....Fingers crossed...lol |
|
| Logged |
|
|
|
Reply: 290 - 504 |
|
|
| Badger |
Posted on: Sunday, May 22nd, 2011, 8:20:11am
Attachment: 100_2303.jpg - 35.79 KB (606 views) |
|
|
|
While waiting for things, pressed on with the 'Spare' engine dismantle.....
After soaking in 'Brown Vinegar' Overnight, the Manifold came up well...... |
 |
|
| Logged |
|
|
|
Reply: 291 - 504 |
|
|
| Badger |
Posted on: Sunday, May 22nd, 2011, 8:23:22am
Attachment: 100_2304.jpg - 28.97 KB (604 views) |
|
|
|
| Rear.....5 mins after this, I scraped the Flange Clean....Nice and shiny. Though this will only be used as a Template........ More to come..... |
 |
|
| Logged |
|
|
|
Reply: 292 - 504 |
|
|
| capgun |
| Posted on: Sunday, May 22nd, 2011, 4:32:11pm |
|
|
|
| interesting |
|
| Logged |
|
|
|
Reply: 293 - 504 |
|
|
| Badger |
|
|
I hope so, or it all makes very boring reading.....lol
And so to the Templates...........Exhaust Flange |
 |
|
| Logged |
|
|
|
Reply: 294 - 504 |
|
|
| Badger |
|
|
Dump Pipe Flanges.........
Hopefully will have a set knocked up soon. |
 |
|
| Logged |
|
|
|
Reply: 295 - 504 |
|
|
| mk1powah |
| Posted on: Monday, May 23rd, 2011, 9:36:14am |
|
|
|
| Sneaza wtf are you doing there with a dutch newspaper???? |
|
| Logged |
|
|
|
Reply: 296 - 504 |
|
|
| grant4561 |
| Posted on: Tuesday, May 24th, 2011, 12:19:21am |
|
|
Maximum Member

Posts: 1719
Posts Per Day: 0.98 |
|
| Happy Birthday |
|
| Logged |
|
|
 |
Reply: 297 - 504 |
|
|
| Badger |
| Posted on: Tuesday, May 24th, 2011, 12:20:05am |
|
|
|
| LOL....Well spotted. Ezra used this as packing around the Sump Pan he sent me....See Wanted Section under 'Oil Plate etc..." |
|
| Logged |
|
|
|
Reply: 298 - 504 |
|
|
| Badger |
| Posted on: Saturday, May 28th, 2011, 8:14:16am |
|
|
|
“ |
Quoted from grant4561, posted Tuesday, May 24th, 2011, 12:19:21am at here |
” |
Happy Birthday
|
|
Cheers mate. Had a good day with the Family then told them all to Bugga off so I could continue with the Car.......Priorities..... Then went to the club for Dinner and had a win on the Pokies, which Paid for it.....result.
|
|
| Logged |
|
|
|
Reply: 299 - 504 |
|
|
| Badger |
Posted on: Sunday, June 5th, 2011, 5:03:02am
Attachment: 100_2318.jpg - 19.09 KB (458 views) |
|
|
|
| So work continues.........now the Sun has to decided to visit..... |
 |
|
| Logged |
|
|
|
Reply: 300 - 504 |
|
|
| Badger |
Posted on: Sunday, June 5th, 2011, 5:04:05am
Attachment: 100_2319.jpg - 13.13 KB (456 views) |
|
|
|
| From the top.......did this one a different way to the previous effort. |
 |
|
| Logged |
|
|
|
Reply: 301 - 504 |
|
|
| Badger |
Posted on: Sunday, June 5th, 2011, 5:04:56am
Attachment: 100_2321.jpg - 20.13 KB (455 views) |
|
|
|
| Light removed ready for the next bit......... |
 |
|
| Logged |
|
|
|
Reply: 302 - 504 |
|
|
| Badger |
Posted on: Sunday, June 5th, 2011, 5:07:21am
Attachment: 100_2323.jpg - 48.73 KB (455 views) |
|
|
|
| Not that you can see it, but before I covered it in Fibreglass, I glassed the inside, so it should besolid when I re-cut the hole for the light. The Rear bumper is now the only thing left with the Kit....other than seperating the pieces..... |
 |
|
| Logged |
|
|
|
Reply: 303 - 504 |
|
|
| Badger |
Posted on: Sunday, June 5th, 2011, 5:09:07am
Attachment: 100_2331.jpg - 23.86 KB (454 views) |
|
|
|
| Pass. side High filled, spot filled ready for the Primer.......... |
 |
|
| Logged |
|
|
|
Reply: 304 - 504 |
|
|
| Badger |
Posted on: Sunday, June 5th, 2011, 5:10:35am
Attachment: 100_2330.jpg - 25.07 KB (453 views) |
|
|
|
| Drivers side Primered ready for the High fill then the Primer again...... |
 |
|
| Logged |
|
|
|
Reply: 305 - 504 |
|
|
| soongster |
| Posted on: Tuesday, June 7th, 2011, 3:58:50am |
|
|
|
zomg... progresssss... its all coming together D
the ducktail doesnt look like its curving to the shape of the boot? or did u intend it to be like that? looks cool with the brake light imo. |
|
| Logged |
|
|
|
Reply: 306 - 504 |
|
|
| Badger |
| Posted on: Tuesday, June 7th, 2011, 8:42:27am |
|
|
|
| Must be the angle I took the photo, shaped the same as I did for yours, but the face where the lights sits is slightly flatter....even though the light is curved. It will be more obvious when I get filler on it cos it follows the lines of the boot...... |
|
| Logged |
|
|
|
Reply: 307 - 504 |
|
|
| ggutnik |
| Posted on: Sunday, August 14th, 2011, 8:41:50am |
|
|
|
Anyyyy... updates updates updates updates updates updates updates updates updates updates updates updates updates updates updates updates updates updates updates updates updates updates updates updates updates updates updates updates updates updates updates updates updates updates updates updates updates updates updates updates updates updates updates updates updates updates updates updates updates updates updates updates updates updates updates updates updates updates updates updates updates updates updates updates updates updates updates updates updates updates !!!!!!
 |
Last modified Sunday, August 14th, 2011, 8:42:17am by ggutnik |
|
| Logged |
|
|
|
Reply: 308 - 504 |
|
|
| Badger |
| Posted on: Sunday, August 14th, 2011, 7:15:28pm |
|
|
|
NO!!!!!........LOL.
Have been busy renovating, getting over illness, renovating and work.....Hoping to have it done soon though. |
|
| Logged |
|
|
|
Reply: 309 - 504 |
|
|
| Badger |
Posted on: Monday, January 23rd, 2012, 7:18:31am
Attachment: 100_2386.jpg - 35.34 KB (301 views) |
|
|
|
Okay, it's been a while now and I scrapped the Light in the Boot idea ....FOR NOW .....Came up with a few other ideas to try out.
So, here are a few Pics of the car as it stands ALMOST, ready for Paint. |
 |
|
| Logged |
|
|
|
Reply: 310 - 504 |
|
|
| Badger |
Posted on: Monday, January 23rd, 2012, 7:19:07am
Attachment: 100_2385.jpg - 26.81 KB (300 views) |
|
|
|
| Front....... |
 |
|
| Logged |
|
|
|
Reply: 311 - 504 |
|
|
| Badger |
Posted on: Monday, January 23rd, 2012, 7:19:52am
Attachment: 100_2389.jpg - 22.66 KB (300 views) |
|
|
|
| Front Side.......... |
 |
|
| Logged |
|
|
|
Reply: 312 - 504 |
|
|
| Badger |
Posted on: Monday, January 23rd, 2012, 7:20:37am
Attachment: 100_2387.jpg - 23.22 KB (297 views) |
|
|
|
| Back Side........ Door Handles to be removed soon, now replacement locks have turned up. |
 |
Last modified Monday, January 23rd, 2012, 7:21:43am by Badger |
|
| Logged |
|
|
|
Reply: 313 - 504 |
|
|
| Badger |
Posted on: Monday, January 23rd, 2012, 7:22:52am
Attachment: 100_2395.jpg - 25.81 KB (300 views) |
|
|
|
| Mods complete to Rear Bar, just need to remove it now and finish the underside. |
 |
|
| Logged |
|
|
|
Reply: 314 - 504 |
|
|
| Badger |
Posted on: Monday, January 23rd, 2012, 7:25:23am
Attachment: 100_2394.jpg - 24.28 KB (297 views) |
|
|
|
| Drivers Side......cuts to seperate were successful....Very Happy. |
 |
|
| Logged |
|
|
|
Reply: 315 - 504 |
|
|
| Badger |
Posted on: Monday, January 23rd, 2012, 7:26:40am
Attachment: 100_2393.jpg - 21.91 KB (293 views) |
|
|
|
| .....AND FINALLY FOR NOW.......Decided to do a Duck Tail again. |
 |
|
| Logged |
|
|
|
Reply: 316 - 504 |
|
|
| Badger |
Posted on: Monday, January 23rd, 2012, 7:28:11am
Attachment: 100_2391.jpg - 21.26 KB (291 views) |
|
|
|
| Primer to go........ , then Finish Capgun's Sub Enclosure. |
 |
|
| Logged |
|
|
|
Reply: 317 - 504 |
|
|
| ThePorko |
| Posted on: Monday, January 23rd, 2012, 8:27:41am |
|
|
|
|
| Logged |
|
|
|
Reply: 318 - 504 |
|
|
| Ricou |
| Posted on: Monday, January 23rd, 2012, 1:45:50pm |
|
|
Maximum Member
Posts: 1110
Posts Per Day: 0.65 |
|
| Very nice work. I wish I could do that kind of stuff too. |
|
| Logged |
|
|
| |
Reply: 319 - 504 |
|
|
Pages: « ... 2, 3, 4, 5, 6, 7, 8, 9, 10, 11, 12, 13 » |
|
|
 Cappuccino Owners Club › Gallery › Cappo Related Album › Sneaza 2...The RED One (Moderators: )
 Locked Board