|
|
 Author Author |
 Sneaza 2...The RED One (currently 9729 views) Sneaza 2...The RED One (currently 9729 views) |
| Badger |
|
|
I kinda agree, because they look like an alternative to the VERY EXPENSIVE SPL lights,
but as I said will leave it for when the whole thing is painted 'cos they sort of go with the Bodykit.....see below... 
Lord, the Problem with opening up the lights and Painting the INSIDE (Which Personally II would get CHROMED  )....is that the Lenses will Yellow and make the colour look crap. )....is that the Lenses will Yellow and make the colour look crap. |
 |
Last modified Monday, February 27th, 2012, 1:50:03am by Badger |
|
 Logged Logged |
|
|
 |
Reply: 360 - 504 |
|
|
| Badger |
|
|
 .......... .......... |
 |
|
| Logged |
|
|
|
Reply: 361 - 504 |
|
|
| Chernoby1 |
Posted on: Monday, February 27th, 2012, 2:40:45am
 Attachment: holeremoved.jpg - 139.18 KB (514 views) Attachment: holeremoved.jpg - 139.18 KB (514 views) |
  |
|
|
I was going to say get it chromed inside! Makes the lights pop 
Have you thought about removing the hole for the intercooler (between bonnet and front bar)? If you have standard intercooler might not be best idea, but if not... it might have some potential...
Dodgy 5minute photoshop:
|
 |
|
| Logged |
|
|
|
Reply: 362 - 504 |
|
|
| Badger |
| Posted on: Monday, February 27th, 2012, 4:18:01am |
|
|
|
HA,HA, Have you not looked a few Pages Back...Page 7, 4th from the Bottom.....
Because I have no Plans to change the Red One, it will remain as is, but is something I am seriously considering when Sneaza goes in for the Engine Re-Build. |
|
| Logged |
|
|
|
Reply: 363 - 504 |
|
|
| CaffieneHit |
| Posted on: Monday, February 27th, 2012, 8:14:18am |
|
|
Maximum Member

Posts: 541
Posts Per Day: 0.32 |
|
Wow Dave!
I can't believe I haven't been following this page for so long.
I'm absolutely gob smacked.
Car looks incredible. I'm very impressed.
Well done mate. |
|
| Logged |
|
|
 |
Reply: 364 - 504 |
|
|
| Badger |
| Posted on: Monday, February 27th, 2012, 8:45:12am |
|
|
|
|
| Logged |
|
|
|
Reply: 365 - 504 |
|
|
| redgaijin |
| Posted on: Tuesday, February 28th, 2012, 12:12:11am |
|
|
|
| Dave, why will the lenses yellow if you get the inside chromed? |
|
| Logged |
|
|
|
Reply: 366 - 504 |
|
|
| Badger |
| Posted on: Tuesday, February 28th, 2012, 4:19:34am |
|
|
|
They won't.....The Plastic Lenses 'YELLOW' Because of their age and need to be Polished to keep them looking Clear and New.
Getting the inside Chromed is MY preference to Painting them....Similar to NEW Model cars. Even with the inside Chromed, I'll still have to Polish them.
|
|
| Logged |
|
|
|
Reply: 367 - 504 |
|
|
| Badger |
Posted on: Sunday, March 4th, 2012, 4:20:04am
Attachment: 100_2442.jpg - 71.16 KB (443 views) |
|
|
|
| Here ya go Caffeinhit.....Front Strut...same as Gabe's. |
 |
|
| Logged |
|
|
|
Reply: 368 - 504 |
|
|
| Badger |
Posted on: Sunday, March 4th, 2012, 4:21:01am
Attachment: 100_2443.jpg - 63.36 KB (444 views) |
|
|
|
another......Could use a bit of a Polish.....  |
 |
|
| Logged |
|
|
|
Reply: 369 - 504 |
|
|
| Badger |
Posted on: Sunday, March 4th, 2012, 4:21:59am
Attachment: 100_2444.jpg - 21.64 KB (440 views) |
|
|
|
| and the Rear one............. Garage John type..... |
 |
|
| Logged |
|
|
|
Reply: 370 - 504 |
|
|
| Badger |
Posted on: Sunday, March 4th, 2012, 4:23:41am
Attachment: 100_2446.jpg - 24.40 KB (441 views) |
|
|
|
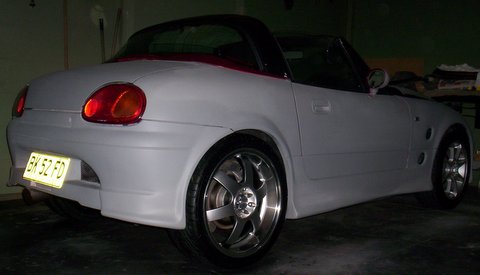
| .....Ready for Pink Slip Tomorrow.....Sold the Original Wheels to ABI.....These are the Temps while I get the Tyres fitted to the 17's....... |
 |
Last modified Sunday, March 4th, 2012, 4:25:15am by Badger |
|
| Logged |
|
|
|
Reply: 371 - 504 |
|
|
| CaffieneHit |
| Posted on: Monday, March 5th, 2012, 12:03:06am |
|
|
Maximum Member
Posts: 541
Posts Per Day: 0.32 |
|
| If both are for sale dave I'll take them otherwise I'll just grab the rear and I'll get the front one from gab because he has his for sale aswell. |
|
| Logged |
|
|
| |
Reply: 372 - 504 |
|
|
| Badger |
Posted on: Sunday, April 8th, 2012, 7:30:28am
Attachment: 100_2447.jpg - 47.70 KB (380 views) |
|
|
|
How time flies........ when you forget things.....Registered for another year, driving it for the first time in 12 months, forgot just how much I smile when I drive these.....confuses the OH.... ,
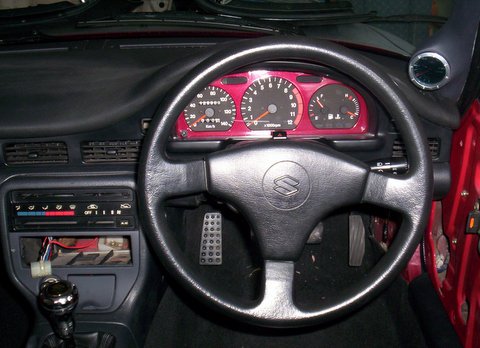
So, got to a couple of things I've been dreading, adding an Electronic Boost Gauge and Tweeters ready for the stereo. I also ran the wires and connected Elec. Boost and Volts in Sneaza, which I just had running down under the Pillars.
I've NEVER attempted to add Gauges before and quite frankly, the thought of f**king up the wiring and having the car explode, wasn't helping, as well as the NAGGING in the background, bless her..... .
Another thing that also didn't help, was the fact that the 'Original' connector...(seen in picture) had totally different colours to the other half that plugs in....  , but after some searching, finally got it sorted. , but after some searching, finally got it sorted.
Replaced the Dash Lights to RED LED to match the Gauges in both cars and while I had the facia out, decided to add the accent colout that will be throughout the car.....same as Body Colour |
 |
|
| Logged |
|
|
|
Reply: 373 - 504 |
|
|
| Badger |
Posted on: Sunday, April 8th, 2012, 7:36:17am
Attachment: 100_2452.jpg - 23.66 KB (377 views) |
|
|
|
Then came another job I had been avoiding....Due to the fact that I really didn't know how I was going to attack the problem....'The Roof'...But after reading Nikki's thread and seeing the result, decided it was time.
As my Grandson was over and we did the Easter Egg Hunt, thought I'd wait till after Lunch.
That done, started pulling apart the Panels...Edge strips, lining, etc....what a Bastard those xmas tree clips ar that hold the lining on.... > Any way, here's what the Panels looked like....Driver's Side Any way, here's what the Panels looked like....Driver's Side |
 |
Last modified Sunday, April 8th, 2012, 7:36:42am by Badger |
|
| Logged |
|
|
|
Reply: 374 - 504 |
|
|
| Badger |
Posted on: Sunday, April 8th, 2012, 7:39:28am
Attachment: 100_2449.jpg - 42.10 KB (376 views) |
|
|
|
| Started with the Smallest Panel. Sanding down with 80 grit, was taking forever and Clogging up the 'Non-Clog' Paper, so decided to stop and use the 'Do it in Half the Time' Method.......Applied first coat.... |
 |
|
| Logged |
|
|
|
Reply: 375 - 504 |
|
|
| Badger |
Posted on: Sunday, April 8th, 2012, 7:40:56am
Attachment: 100_2450.jpg - 39.69 KB (374 views) |
|
|
|
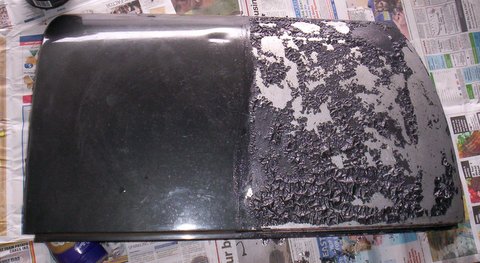
| Then the Second coat....realised there was more than one layer of paint and was dreading the worst.... |
 |
|
| Logged |
|
|
|
Reply: 376 - 504 |
|
|
| Badger |
Posted on: Sunday, April 8th, 2012, 7:43:40am
Attachment: 100_2451.jpg - 22.40 KB (375 views) |
|
|
|
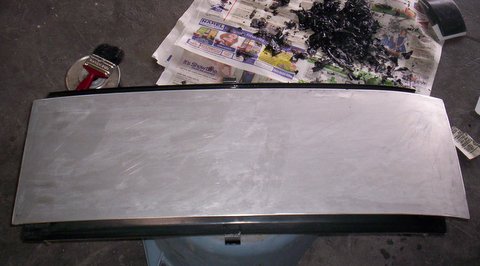
....But all ended well. Result
Passenger side done and as tempted as I am to getting the dents out and Polishing the roof, think I can do without the attention from the Boys in Blue, so they'll end up same colour as the rest of the car....  |
 |
|
| Logged |
|
|
|
Reply: 377 - 504 |
|
|
| Badger |
Posted on: Sunday, April 8th, 2012, 7:44:38am
Attachment: 100_2448.jpg - 27.79 KB (373 views) |
|
|
|
| Smallest Panel....didn't have camera ready when I started. The pile of Black Crap on the paper, is the Paint. |
 |
Last modified Sunday, April 8th, 2012, 7:45:51am by Badger |
|
| Logged |
|
|
|
Reply: 378 - 504 |
|
|
| Capposteve |
| Posted on: Sunday, April 8th, 2012, 10:24:48am |
|
|
|
|
| Logged |
|
|
|
Reply: 379 - 504 |
|
|
| nikki |
| Posted on: Sunday, April 8th, 2012, 6:22:17pm |
|
|
|
“ |
Quoted from Badger, posted Sunday, April 8th, 2012, 7:36:17am at here |
” |
...But after reading Nikki's thread and seeing the result, decided it was time.
|
|
Ahh thanks All I used was spray cans, the key to a good paint job is in the finishing, Wet sanding and mopping.
Keep up the good work.
|
|
| Logged |
|
|
|
Reply: 380 - 504 |
|
|
| Badger |
Posted on: Thursday, April 12th, 2012, 6:15:01am
Attachment: 100_2453.jpg - 31.57 KB (314 views) |
|
|
|
LOL, Yes, but if it aint prepped right, all the good work will be for nowt....
I took mine back to metal for fear there may be more probs than I could see, thankfully there wasn't, except that I can see more dents than with the colour on them. These will be sorted and then primed while I wait for the Paint Fund to grow.....
So while I've had a couple of days off coz of the Flu, decided I would try and finish a few jobs I had put on hold.
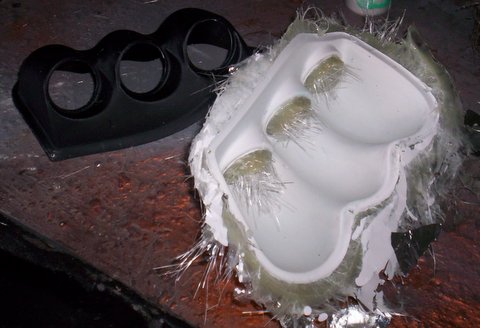
Gauge Pod I bought ages ago......decided it was time to make a mold.... |
 |
|
| Logged |
|
|
|
Reply: 381 - 504 |
|
|
| Badger |
Posted on: Thursday, April 12th, 2012, 6:15:55am
Attachment: 100_2454.jpg - 29.50 KB (313 views) |
|
|
|
| Waxed, Gelcoated and 'Glassed..... |
 |
|
| Logged |
|
|
|
Reply: 382 - 504 |
|
|
| Badger |
Posted on: Thursday, April 12th, 2012, 6:16:48am
Attachment: 100_2455.jpg - 38.10 KB (314 views) |
|
|
|
| Couple of hours later....popped it out. |
 |
|
| Logged |
|
|
|
Reply: 383 - 504 |
|
|
| Badger |
Posted on: Thursday, April 12th, 2012, 6:21:23am
Attachment: 100_2456.jpg - 34.51 KB (311 views) |
|
|
|
I must say, I even impressed myself......Other than the Front Lip mold I made a while back (which after this will be using shortly), this was the First time I have attempted to make a mold and used Gelcoat.
Now just need to trim it and wax it ready for the 'Glasssing to actually make one. |
 |
|
| Logged |
|
|
|
Reply: 384 - 504 |
|
|
| Badger |
Posted on: Thursday, April 12th, 2012, 6:23:37am
Attachment: 100_2457.jpg - 29.98 KB (310 views) |
|
|
|
| Then, onto the Pods.....needed to cut a bit more from the circle to fit the 6.5" speakers. Then sand and paint. Job's done |
 |
|
| Logged |
|
|
|
Reply: 385 - 504 |
|
|
| Badger |
Posted on: Thursday, April 12th, 2012, 6:24:24am
Attachment: 100_2458.jpg - 32.30 KB (311 views) |
|
|
|
| and will be 'For Sale' when painted..... |
 |
Last modified Thursday, April 12th, 2012, 6:27:15am by Badger |
|
| Logged |
|
|
|
Reply: 386 - 504 |
|
|
| Badger |
Posted on: Thursday, April 12th, 2012, 6:26:56am
Attachment: 100_2459.jpg - 18.71 KB (308 views) |
|
|
|
...coz they won't fit in my car when I install this......Hopefully Painted and instsalled before the cruise on Saturday........
Still working on the Speaker Portion....modifications due to insane thought process.... |
 |
|
| Logged |
|
|
|
Reply: 387 - 504 |
|
|
| Badger |
Posted on: Thursday, April 12th, 2012, 9:11:18am
Attachment: 100_2466.jpg - 28.67 KB (299 views) |
|
|
|
| While I was waiting for stuff to dry, went and got the NEW tyres put on the 17's..... |
 |
|
| Logged |
|
|
|
Reply: 388 - 504 |
|
|
| Badger |
Posted on: Thursday, April 12th, 2012, 9:11:57am
Attachment: 100_2460.jpg - 20.82 KB (297 views) |
|
|
|
| better view..... |
 |
|
| Logged |
|
|
|
Reply: 389 - 504 |
|
|
| Badger |
Posted on: Thursday, April 12th, 2012, 9:12:26am
Attachment: 100_2461.jpg - 22.07 KB (295 views) |
|
|
|
| From the floor......... |
 |
|
| Logged |
|
|
|
Reply: 390 - 504 |
|
|
| Badger |
Posted on: Thursday, April 12th, 2012, 9:13:20am
Attachment: 100_2463.jpg - 39.81 KB (295 views) |
|
|
|
Plenty of CLEARANCE...........  ....225/35/17.....40 Offset. ....225/35/17.....40 Offset. |
 |
Last modified Thursday, April 12th, 2012, 9:14:04am by Badger |
|
| Logged |
|
|
|
Reply: 391 - 504 |
|
|
| Badger |
Posted on: Thursday, April 12th, 2012, 9:16:39am
Attachment: 100_2465.jpg - 34.36 KB (291 views) |
|
|
|
| This may be an issue as I haven't got to fixing the Original part of the Rear Bumper yet, but if the Tyre catches it, it should MELT.....lol about to go for a drive, so I'll soon find out. |
 |
|
| Logged |
|
|
|
Reply: 392 - 504 |
|
|
| Badger |
Posted on: Thursday, April 12th, 2012, 9:20:29am
Attachment: 100_2467.jpg - 37.97 KB (292 views) |
|
|
|
| and thought I'd attach the new doorcards before the cruise.......NO, they are not staying that colour, that was a sample, which I have since discarded. They will either end up same as the Outside Colour....as I'm thinking ALL the PLASTIC Parts will with SUEDE/ALLECANTRA/WOTEVA...accent material for the Inserts and the Seats and Roof Lining....or Black...Time will tell..... |
 |
Last modified Thursday, April 12th, 2012, 9:21:28am by Badger |
|
| Logged |
|
|
|
Reply: 393 - 504 |
|
|
| Chernoby1 |
| Posted on: Thursday, April 12th, 2012, 9:55:05am |
|
|
|
i saw the insert and nearly spilt my coffee LOL
Everything else is looking good =D |
|
| Logged |
|
|
|
Reply: 394 - 504 |
|
|
| lord |
| Posted on: Thursday, April 12th, 2012, 8:33:36pm |
|
|
|
Thats all looking sooooo goood........!
Then this is finished this will be the bogs dollocks! |
|
| Logged |
|
|
|
Reply: 395 - 504 |
|
|
| Badger |
Posted on: Friday, April 13th, 2012, 9:51:57am
Attachment: 100_2470.jpg - 33.35 KB (249 views) |
|
|
|
“ |
Quoted from Chernoby1, posted Thursday, April 12th, 2012, 9:55:05am at here |
” |
i saw the insert and nearly spilt my coffee LOL
Everything else is looking good =D
|
|
Insert isn't there...lol the 'Space' for it is....Insert is the cover that will go over the Door Handle/Lock Mechanism.....and as I said, will be covered in Material matching seats and Head liners.....
So, went for a test drive with my Son in the Pass. Seat and as suspected, it caught on the part pictured above...and as I ran out of light, had to wait until daylight to remove the bits on both sides...just to be sure. Now all is well.....
So today I put the Fronts on and was Pleasantly surprised that after fitting the bodykit and fibreglassing it all in place, I only had to remove this section at the front, where the Lip was added, now wheel turns unhindered on Full Lock on both sides.... ...with the exception of same place as Sneaza on Firewall.....Using the Knockometer, that also is rectified......Not bad for 17 x 7" 205/40 17's 40 offset. |
 |
Last modified Friday, April 13th, 2012, 9:56:53am by Badger |
|
| Logged |
|
|
|
Reply: 396 - 504 |
|
|
| Badger |
Posted on: Friday, April 13th, 2012, 9:58:49am
Attachment: 100_2475.jpg - 25.79 KB (242 views) |
|
|
|
| Thanx Lord, I'm hoping so..........So now a few pics side by side.... |
 |
|
| Logged |
|
|
|
Reply: 397 - 504 |
|
|
| Badger |
Posted on: Friday, April 13th, 2012, 9:59:24am
Attachment: 100_2469.jpg - 18.10 KB (242 views) |
|
|
|
|
| Logged |
|
|
|
Reply: 398 - 504 |
|
|
| Badger |
Posted on: Friday, April 13th, 2012, 10:00:11am
Attachment: 100_2474.jpg - 26.30 KB (243 views) |
|
|
|
| Running out of Daylight again......... |
 |
|
| Logged |
|
|
|
Reply: 399 - 504 |
|
|
|
 Cappuccino Owners Club › Gallery › Cappo Related Album › Sneaza 2...The RED One (Moderators: )


 Locked Board