|
|
 Author Author |
 To restore or not to restore (currently 1721 views) To restore or not to restore (currently 1721 views) |
| Erik |
Posted on: Tuesday, December 14th, 2010, 9:13:12pm
 Attachment: 12122010_012.jpg - 42.28 KB (962 views) Attachment: 12122010_012.jpg - 42.28 KB (962 views) |
  |
|
|
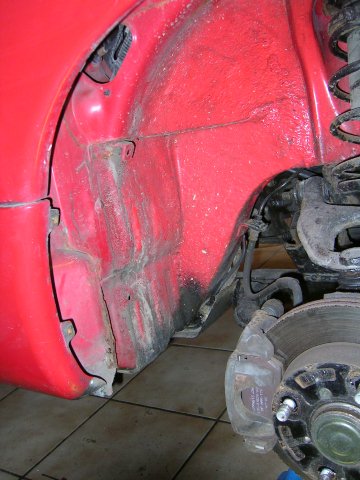
| So I decided to check the condition of the newly bought car, disassembling the RH front fender liner to check the condition of the sills. |
 |
|
 Logged Logged |
|
|
|
|
| Erik |
Posted on: Tuesday, December 14th, 2010, 9:20:58pm
Attachment: 12122010_013bis.jpg - 166.61 KB (962 views) |
|
|
|
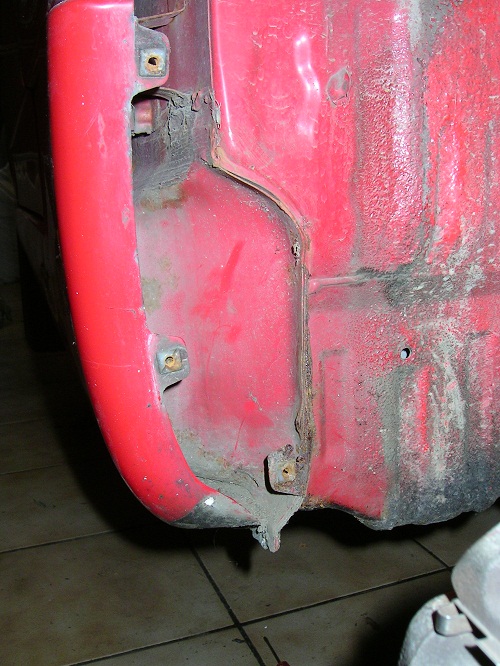
| What I found did not seem bad at all... |
 |
|
| Logged |
|
|
 |
Reply: 1 - 91 |
|
|
| Erik |
Posted on: Tuesday, December 14th, 2010, 9:28:04pm
Attachment: 12122010_019bis.jpg - 135.73 KB (962 views) |
|
|
|
| The inside of the cabin however, after disassembly of the driver's seat and the carpet, shows the common rust holes, but not that bad either I think, when compared with other pictures I'v seen. I am contemplating doing the restoration myself, meaning complete disassembly, get the body to a proper workshop, have it welded and painted and do the reassembly afterwards. I'm only afraid of giving up halfway... |
 |
|
| Logged |
|
|
|
Reply: 2 - 91 |
|
|
| Andy |
| Posted on: Tuesday, December 14th, 2010, 9:54:30pm |
|
|
Official C.O.C Contributor


Gender:  Male Male
Posts: 23604
Posts Per Day: 3.48 |
|
Compared to others that is nothing at all. Should be an easy and worthwhile repair  |
Drop me a PM if you would like to be added to the ClubCappo Member Map. More details can be found here.
We now have an official Facebook group as well as a page! See here |
|
| Logged |
|
|
 |
Reply: 3 - 91 |
|
|
| kingpow |
| Posted on: Tuesday, December 14th, 2010, 11:21:42pm |
|
|
|
| That is an easy repair as Andy stated, you should have seen mine, it was much much worse. |
|
| Logged |
|
|
|
Reply: 4 - 91 |
|
|
| lord |
| Posted on: Wednesday, December 15th, 2010, 12:01:00am |
|
|
|
its worth it if you have the skills and patiets to tdo it. What about the floor pans?? where they join and meet the sills??
what about under the rear of the car?? Like under up by the petrol tank. I havent worked on mine for 5 weeks!! Still buying parts though.
see my pics in my album and list of parts i've bought for mine so far. |
|
| Logged |
|
|
|
Reply: 5 - 91 |
|
|
| Erik |
| Posted on: Wednesday, December 15th, 2010, 9:17:58pm |
|
|
|
Thanks for all the reactions & suggestions. The floor pans also seem reasonnably intact. I will have a look under the petrol tank, didn't know this is a weak spot. Next week I have a holliday, more time to spend on the car then. I don't have any welding skills though, as I said I would prefer the welding and painting to be done by someone more experienced than me. Problem is also that I work from 9 to 19 hour, so in the evening it's difficult to push myself to go work on the car.
Find the website a bit confusing though, cannot find the pictures in the album for example, although I did find the parts list. Will keep on trying! |
|
| Logged |
|
|
|
Reply: 6 - 91 |
|
|
| Erik |
Posted on: Thursday, December 30th, 2010, 9:04:29pm
Attachment: 27122010_021bis.jpg - 120.31 KB (897 views) |
|
|
|
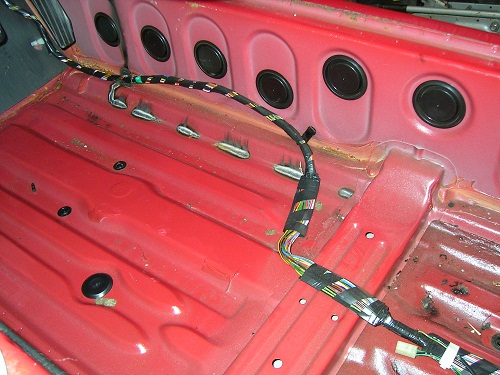
| Didn't spend half the time I wanted during my holiday, but next are some pictures of the disassembled interior...LH rear |
 |
|
| Logged |
|
|
|
Reply: 7 - 91 |
|
|
| Erik |
Posted on: Thursday, December 30th, 2010, 9:05:34pm
Attachment: 27122010_022bis.jpg - 114.92 KB (899 views) |
|
|
|
| ...LH front... |
 |
|
| Logged |
|
|
|
Reply: 8 - 91 |
|
|
| Erik |
Posted on: Thursday, December 30th, 2010, 9:06:17pm
Attachment: 27122010_025bis.jpg - 108.54 KB (900 views) |
|
|
|
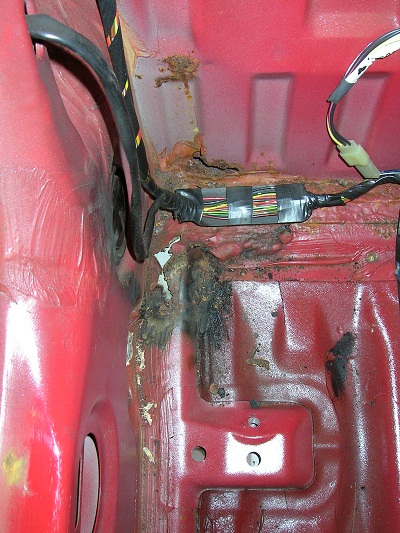
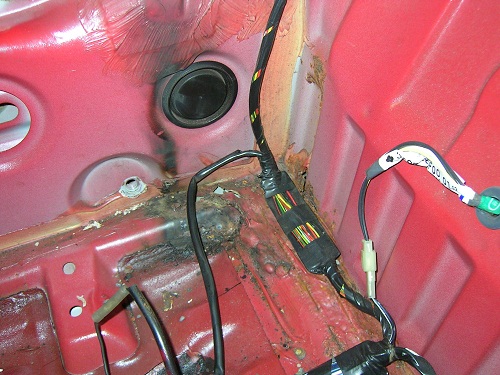
| ... RH rear ... |
 |
|
| Logged |
|
|
|
Reply: 9 - 91 |
|
|
| Erik |
Posted on: Thursday, December 30th, 2010, 9:08:09pm
Attachment: 27122010_023bis.jpg - 103.36 KB (893 views) |
|
|
|
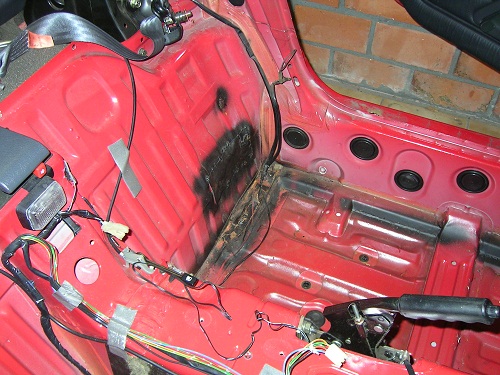
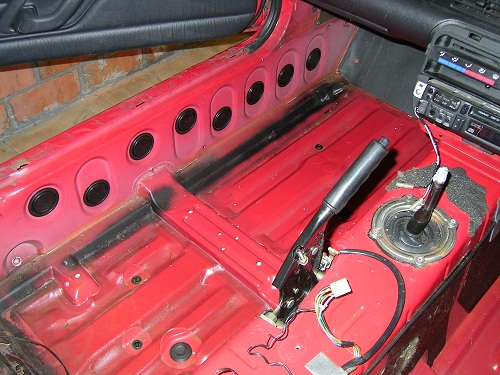
... and lastly for the time being, RH front. As you can see someone has been there before me  . See you next time after some more work! . See you next time after some more work! |
 |
|
| Logged |
|
|
|
Reply: 10 - 91 |
|
|
| Erik |
Posted on: Tuesday, January 11th, 2011, 10:27:52pm
Attachment: 11012011_020bis.jpg - 116.80 KB (858 views) |
|
|
|
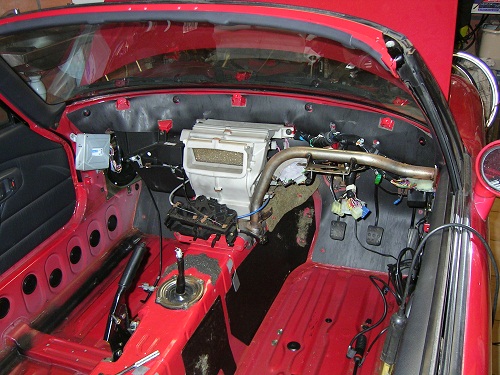
| Although it seems not much changed I have spent some considerable time removing most of the interior. First time ever to remove a steering column, frightening, I'm convinced I'll never be able to put the puzzle back together again. But you cannot say that I didn't enjoy it. Also removed the brake and fuel line covers underneath, had read and thought that it would be a pain to get them off but with a hydraulic jack I could wedge a screw driver firmly against the screw and I got most of them undone with relative ease. |
 |
|
| Logged |
|
|
|
Reply: 11 - 91 |
|
|
| Erik |
| Posted on: Friday, January 14th, 2011, 6:28:43am |
|
|
|
I'm devastated. Yesterday my contact told me that his contact in Poland had said that a complete restoration would be between 2.000 and 3.000 Euro's, but that they only accepted complete cars. I started this venture with the idea that, if the Polish people would accept the car for repair that I could as well dismantle the car myself and deliver the bodywork only. Damn! And that price!
Since I got the news I'm desparately trying to fool myself that I really like working on the car, that it's really a therapy or a compensation for my all-consuming daytime job. Damn! |
|
| Logged |
|
|
|
Reply: 12 - 91 |
|
|
| Ricou |
| Posted on: Friday, January 14th, 2011, 9:53:12pm |
|
|
Maximum Member
Posts: 1110
Posts Per Day: 0.66 |
|
| I'm not well informed about that, but I think there should be shops willing to restore your car at a better price and which would prefer to get it already dismantled rather than complete. |
|
| Logged |
|
|
| |
Reply: 13 - 91 |
|
|
| Andy |
| Posted on: Friday, January 14th, 2011, 10:07:12pm |
|
|
Official C.O.C Contributor
Gender: Male
Posts: 23604
Posts Per Day: 3.48 |
|
| Surely they mean they don't take on cars that are in boxes rather than ones that have had the things removed that need to be removed to do the job? |
Drop me a PM if you would like to be added to the ClubCappo Member Map. More details can be found here.
We now have an official Facebook group as well as a page! See here |
|
| Logged |
|
|
| |
Reply: 14 - 91 |
|
|
| Erik |
| Posted on: Friday, January 14th, 2011, 10:30:23pm |
|
|
|
Thanks for the reactions, this is good for my spirit. I have cooled off a bit now. Apparently they prefer to take on a whole car, do everything from disassembly to assembly. My contact suggested to put the wheels and the steering wheel back on and send it like that but that doesn't seem like a good idea, to send half a car. But I don't know really because it's not a direct contact. Between 2500 and 3000 Euro doesn't seem that expensive though for a complete restoration. They did the DKW for my boss and that cost 9000 but there was a lot more work on that one. Anyway the more I think about it the more I prefer to do the disassembly myself, find someone to do the welding and then someone to do the painting, then assemble again because I would be afraid that they would cut corners at that price. The more I disassemble however the more I'm starting to wonder 1) where am I going to put all this stuff and 2) how am I going to put it back together? Only time will tell.
|
|
| Logged |
|
|
|
Reply: 15 - 91 |
|
|
| Ricou |
| Posted on: Friday, January 21st, 2011, 4:06:31pm |
|
|
Maximum Member
Posts: 1110
Posts Per Day: 0.66 |
|
| One advice if you're not doing it already: put the screws in boxes or bags and write on it from where it is (bumper, headlights, steering... etc). |
|
| Logged |
|
|
| |
Reply: 16 - 91 |
|
|
| lord |
| Posted on: Friday, January 21st, 2011, 5:24:04pm |
|
|
|
| Ive put mine in freezer bags! See lords cappo diary in album. |
|
| Logged |
|
|
|
Reply: 17 - 91 |
|
|
| DickW |
| Posted on: Friday, January 21st, 2011, 11:50:55pm |
|
|
|
| I use yoghurt pots and plastic chinese takeaway containers..... ! |
|
| Logged |
|
|
|
Reply: 18 - 91 |
|
|
| Erik |
| Posted on: Saturday, January 22nd, 2011, 9:26:37pm |
|
|
|
- Put the screws, bolts and nuts in bags - check!
- Keep them assorted by part or subject - oops! 
- Put name on label or bag - oops!
Don't worry, can still go back and check & label.
Thanks for reminding me of my original plan guys! |
|
| Logged |
|
|
|
Reply: 19 - 91 |
|
|
| Erik |
Posted on: Sunday, February 6th, 2011, 5:36:22pm
Attachment: 024bis.jpg - 95.08 KB (734 views) |
|
|
|
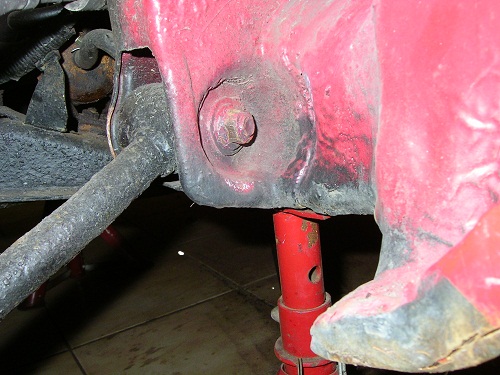
Finally after a month hard work (11 to 12 hours a day, 7 days a week for three weeks) I can finally spend some time again on the car. So I started at the rear, with the advice from Lord in my mind. Undid the bolts of the drive shaft, no problem. But then I noticed that all other bolts and nuts from the rear end are covered in paint, rust etc. The bolt in the picture is an example.
When you feel the wrench sliding you know it's too late, I don't know if you can see it in the picture but the corners are already slightly rounded off. Apart from cutting it off with an angle grinder (this certainly is NOT the way I want to tackle it) or heating (doesn't seem a good solution neither) does anyone have any useful tips or solutions? |
 |
|
| Logged |
|
|
|
Reply: 20 - 91 |
|
|
| Erik |
Posted on: Sunday, February 6th, 2011, 5:39:38pm
Attachment: 023bis.jpg - 107.51 KB (734 views) |
|
|
|
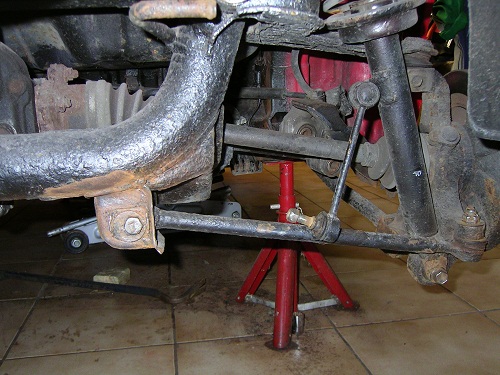
| It will be a big improvement if everything will be nicely treated and painted. The black stuff seems however to have protected the car. I still think that my Cappuccino is not half bad corrosion-wise. |
 |
|
| Logged |
|
|
|
Reply: 21 - 91 |
|
|
| allan_brown |
| Posted on: Sunday, February 6th, 2011, 9:28:00pm |
|
|
|
| Even if you do get that nut undone, the bolt will probably be seized to the inside of the bush. It was on mine. I destroyed the bush trying to get mine out. You can't buy that bush on its own, it comes with a new arm. |
|
| Logged |
|
|
|
Reply: 22 - 91 |
|
|
| lord |
| Posted on: Monday, February 7th, 2011, 2:46:13pm |
|
|
|
|
| Logged |
|
|
|
Reply: 23 - 91 |
|
|
| allan_brown |
| Posted on: Monday, February 7th, 2011, 4:47:10pm |
|
|
|
| Sorry, I meant the standard bush. Can you get the uprated bush on its own or do you have to buy the complete set? |
|
| Logged |
|
|
|
Reply: 24 - 91 |
|
|
| Erik |
| Posted on: Monday, February 7th, 2011, 9:12:28pm |
|
|
|
Thanks for the good suggestions, having a sizeable compressor it's maybe interesting to borrow or buy a compressor bolt gun.
The problem seems to be also that they are not really 17 or 19mm, which are the standard sizes. They can't have shrunk now can they?
Does anyone have experience with a nut splitter? |
|
| Logged |
|
|
|
Reply: 25 - 91 |
|
|
| Erik |
Posted on: Sunday, February 20th, 2011, 5:17:27pm
Attachment: sany0033bis.jpg - 101.18 KB (670 views) |
|
|
|
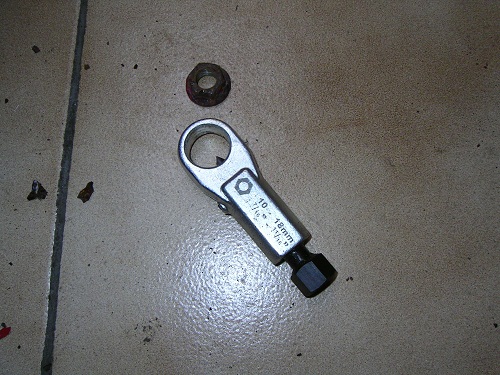
| So I did buy the nut splitter but the result was not impressive. First of all the nuts are not totally square but they have some sort of collar which effectively makes it impossible for the nut splitter to work as it is supposed to, and a second problem is that of course ideally the nut should be on a nice flat area which is rarely the case. |
 |
|
| Logged |
|
|
|
Reply: 26 - 91 |
|
|
| Erik |
Posted on: Sunday, February 20th, 2011, 5:19:37pm
Attachment: sany0032bis.jpg - 96.18 KB (669 views) |
|
|
|
| So I ground off the head of the bolt at the inner side, because there was the most room to work on it, but again, nothing moved. |
 |
|
| Logged |
|
|
|
Reply: 27 - 91 |
|
|
| Erik |
Posted on: Sunday, February 20th, 2011, 5:25:29pm
Attachment: sany0031bis.jpg - 96.25 KB (669 views) |
|
|
|
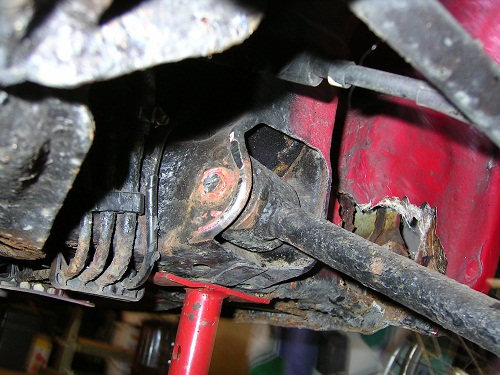
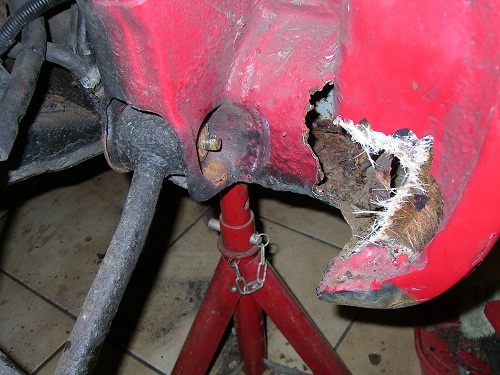
| I tried to attack the nut on the RH side with the nut splitter, this had the effect that now my wrench fitted better and I was able to unod the nut. By wiggling the bolt end with a vise-grip I noticed that here also the bolt has rusted to the steel inner part of the rubber bushing. As you can see all the work created a big hole at the end of the sill where I found that this part has been patched ( or rahter 'bodged') with polyester matting. |
 |
|
| Logged |
|
|
|
Reply: 28 - 91 |
|
|
| lord |
| Posted on: Monday, February 21st, 2011, 7:24:02pm |
|
|
|
Bloody hell....Look at that patch...!!!
Its when you start pulling them apart you begin to realise that they do rust ha ha
|
|
| Logged |
|
|
|
Reply: 29 - 91 |
|
|
| Erik |
Posted on: Sunday, May 8th, 2011, 9:10:36pm
Attachment: dsc00042bis.jpg - 93.62 KB (603 views) |
|
|
|
The lack of postings might indicate that I've given up which is not really the case. I admit I haven't worked on the car anymore but this had also to do with the motorcycles I have been fettling (too many toys, something has to go!) as with the fact that indeed it is worse than I thought.
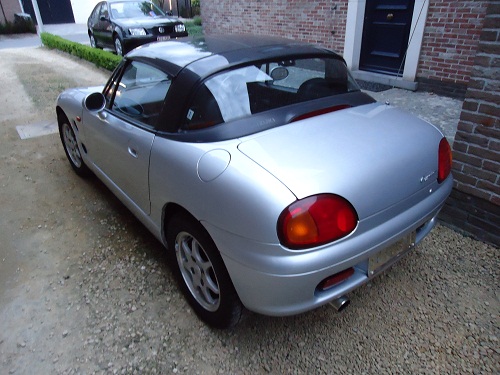
Anyway, because the sun has been shining for weeks now the urge to go out with a convertible became to important to ignore, so I indicated to the missus that maybe another Cappuccino would be a good idea. I always count on her to be sensible and smart but in this case it went all wrong and now I own two Cappuccino's!
One to drive and one to wrench on, how lucky can a man get.
My wife does insist however that I start looking for a luggage rack so that we can go on holiday with it, anyone has one laying around? |
 |
|
| Logged |
|
|
|
Reply: 30 - 91 |
|
|
| Andy |
| Posted on: Sunday, May 8th, 2011, 9:16:13pm |
|
|
Official C.O.C Contributor
Gender: Male
Posts: 23604
Posts Per Day: 3.48 |
|
| Excellent |
Drop me a PM if you would like to be added to the ClubCappo Member Map. More details can be found here.
We now have an official Facebook group as well as a page! See here |
|
| Logged |
|
|
| |
Reply: 31 - 91 |
|
|
| Erik |
Posted on: Tuesday, May 24th, 2011, 9:01:58pm
Attachment: dsc00044bis.jpg - 95.94 KB (568 views) |
|
|
|
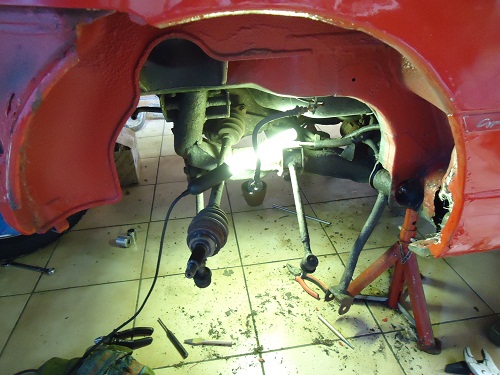
Finally been able to work again on the Cappuccino, succeeded in removing the RH side suspension. It worries me a bit how many parts get damaged though. The disadvantage of an amateur working on a car  |
 |
|
| Logged |
|
|
|
Reply: 32 - 91 |
|
|
| Badger |
| Posted on: Wednesday, May 25th, 2011, 3:22:38am |
|
|
|
| LOL....Nowt wrong with amatuers, that's how we ALL Learn.......'How not to do it the same the second time'. Keep up the good work, it'll be worth it in the end. |
|
| Logged |
|
|
|
Reply: 33 - 91 |
|
|
| Erik |
Posted on: Sunday, November 20th, 2011, 8:36:26pm
Attachment: dsc00065bis.jpg - 95.99 KB (502 views) |
|
|
|
Last posting in May, how time flies.
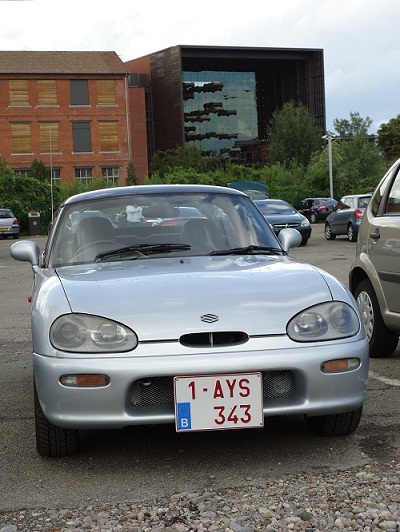
I have procrastinated (nice word, I hope iI use it correctly here) for months, regretting what I had started and wondering what to do. I really would like to protect the other Cappuccino by putting it in the garage but as the situation is now this is not really possible. In the mean time I went on holiday with my wife to the Elsace in France with the Cappuccino and then again realised what a wonderfully nice car it is. I visited the 'Schlumpf' collection, drove at highway speeds and we generally had a real good time. Didn't use it however a few months later to go to the south of France because we wanted to take the bicycles. |
 |
|
| Logged |
|
|
|
Reply: 34 - 91 |
|
|
| Erik |
Posted on: Sunday, November 20th, 2011, 8:45:55pm
Attachment: dsc00133bis.jpg - 105.68 KB (502 views) |
|
|
|
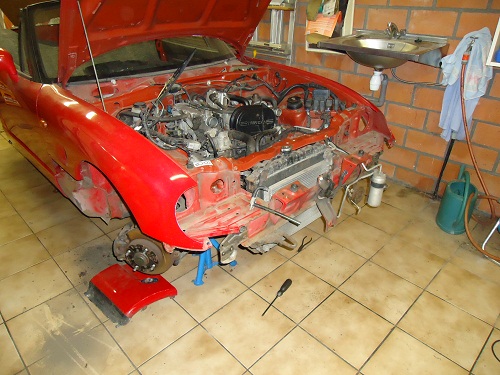
But recently I have cleaned up the garage and have restarted on the Cappuccino (sorry I can't bring myself to call it a Cappo). Having had such a hard time at the rear I started at the front now, removing the front bumper.
|
 |
|
| Logged |
|
|
|
Reply: 35 - 91 |
|
|
| Erik |
Posted on: Sunday, November 20th, 2011, 8:48:08pm
Attachment: dsc00136bis.jpg - 94.23 KB (503 views) |
|
|
|
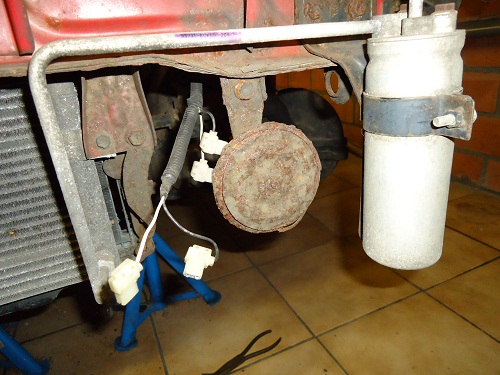
Look at that rusted horn!
Impossible to remove, if I turn the nut everything moves with it! |
 |
|
| Logged |
|
|
|
Reply: 36 - 91 |
|
|
| Erik |
Posted on: Sunday, November 20th, 2011, 8:53:16pm
Attachment: dsc00137bis.jpg - 71.20 KB (497 views) |
|
|
|
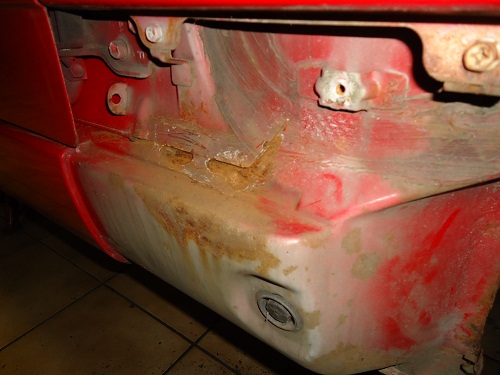
Removed the RH side panel, only afterwards noticing that 1) it is held by a screw at the back and then 2) surprise, also by a nut concealed by the black plastic cover or screen
Found some nasty corrossion, not because it is very bad but because it is forming between two panels welded together in the factory and then covered with some material which evidently hasn't performed very well in protecting against corrossion. |
 |
|
| Logged |
|
|
|
Reply: 37 - 91 |
|
|
| Andy |
| Posted on: Sunday, November 20th, 2011, 8:55:43pm |
|
|
Official C.O.C Contributor
Gender: Male
Posts: 23604
Posts Per Day: 3.48 |
|
| Good to see this project is still going Personally I think you are right to take your time and just do bits as and when. |
Drop me a PM if you would like to be added to the ClubCappo Member Map. More details can be found here.
We now have an official Facebook group as well as a page! See here |
|
| Logged |
|
|
| |
Reply: 38 - 91 |
|
|
| Erik |
Posted on: Sunday, November 20th, 2011, 8:58:47pm
Attachment: dsc00139bis.jpg - 81.20 KB (497 views) |
|
|
|
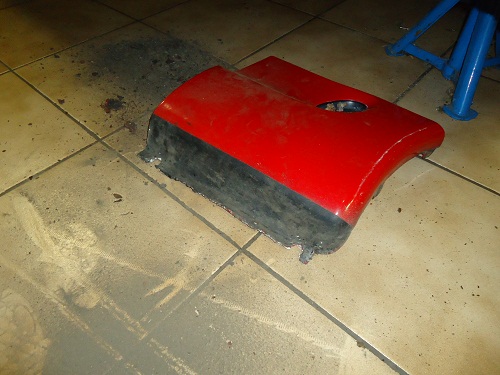
The side panel in aluminium, looks like it's chewed up at the lower portion, I suppose because the aluminium reacts with the metal (electrolytic corrossion?).
Next thing seems the disassembly of the air conditioning parts. Do I have to be carefull with this (is it toxic?). Any advice as always really appreciated. |
 |
|
| Logged |
|
|
|
Reply: 39 - 91 |
|
|
|
 Cappuccino Owners Club › Gallery › Cappo Related Album › To restore or not to restore (Moderators: )


 Locked Board