|
|
 Author Author |
 Fibre Glass Parcel Shelf Enclosure (currently 7423 views) Fibre Glass Parcel Shelf Enclosure (currently 7423 views) |
| Badger |
| Posted on: Saturday, August 9th, 2008, 7:34:08am |
  |
|
|
CG..............I like 'EM. pm on it's way..... 
Crisp,........... Ta mate....more to come soon as work finishes. |
|
 Logged Logged |
|
|
 |
Reply: 400 - 446 |
|
|
| capgun |
| Posted on: Saturday, August 9th, 2008, 2:39:32pm |
|
|
|
 haven't got pm yet! (no huwwy though! ) haven't got pm yet! (no huwwy though! )
I went to a Sound Quality comp today - got my 3 way setup going without the subs, judges said my highs and mids were beautiful but I lacked sub-bass and lost points for no extinguisher and not being able to disconnect the battery in under 20 seconds. |
|
| Logged |
|
|
|
Reply: 401 - 446 |
|
|
| Olyfan |
| Posted on: Saturday, August 9th, 2008, 4:26:43pm |
|
|
|
| sounds like a new game show CG |
|
| Logged |
|
|
|
Reply: 402 - 446 |
|
|
| capgun |
| Posted on: Saturday, August 9th, 2008, 4:53:57pm |
|
|
|
| nah, it's like a scorecard system where they just tick things off on a list |
|
| Logged |
|
|
|
Reply: 403 - 446 |
|
|
| Badger |
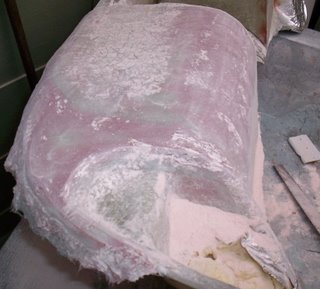
Posted on: Tuesday, August 12th, 2008, 4:36:12am
 Attachment: 100_1394.jpg - 16.37 KB (735 views) Attachment: 100_1394.jpg - 16.37 KB (735 views) |
|
|
|
| View from the Top.... |
 |
|
| Logged |
|
|
|
Reply: 404 - 446 |
|
|
| Badger |
Posted on: Tuesday, August 12th, 2008, 4:37:01am
Attachment: 100_1395.jpg - 14.73 KB (731 views) |
|
|
|
| One more layer added...... |
 |
|
| Logged |
|
|
|
Reply: 405 - 446 |
|
|
| Badger |
Posted on: Tuesday, August 12th, 2008, 4:38:00am
Attachment: 100_1396.jpg - 20.04 KB (732 views) |
|
|
|
| ...while waiting for that to dry, moved onto sanding the Pods.... |
 |
|
| Logged |
|
|
|
Reply: 406 - 446 |
|
|
| Badger |
Posted on: Tuesday, August 12th, 2008, 4:40:36am
Attachment: 100_1397.jpg - 15.03 KB (729 views) |
|
|
|
| At this pont, I have left them connected to Parcel Shelf for ease of sanding....no movement.... You can see the low spots that will get a fine layer of finish coat once I've Trimmed to shape and happy..... |
 |
|
| Logged |
|
|
|
Reply: 407 - 446 |
|
|
| Badger |
Posted on: Tuesday, August 12th, 2008, 4:41:48am
Attachment: 100_1398.jpg - 12.56 KB (731 views) |
|
|
|
| Washed down.....and ready for the other side.... |
 |
|
| Logged |
|
|
|
Reply: 408 - 446 |
|
|
| Badger |
Posted on: Tuesday, August 12th, 2008, 4:44:00am
Attachment: 100_1399.jpg - 23.16 KB (727 views) |
|
|
|
You wouldn't believe this weather.....this is the next day from previous weather shot, just washed the car too..... > |
 |
|
| Logged |
|
|
|
Reply: 409 - 446 |
|
|
| Badger |
Posted on: Tuesday, August 12th, 2008, 4:44:47am
Attachment: 100_1403.jpg - 15.57 KB (724 views) |
|
|
|
| ....Now look at today..... |
 |
|
| Logged |
|
|
|
Reply: 410 - 446 |
|
|
| Badger |
Posted on: Tuesday, August 12th, 2008, 4:46:29am
Attachment: 100_1401.jpg - 15.34 KB (726 views) |
|
|
|
| Moving on, removed the 1st Pod, Trimmed to desired shape, removed excess foil and Fibreglass bits, washed down...... |
 |
|
| Logged |
|
|
|
Reply: 411 - 446 |
|
|
| Badger |
Posted on: Tuesday, August 12th, 2008, 4:50:30am
Attachment: 100_1404.jpg - 17.20 KB (724 views) |
|
|
|
| This is the Joining piece we attached earlier.....will now lay a piece over this to blend in with the rest....yes, there is enough 'play' around the Pod....you will notice this if you have been following.....Once this has dried, will be sanded smooth like before, then I will apply the Finish coat, sand smooth, prime and mark Door Location properly ready for cut out. |
 |
|
| Logged |
|
|
|
Reply: 412 - 446 |
|
|
| Badger |
Posted on: Tuesday, August 12th, 2008, 4:52:57am
Attachment: 100_1405.jpg - 12.81 KB (725 views) |
|
|
|
and while I wait for All that to dry, will continue in the same way with the 2nd Pod....I won't bother with pics for that as it is only a repeat of the 1st...... and I don't want you all falling asleep.....  |
 |
|
| Logged |
|
|
|
Reply: 413 - 446 |
|
|
| Badger |
Posted on: Tuesday, August 12th, 2008, 5:02:01am
Attachment: 100_1406.jpg - 7.88 KB (723 views) |
|
|
|
Waiting is the most frustrating thing about all of ths process, and the weather plays a very big part.........
That said, I will be proceeding with my Side Skirts and Rear Bumper at the same time...to finally get them ready for paint.
No these aren't the finished article....the Small Front Guard will be attached above the Vents....(not sure if I will keep the Vents or not)....Nowt else matches them, and the insert I made earlier from the Guard, will be smoothed into the Rear, then the Flare to be added. If you look closely, you can see how much I have to remove to get the Right Size for the CAP......Pencil line toward RHS....and yes, that is another 'Parcel Shelf' enjoying the sun............
Probably should've put this in the SNEAZA Album...??? Oh well.... |
 |
Last modified Tuesday, August 12th, 2008, 5:23:02am by Badger |
|
| Logged |
|
|
|
Reply: 414 - 446 |
|
|
| Badger |
| Posted on: Tuesday, August 12th, 2008, 5:03:44am |
|
|
|
STOP THE PRESS.....!!! Excellent, it worked.....
It is with regret, that I will have to put a HOLD on this........
Here's why......
1) NO BEER IN THE FRIDGE. 
2) Apparently I have to pay attention to the Wife in order to spend more money and continue.
3) Have to attend to the jobs I've been NEGLECTING.....Re-Oil the Deck around the Pool Area and Front Courtyard. I told her IT WAS THE MIDDLE OF WINTER.....But she's a Blonde and it went straight through.......
4) Get rid of excessive amount of Palm Leaves.....Told her I was saving them to build a Hut near the Pool and she pondered on that for a minute before I copped a 'Slap' to the Earhole....DOH!!!
5) Apparently, the Kids have Projects that require my Drawing and Model building experteeeeeze ( I'll Post some Pics when I'm done). Said, why is it always up to me to do this.....they are YOUR PROJECTS.....answer, because we love you and we can't do it like you....Little Brown nosing B!##%$%s....that's the problem when you HELP with the First one........it never ends...
6) THE IMPORTANT ONE.....Got my 1st Customer for a Parcel Shelf Build, which looks like it may be a Complete Sub Enclosure...??? we will see
So, if you can bear with it for a week or two.....I'll Be Back..... |
Last modified Tuesday, August 12th, 2008, 5:24:04am by Badger |
|
| Logged |
|
|
|
Reply: 415 - 446 |
|
|
| grant4561 |
| Posted on: Tuesday, August 12th, 2008, 6:42:27am |
|
|
Maximum Member

Posts: 1719
Posts Per Day: 0.98 |
|
She must have a blonde twin sister that I am married to.
Exactly the same questions & answers, no respect at all! |
|
| Logged |
|
|
 |
Reply: 416 - 446 |
|
|
| Badger |
| Posted on: Tuesday, August 12th, 2008, 8:34:45am |
|
|
|
| LOL..... Ain't dat da twuth...... |
|
| Logged |
|
|
|
Reply: 417 - 446 |
|
|
| crisp |
| Posted on: Tuesday, August 12th, 2008, 10:10:36am |
|
|
|
I have the same problems here with the definition of "help", Sneaza, lol.
|
|
| Logged |
|
|
|
Reply: 418 - 446 |
|
|
| grant4561 |
| Posted on: Tuesday, August 12th, 2008, 11:46:27am |
|
|
Maximum Member
Posts: 1719
Posts Per Day: 0.98 |
|
| They dont seem to understand that home maintenance will always be there and will actually wait patiently for you to attend to it. Must admit I will use the excuse about building a hut with the palm leaves though...good one! |
|
| Logged |
|
|
| |
Reply: 419 - 446 |
|
|
| capgun |
| Posted on: Tuesday, August 12th, 2008, 6:50:33pm |
|
|
|
| LOL! Say you are doing your bit for the planet and making compost out of the palm leaves! And with the kids drawings say 'the teachers are cracking down on fraudulent copying off the net and other people doing thier schoolwork! |
|
| Logged |
|
|
|
Reply: 420 - 446 |
|
|
| capgun |
| Posted on: Tuesday, August 12th, 2008, 6:54:15pm |
|
|
|
You could offer a picture of you in a photo frame to your wife so she can carry it around and always be 'around' too! lol
Sideskirts look good, will be exciting to see them and the rear bumper on your capp (I got those subs yesterday too!) |
|
| Logged |
|
|
|
Reply: 421 - 446 |
|
|
| Badger |
| Posted on: Wednesday, August 13th, 2008, 7:24:11am |
|
|
|
| Subs----Cool......as for the carrying of the photo frame....she has one already, it's called a 'DART BOARD'.....lol |
|
| Logged |
|
|
|
Reply: 422 - 446 |
|
|
| Badger |
| Posted on: Monday, September 8th, 2008, 6:15:54am |
|
|
|
| I'M Back.....projects outdaway.....CG's shelf done....can now continue.... |
|
| Logged |
|
|
|
Reply: 423 - 446 |
|
|
| Olyfan |
| Posted on: Monday, September 8th, 2008, 8:27:10am |
|
|
|
|
| Logged |
|
|
|
Reply: 424 - 446 |
|
|
| Badger |
Posted on: Monday, September 8th, 2008, 10:19:11am
Attachment: cgs_base.jpg - 16.17 KB (652 views) |
|
|
|
| Just like the other one......it just depends wether CG will want me to 'FILL IN' the front or not...??? |
 |
|
| Logged |
|
|
|
Reply: 425 - 446 |
|
|
| Olyfan |
| Posted on: Monday, September 8th, 2008, 3:01:44pm |
|
|
|
I so wish I had your skill/experience Sneaza  |
|
| Logged |
|
|
|
Reply: 426 - 446 |
|
|
| Badger |
| Posted on: Monday, September 8th, 2008, 4:15:19pm |
|
|
|
| HaHaHa....you're too kind, cheers mate. Actually, CG's design is relatively straight forward...2 Holes and fill in the rest.....unless he has changed his mind. |
|
| Logged |
|
|
|
Reply: 427 - 446 |
|
|
| capgun |
| Posted on: Tuesday, September 9th, 2008, 6:18:38pm |
|
|
|
| Thanks so much Sneaza It looks really great! Not something I would attempt as a beginner - I like your idea of a smooth panel going over the top of the 'shelf', I will probably implement that and mount the subs on a thick bit of ally plate and fix it to the rest! |
|
| Logged |
|
|
|
Reply: 428 - 446 |
|
|
| Badger |
Posted on: Tuesday, September 23rd, 2008, 12:55:48pm
Attachment: 100_1475.jpg - 28.63 KB (613 views) |
|
|
|
Been a bit Slack as I am now working 2 jobs, so not getting as much done at the moment, A lot of sanding on the Pods, but haven't bothered with the Pics until next step, but I did continue with the Sub Part.....
Attached the Front after Trimming to rough size..... and applied Spray Foam where the Sides meet the Curve...... |
 |
|
| Logged |
|
|
|
Reply: 429 - 446 |
|
|
| Badger |
Posted on: Tuesday, September 23rd, 2008, 1:00:17pm
Attachment: 100_1476.jpg - 14.47 KB (613 views) |
|
|
|
From the Inside.....Needed to fill this so that I can 'Shape' the Centre Section over the Console then apply the Fibreglass Matt.....
This Foam will be removed, as I will apply the Matting to the Inside as well to get the desired Thickness and strengthen the Walls. |
 |
|
| Logged |
|
|
|
Reply: 430 - 446 |
|
|
| Badger |
Posted on: Tuesday, September 23rd, 2008, 1:02:07pm
Attachment: 100_1477.jpg - 17.10 KB (610 views) |
|
|
|
| Tape removed, you can see now where I need to 'Shape' it and apply the Matting... |
 |
|
| Logged |
|
|
|
Reply: 431 - 446 |
|
|
| Badger |
Posted on: Tuesday, September 23rd, 2008, 1:03:32pm
Attachment: 100_1478.jpg - 18.93 KB (609 views) |
|
|
|
| Trimmed the Front ready for the Top Coat..... |
 |
|
| Logged |
|
|
|
Reply: 432 - 446 |
|
|
| crisp |
| Posted on: Tuesday, September 23rd, 2008, 7:04:48pm |
|
|
|
Looking good, well worth the wait, Sneaza.
|
|
| Logged |
|
|
|
Reply: 433 - 446 |
|
|
| Badger |
| Posted on: Tuesday, September 23rd, 2008, 8:32:31pm |
|
|
|
| Cheers Crisp, we're getting there, albeit, slowly.......while doing this one am also doing one with solid 1 piece door......full length of Parcel Shelf, though base is same, Door is only difference and a LOT less work..... |
|
| Logged |
|
|
|
Reply: 434 - 446 |
|
|
| crisp |
| Posted on: Tuesday, September 23rd, 2008, 8:49:03pm |
|
|
|
Please post the pics of that one as well when you get the chance, please Sneaza.
|
|
| Logged |
|
|
|
Reply: 435 - 446 |
|
|
| Badger |
Posted on: Tuesday, September 30th, 2008, 8:14:05am
Attachment: 100_1498.jpg - 9.93 KB (592 views) |
|
|
|
| Just for you....Made theprofile same as the First, only this time, used thick Card...no flat spots..... |
 |
|
| Logged |
|
|
|
Reply: 436 - 446 |
|
|
| crisp |
| Posted on: Tuesday, September 30th, 2008, 8:16:17am |
|
|
|
|
| Logged |
|
|
|
Reply: 437 - 446 |
|
|
| Badger |
Posted on: Tuesday, September 30th, 2008, 8:32:04am
Attachment: 100_1499.jpg - 14.48 KB (589 views) |
|
|
|
Next, thought I'd try something different.....Will line the inside surface with some Vinyl left over from a previous venture, the plan being, that, when I lay the fibreglass onto the surface, it will give the TEXTURE of the vinyl.....hopefully.....
As I am now working 2 jobs ( money needed for my HABIT....Fibreglass ) and have quite a bit to do, this will be a bit slow for a while.
The List so far:
Sand and Re-Oil the Decking around the House and Pool....(Think Karate Kid..Mr Miyage)
Finish Capguns Enclosure.
Finish Rear Bumper.
Finish 'How To'.
Modify and Finish Sub Enclosure 2.
Finish and install A-Pillar Tweet Pods.
Finish 'How To Parcel Shelf 2'.
Continue and Finish Dashboard Gauge Pod.
Start Sideskirts.
Start Sub Enclosure 3.
Start Sub Pods for Boot.
|
 |
|
| Logged |
|
|
|
Reply: 438 - 446 |
|
|
| crisp |
| Posted on: Tuesday, September 30th, 2008, 5:41:09pm |
|
|
|
Impressive to do list there Sneaza!
Textures?
Yes, I did a couple of short spells in a GRP place in my youth and they used shaped/imprinted sheets to give their security & fire windows (clear GRP & some was steel mesh reinforced) a dimpled/rippled look.
Not sure if vinyl would work as it's a very fine patern?
Can't wait ot see the result 
|
|
| Logged |
|
|
|
Reply: 439 - 446 |
|
|
|
 Cappuccino Owners Club › FAQ › How to... › Fibre Glass Parcel Shelf Enclosure (Moderators: )


 Locked Board