 |
Pages: « 1, 2, 3, 4, 5, 6, 7, 8, 9, 10, 11, 12, 13 ... » |
  |
|
 Author Author |
 Sneaza 2...The RED One (currently 9661 views) Sneaza 2...The RED One (currently 9661 views) |
| Badger |
| Posted on: Tuesday, November 10th, 2009, 2:08:57am |
  |
|
|
| Got a few more bits to go on, but will wait until the car is painted.....Next job, Running Stereo wiring for Amps, Subs and Speakers, Central Locking and Alarm. |
|
 Logged Logged |
|
|
 |
Reply: 40 - 504 |
|
|
| Badger |
Posted on: Friday, November 13th, 2009, 8:41:50am
 Attachment: 100_1849.jpg - 18.61 KB (698 views) Attachment: 100_1849.jpg - 18.61 KB (698 views) |
|
|
|
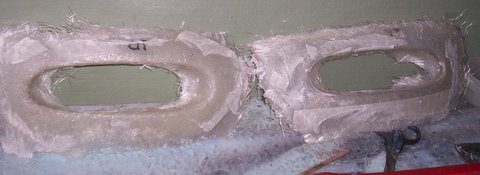
| So after some thought about where to put and what type to put Driving/Spot Lights, I decided to design my own and keep within the existing look of the car.....Made a couple of molds from Rear of Indicators.... |
 |
|
| Logged |
|
|
|
Reply: 41 - 504 |
|
|
| Badger |
Posted on: Friday, November 13th, 2009, 8:43:32am
Attachment: 100_1848.jpg - 28.05 KB (696 views) |
|
|
|
| Close up of Driver side.... |
 |
|
| Logged |
|
|
|
Reply: 42 - 504 |
|
|
| Badger |
Posted on: Friday, November 13th, 2009, 8:45:10am
Attachment: 100_1852.jpg - 25.07 KB (698 views) |
|
|
|
| Decide where it will be acceptable...... |
 |
|
| Logged |
|
|
|
Reply: 43 - 504 |
|
|
| Badger |
Posted on: Friday, November 13th, 2009, 8:53:03am
Attachment: 100_1853.jpg - 46.91 KB (695 views) |
|
|
|
| Holes to be cut out......The rear to be reinforced and filled...... |
 |
|
| Logged |
|
|
|
Reply: 44 - 504 |
|
|
| Badger |
Posted on: Friday, November 13th, 2009, 8:57:42am
Attachment: 100_1850.jpg - 42.42 KB (690 views) |
|
|
|
....then, trim pieces insert and 'Glass into place. I will use a spare set of Indicators as the Driving Lights with the inside already at the Chrome Platers, then I will attach the Clear Lenses that will match the Clear Lenses which will cover the Indicators.  |
 |
|
| Logged |
|
|
|
Reply: 45 - 504 |
|
|
| yoshiyuki09 |
| Posted on: Friday, November 13th, 2009, 10:32:10am |
|
|
|
I'm really liking the engine bay, very subtle mods but change the look loads!!  where did you get the s/s intercooler pipes from? where did you get the s/s intercooler pipes from? |
|
| Logged |
|
|
|
Reply: 46 - 504 |
|
|
| Badger |
| Posted on: Friday, November 13th, 2009, 1:23:34pm |
|
|
|
| Cheers Mate, the Pipes were on the car when I bought it. they looked as if they were Painted Silver, but after I cleaned them up....... |
|
| Logged |
|
|
|
Reply: 47 - 504 |
|
|
| capgun |
| Posted on: Saturday, November 14th, 2009, 6:45:30pm |
|
|
|
You are still moving this project along quickly since I saw you last Dave! 
|
|
| Logged |
|
|
|
Reply: 48 - 504 |
|
|
| Badger |
| Posted on: Saturday, November 14th, 2009, 10:00:43pm |
|
|
|
| Cheers CG, Hows the Green one coming along...??? |
|
| Logged |
|
|
|
Reply: 49 - 504 |
|
|
| capgun |
| Posted on: Sunday, November 15th, 2009, 11:02:25pm |
|
|
|
got posting ability back!
Green one lost it's bumper now and new HU installed (Nak MB100 with green lighting to match car), got some more stainless overflow and catch can bottles ready for silicone hose install
|
|
| Logged |
|
|
|
Reply: 50 - 504 |
|
|
| Badger |
| Posted on: Sunday, November 15th, 2009, 11:17:03pm |
|
|
|
| Cool, check your emails.....and set up Album for Green One...??? we need Pics....lol |
|
| Logged |
|
|
|
Reply: 51 - 504 |
|
|
| Badger |
Posted on: Friday, December 4th, 2009, 1:55:29am
Attachment: 100_1854.jpg - 17.92 KB (614 views) |
|
|
|
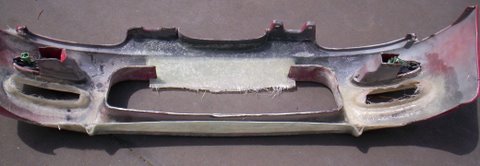
| So, cut outs made and bits Glassed in place... |
 |
|
| Logged |
|
|
|
Reply: 52 - 504 |
|
|
| Badger |
Posted on: Friday, December 4th, 2009, 1:57:30am
Attachment: 100_1855.jpg - 23.06 KB (615 views) |
|
|
|
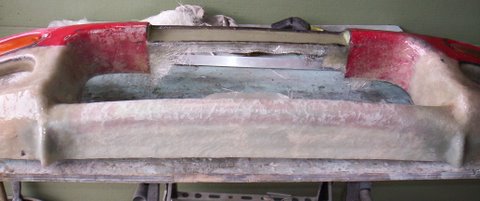
| Centre section removed and modded for Number Plate and holes glassed.... |
 |
|
| Logged |
|
|
|
Reply: 53 - 504 |
|
|
| Badger |
Posted on: Friday, December 4th, 2009, 2:01:01am
Attachment: 100_1857.jpg - 22.15 KB (613 views) |
|
|
|
| Centre section..... |
 |
|
| Logged |
|
|
|
Reply: 54 - 504 |
|
|
| Badger |
Posted on: Friday, December 4th, 2009, 2:02:35am
Attachment: 100_1859.jpg - 30.78 KB (615 views) |
|
|
|
| Bottom glassed..... |
 |
|
| Logged |
|
|
|
Reply: 55 - 504 |
|
|
| Badger |
Posted on: Friday, December 4th, 2009, 2:04:21am
Attachment: 100_1860.jpg - 28.76 KB (614 views) |
|
|
|
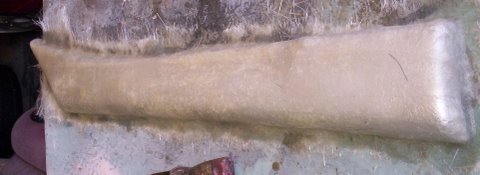
| Rear Reinforcing...... |
 |
|
| Logged |
|
|
|
Reply: 56 - 504 |
|
|
| Badger |
Posted on: Friday, December 4th, 2009, 2:06:19am
Attachment: 100_1865.jpg - 19.50 KB (613 views) |
|
|
|
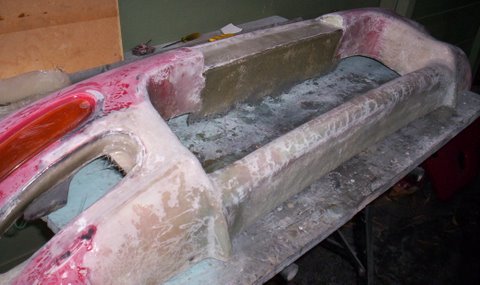
| Holes filled, ready for smoothing, Lines filled ready for smoothing...... |
 |
|
| Logged |
|
|
|
Reply: 57 - 504 |
|
|
| Badger |
Posted on: Friday, December 4th, 2009, 2:08:49am
Attachment: 100_1856.jpg - 38.73 KB (609 views) |
|
|
|
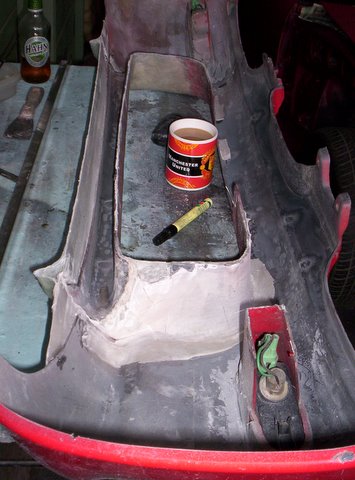
| While I was again waiting, decided to make up a NEW Fascia to house Head Unit and EQ.... |
 |
|
| Logged |
|
|
|
Reply: 58 - 504 |
|
|
| Badger |
Posted on: Friday, December 4th, 2009, 2:10:19am
Attachment: 100_1866.jpg - 51.91 KB (609 views) |
|
|
|
| ...and also started on the bits for my NEW Door trims for Sneaza.... |
 |
|
| Logged |
|
|
|
Reply: 59 - 504 |
|
|
| Badger |
Posted on: Friday, December 4th, 2009, 2:12:12am
Attachment: 100_1867.jpg - 17.48 KB (605 views) |
|
|
|
Top of Trim. These bits will be Glassed to the trim, which of course will be fibreglass and house a few speakers.....  |
 |
|
| Logged |
|
|
|
Reply: 60 - 504 |
|
|
| capgun |
| Posted on: Friday, December 4th, 2009, 5:57:45am |
|
|
|
| You are the Fiberglass King! |
|
| Logged |
|
|
|
Reply: 61 - 504 |
|
|
| Badger |
Posted on: Friday, December 4th, 2009, 8:02:28am
Attachment: 100_1870.jpg - 28.53 KB (598 views) |
|
|
|
LOL......Cheers CG. Made the NEW Cards.
Note: Becuase of how these things suffer when they get attacked by the weather...even though there is plastic on the door....and the Holes where the Clips break, I decided to Stiffen and protect them.
Mixed up some Fibreglass resin and painted the Rear sidecompletely, which will stop weather attacking them and makes the Holes unbreakable. |
 |
|
| Logged |
|
|
|
Reply: 62 - 504 |
|
|
| Badger |
Posted on: Friday, December 4th, 2009, 8:07:22am
Attachment: 100_1871.jpg - 25.40 KB (594 views) |
|
|
|
| Bits cleaned up and then a test fit.......sorted. |
 |
Last modified Friday, December 4th, 2009, 8:08:32am by Badger |
|
| Logged |
|
|
|
Reply: 63 - 504 |
|
|
| Badger |
Posted on: Friday, December 4th, 2009, 8:13:39am
Attachment: 100_1875.jpg - 42.64 KB (587 views) |
|
|
|
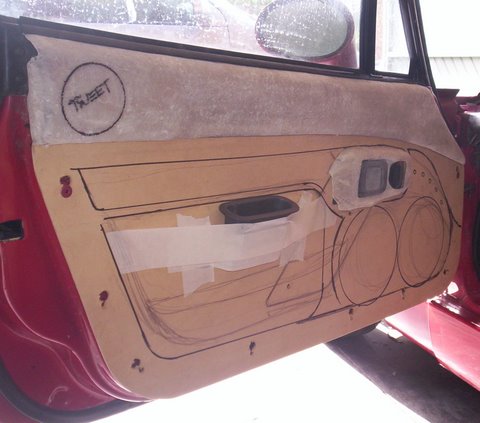
Then playing around......making sure what I'm Planning will fit..........
More Glassing and Gap filling to come.
Then molding the bits for the Armrest which the Handle taped there will be Recessed into and the Map Pocket under it. No the speakers will not fit INTO THE DOOR....they will protrude about same depth as the arm rest...... |
 |
|
| Logged |
|
|
|
Reply: 64 - 504 |
|
|
| Badger |
Posted on: Friday, December 4th, 2009, 8:23:29am
Attachment: 100_1872.jpg - 38.02 KB (595 views) |
|
|
|
| Made up the 'Goal Post' for the start of the NEW Console / Sub Enclosure....This will be Very DIFFERENT from the others I have STILL to finish, but, THIS will be theBees Knees if it turns out like the pics in my head.....just hope I don't hit the erase button..... |
 |
|
| Logged |
|
|
|
Reply: 65 - 504 |
|
|
| Badger |
Posted on: Friday, December 4th, 2009, 8:26:21am
Attachment: 100_1874.jpg - 44.79 KB (589 views) |
|
|
|
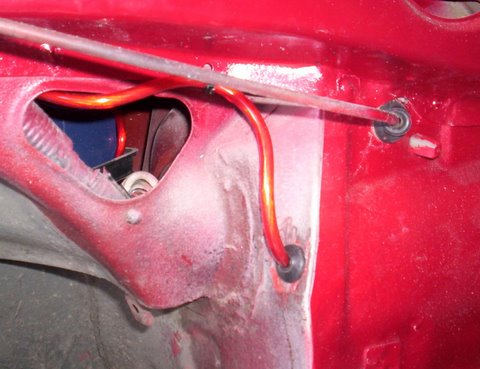
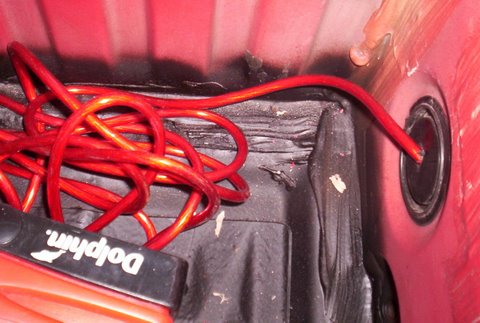
| Amp Cables were next.... Just needed to find a way to make 'em invisible. |
 |
|
| Logged |
|
|
|
Reply: 66 - 504 |
|
|
| Badger |
Posted on: Friday, December 4th, 2009, 8:28:11am
Attachment: 100_1873.jpg - 46.47 KB (587 views) |
|
|
|
| ....and I did. Now just have to decide where I'm going to put the Amps...??? |
 |
|
| Logged |
|
|
|
Reply: 67 - 504 |
|
|
| lord |
| Posted on: Sunday, December 6th, 2009, 7:14:54pm |
|
|
|
This look ns class so far!
I love the look and this is kinda what ive been looking for. I hate the original door handles!! They stick in my leg almost with the door shut! I was hoping to change the door handle some how and i'll be watching this closely!
|
|
| Logged |
|
|
|
Reply: 68 - 504 |
|
|
| Badger |
Posted on: Monday, December 7th, 2009, 2:13:09am
Attachment: 100_1877.jpg - 44.49 KB (545 views) |
|
|
|
| Cheers Lord, More to come......Top piece 'Glassed in place.... |
 |
|
| Logged |
|
|
|
Reply: 69 - 504 |
|
|
| Badger |
Posted on: Monday, December 7th, 2009, 2:17:32am
Attachment: 100_1879.jpg - 31.31 KB (544 views) |
|
|
|
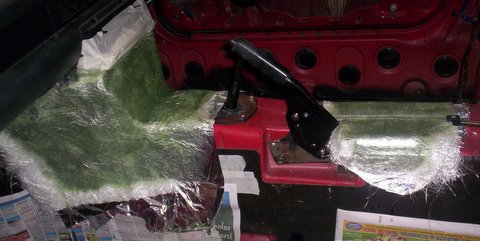
These bits are for Sneaza, but because I have this one pulled apart, it makes sense to 'Mock-up' the bits and then Transfer them when I've finished....at least that's the plan....but the OH can't grasp the concept....nag,nag,nag.....
These are the brackets for the NEW CONSOLE........ |
 |
Last modified Monday, December 7th, 2009, 2:18:06am by Badger |
|
| Logged |
|
|
|
Reply: 70 - 504 |
|
|
| Badger |
Posted on: Monday, December 7th, 2009, 2:19:08am
Attachment: 100_1881.jpg - 56.05 KB (542 views) |
|
|
|
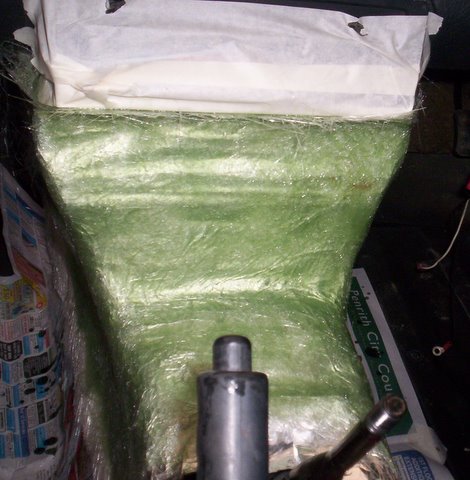
| Front Bracket...... |
 |
|
| Logged |
|
|
|
Reply: 71 - 504 |
|
|
| Badger |
Posted on: Monday, December 7th, 2009, 2:20:03am
Attachment: 100_1878.jpg - 29.02 KB (540 views) |
|
|
|
| Centre..... |
 |
|
| Logged |
|
|
|
Reply: 72 - 504 |
|
|
| Badger |
Posted on: Monday, December 7th, 2009, 2:23:30am
Attachment: 100_1880.jpg - 60.74 KB (540 views) |
|
|
|
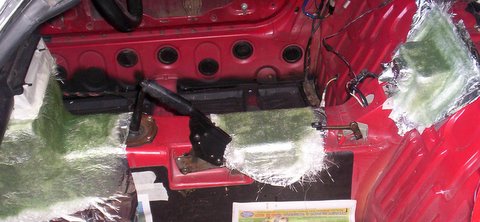
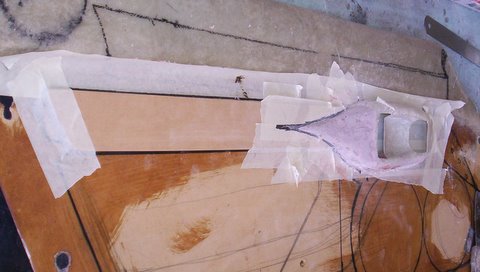
| Rear......Yes the Latch will be relocated into the Front of the New Console, which will be approx as high as the top of the Gearstick Knob, also, the Petrol / Boot Release will be relocated to Drivers side Footwell, Just in front of seat..... |
 |
Last modified Monday, December 7th, 2009, 2:33:33am by Badger |
|
| Logged |
|
|
|
Reply: 73 - 504 |
|
|
| Badger |
Posted on: Monday, December 7th, 2009, 2:29:16am
Attachment: 100_1883.jpg - 19.50 KB (537 views) |
|
|
|
| So, not sure yet for design for the Handle surround, but this will do for now..... |
 |
|
| Logged |
|
|
|
Reply: 74 - 504 |
|
|
| Badger |
Posted on: Monday, December 7th, 2009, 2:31:53am
Attachment: 100_1882.jpg - 26.86 KB (537 views) |
|
|
|
| ....attached to Strip. This will be all One Piece that will be Chromed. It will attach on top of the Door Trim same as the Original Handle does at present...... |
 |
|
| Logged |
|
|
|
Reply: 75 - 504 |
|
|
| capgun |
| Posted on: Monday, December 7th, 2009, 12:45:50pm |
|
|
|
| wow! One thing though - are you sure you want to put the tweets all the way back at your shoulders? It would be really hard to get a front stage happening. |
|
| Logged |
|
|
|
Reply: 76 - 504 |
|
|
| Badger |
| Posted on: Monday, December 7th, 2009, 1:51:24pm |
|
|
|
| Yep, They aren't the Tweets for the Front.......Tried them in this pos. Months ago, same time as I made the A-Pillars.....Have 3 Pairs Front, Mid, Rear....all revealed in due time........ |
|
| Logged |
|
|
|
Reply: 77 - 504 |
|
|
| lord |
| Posted on: Monday, December 7th, 2009, 6:24:29pm |
|
|
|
Modding hell!! How do you fit time for this? ha ha
I can not wait for the doors to be finished. This really is inspirational because ive never modified anything of real purpose like that.
Keep up the good work. |
|
| Logged |
|
|
|
Reply: 78 - 504 |
|
|
| CaffieneHit |
| Posted on: Tuesday, December 8th, 2009, 8:13:22am |
|
|
Maximum Member

Posts: 541
Posts Per Day: 0.32 |
|
Wow Dave! Everything seems to be coming along really well and I'm in love with the colour you've chosen for the red devil!
Looking forward to perving on more of this as it progresses further.
Keep it up soldier! |
|
| Logged |
|
|
 |
Reply: 79 - 504 |
|
|
Pages: « 1, 2, 3, 4, 5, 6, 7, 8, 9, 10, 11, 12, 13 ... » |
|
|
 Cappuccino Owners Club › Gallery › Cappo Related Album › Sneaza 2...The RED One (Moderators: )
 Locked Board