|
|
 Author Author |
 Sneaza 2...The RED One (currently 9662 views) Sneaza 2...The RED One (currently 9662 views) |
| Badger |
| Posted on: Friday, April 13th, 2012, 10:03:08am |
  |
|
|
| Just need to remove the Bumpers now and finish the Fibreglassing underneath and tidy up what I just removed, then get some driving time under the belt while saving for the Paint. |
|
 Logged Logged |
|
|
 |
Reply: 400 - 504 |
|
|
| Andy |
| Posted on: Friday, April 13th, 2012, 11:30:50am |
|
|
Official C.O.C Contributor


Gender:  Male Male
Posts: 23604
Posts Per Day: 3.48 |
|
Got to agree, it looks the dogs danglies!  |
Drop me a PM if you would like to be added to the ClubCappo Member Map. More details can be found here.
We now have an official Facebook group as well as a page! See here |
|
| Logged |
|
|
 |
Reply: 401 - 504 |
|
|
| Badger |
| Posted on: Friday, April 13th, 2012, 12:13:49pm |
|
|
|
| Cheers mate, much appreciated, taken way too long to get here, with so much more to do..... |
|
| Logged |
|
|
|
Reply: 402 - 504 |
|
|
| half-9 |
| Posted on: Saturday, April 14th, 2012, 12:15:51pm |
|
|
Big Member

Posts: 453
Posts Per Day: 0.32 |
|
This looks great! It's very detailed & impressive work!
What suspension are you using to accomodate the 17's?
Cheers
H |
|
| Logged |
|
|
| |
Reply: 403 - 504 |
|
|
| Badger |
| Posted on: Saturday, April 14th, 2012, 12:33:19pm |
|
|
|
| Cheers H-9.....Suspension at the moment is what was on the car when I got it.....GAB All round, but will probably upgrade to BC Coilovers when Money permits, AFTER the Paint.... |
|
| Logged |
|
|
|
Reply: 404 - 504 |
|
|
| Badger |
Posted on: Tuesday, April 17th, 2012, 12:50:55am
 Attachment: 100_2478.jpg - 29.07 KB (635 views) Attachment: 100_2478.jpg - 29.07 KB (635 views) |
|
|
|
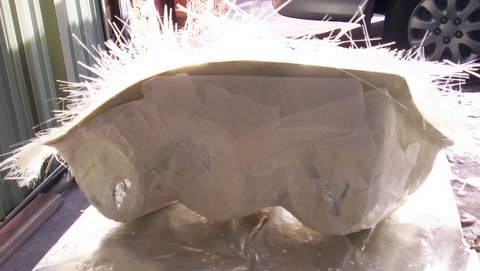
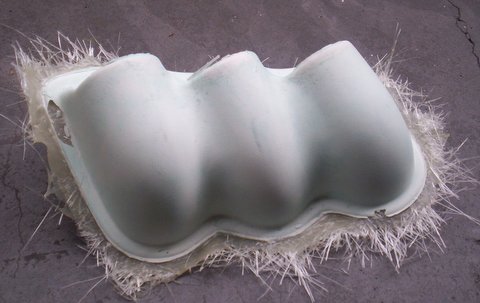
So, Trimmed up the Gauge Pod Mold, 5 coats of wax, PVA Release, Oh,and to make it easier, I cut some Cardboard Circles, Taped and Foiled them then stuck them into the Holes....then applied the Gelcoat then Glassed up....
|
 |
|
| Logged |
|
|
|
Reply: 405 - 504 |
|
|
| Badger |
Posted on: Tuesday, April 17th, 2012, 12:52:15am
Attachment: 100_2482.jpg - 21.01 KB (631 views) |
|
|
|
That was Last night....This morning I was impatient to see if it worked and...............SHAZZAAAAAAMMMMM!  |
 |
|
| Logged |
|
|
|
Reply: 406 - 504 |
|
|
| Badger |
Posted on: Tuesday, April 17th, 2012, 12:53:08am
Attachment: 100_2483.jpg - 26.93 KB (632 views) |
|
|
|
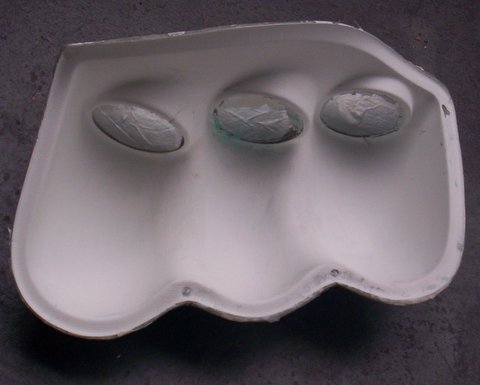
| Mold is perfect, just need to apply wax and go again..... |
 |
|
| Logged |
|
|
|
Reply: 407 - 504 |
|
|
| Badger |
Posted on: Tuesday, April 17th, 2012, 12:54:49am
Attachment: 100_2484.jpg - 27.05 KB (630 views) |
|
|
|
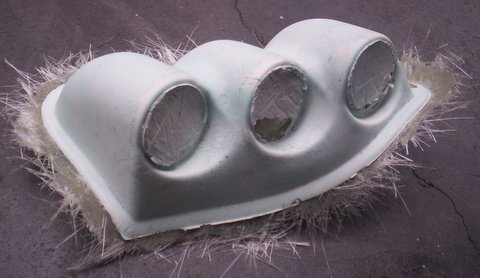
Now just have to trim it up, remove the PVA....Blueish colour, then Paint. Yes I could've used Black Gelcoat, but I already had this, so.....  |
 |
|
| Logged |
|
|
|
Reply: 408 - 504 |
|
|
| Badger |
Posted on: Tuesday, April 17th, 2012, 12:58:59am
Attachment: 100_2485.jpg - 31.99 KB (626 views) |
|
|
|
.....and next time I wont be in such a hurry....you can see the 2 parts I chipped the Gelcoat when I prised it off the mold....Gelcoat putty will fix this good as new. Well pleased so far.
If anyone is interested....??? $30 plus postage. PM if you want one.  |
 |
Last modified Tuesday, April 17th, 2012, 3:02:36am by Badger |
|
| Logged |
|
|
|
Reply: 409 - 504 |
|
|
| Badger |
Posted on: Tuesday, April 17th, 2012, 1:01:14am
Attachment: 100_2481.jpg - 23.15 KB (627 views) |
|
|
|
Also got paint on my new Sub Enclosure....match the Interior....for now 
Wiring, Amps, Head Unit, Speakers and Subs to follow...... |
 |
|
| Logged |
|
|
|
Reply: 410 - 504 |
|
|
| Badger |
Posted on: Tuesday, April 17th, 2012, 2:48:59am
Attachment: 100_2486.jpg - 41.25 KB (621 views) |
|
|
|
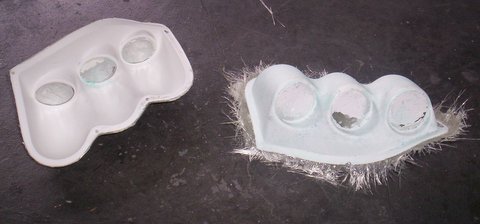
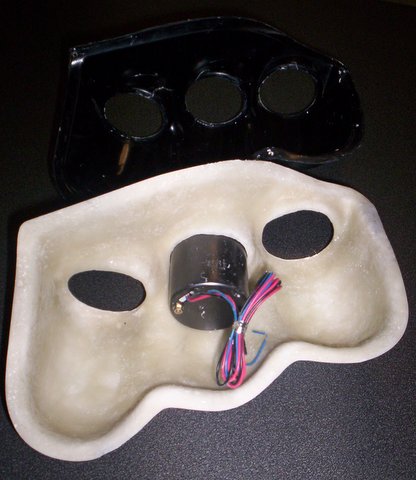
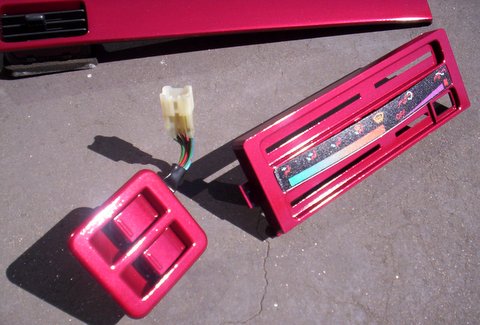
| So now that it's Trimmed up, not bad next to Original Pressed one. |
 |
|
| Logged |
|
|
|
Reply: 411 - 504 |
|
|
| Badger |
Posted on: Tuesday, April 17th, 2012, 2:49:36am
Attachment: 100_2487.jpg - 42.68 KB (623 views) |
|
|
|
| Inside........... |
 |
|
| Logged |
|
|
|
Reply: 412 - 504 |
|
|
| Badger |
Posted on: Tuesday, April 17th, 2012, 2:50:19am
Attachment: 100_2488.jpg - 35.09 KB (621 views) |
|
|
|
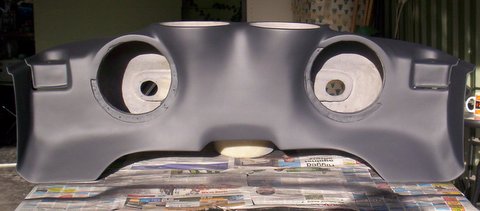
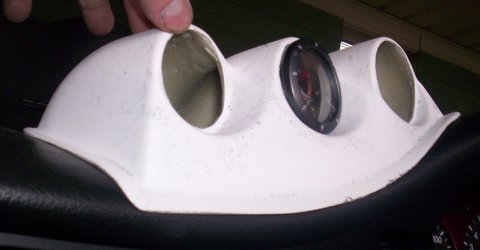
| Test fit on Dash |
 |
|
| Logged |
|
|
|
Reply: 413 - 504 |
|
|
| Badger |
Posted on: Tuesday, April 17th, 2012, 2:50:47am
Attachment: 100_2489.jpg - 17.58 KB (620 views) |
|
|
|
| Another |
 |
|
| Logged |
|
|
|
Reply: 414 - 504 |
|
|
| Badger |
Posted on: Tuesday, April 17th, 2012, 2:59:38am
Attachment: 100_2490.jpg - 40.18 KB (619 views) |
|
|
|
and after some reading, realised why it cracked at those points when I removed it from the mold.....the Gelcoat is not THICK ENOUGH !
I was just to impatient to see if it had actually worked, that and the fact that I 'Brushed' on the Gelcoat instead of 'Spraying' it on.....That's why it looks a bit blotchy.
As you can see from this Pic, though it wont matter when the Paint goes on, the next will be done with less speed and will have a few more coats..... |
 |
Last modified Tuesday, April 17th, 2012, 3:00:53am by Badger |
|
| Logged |
|
|
|
Reply: 415 - 504 |
|
|
| Capposteve |
| Posted on: Tuesday, April 17th, 2012, 7:35:14am |
|
|
|
|
| Logged |
|
|
|
Reply: 416 - 504 |
|
|
| Avar |
| Posted on: Tuesday, April 17th, 2012, 7:46:40am |
|
|
|
I think i made the same mistake with my first fender copy, not enough gel and too eager to get it out the mould. Next time i will be applying a 2nd gel just as the first gets tacky. I didn't think brushing or spraying would make much difference, i brush on and when its worked its pukka. I woulda thought that if you spray on you'll need a few more coats cause it'll be thiner so that it can run through the spray gear.
How much PVA u using and is it neat or slightly watered down?
Looking bloody good though. |
|
| Logged |
|
|
|
Reply: 417 - 504 |
|
|
| Badger |
| Posted on: Tuesday, April 17th, 2012, 8:35:42am |
|
|
|
Thanx guys, Kei, With Brushing it, if it doesn't settle/level, you get Brush strokes and thin spots as opposed to spraying a nice even coat/thickness. That said, I must have applied it thicker when I did the Mold cos It's nice and smooth.
As for the PVA, Straight out of the bottle and applied with a T-Shirt...coz i didn't have a sponge....again, something to be sprayed as most 'Glassers I've seen on YOUTUBE do.
a 2mm nozzle on my spray gun should be okay (Same as for the High Fill) when Spray Painting. I'll find out when I do the next one. |
|
| Logged |
|
|
|
Reply: 418 - 504 |
|
|
| Badger |
Posted on: Thursday, August 2nd, 2012, 7:41:21am
Attachment: 100_2496.jpg - 30.36 KB (538 views) |
|
|
|
| So while the Sun was out decided to get some Go juice and drive this one to work for a while, so Sneaza can get the upgrades.......... |
 |
|
| Logged |
|
|
|
Reply: 419 - 504 |
|
|
| Badger |
Posted on: Thursday, August 2nd, 2012, 7:42:07am
Attachment: 100_2497.jpg - 48.23 KB (540 views) |
|
|
|
| Just lucky, but I like this shot........... |
 |
|
| Logged |
|
|
|
Reply: 420 - 504 |
|
|
| Badger |
Posted on: Thursday, August 2nd, 2012, 7:42:53am
Attachment: 100_2501.jpg - 24.17 KB (536 views) |
|
|
|
| Trading Places.............. |
 |
|
| Logged |
|
|
|
Reply: 421 - 504 |
|
|
| Badger |
Posted on: Thursday, August 2nd, 2012, 7:45:12am
Attachment: 100_2502.jpg - 39.60 KB (537 views) |
|
|
|
| Still need to remove the bits and 'finish behind but been to busy and had sh*te English weather, but hopefully Painted before Xmas, well at least that's the plan......... |
 |
|
| Logged |
|
|
|
Reply: 422 - 504 |
|
|
| Badger |
Posted on: Thursday, August 2nd, 2012, 7:45:59am
Attachment: 100_2504.jpg - 76.53 KB (534 views) |
|
|
|
| Forgot about this one............ |
 |
|
| Logged |
|
|
|
Reply: 423 - 504 |
|
|
| Ricou |
| Posted on: Friday, August 3rd, 2012, 9:35:32am |
|
|
Maximum Member
Posts: 1110
Posts Per Day: 0.65 |
|
Great work Sneaza, I really like how it looks ! Which isn't something I can say about your other Cappuccino
|
|
| Logged |
|
|
| |
Reply: 424 - 504 |
|
|
| Badger |
| Posted on: Sunday, August 5th, 2012, 5:23:26am |
|
|
|
| Thanx.......???? Should I be insulted.........lol |
|
| Logged |
|
|
|
Reply: 425 - 504 |
|
|
| Ricou |
| Posted on: Sunday, August 5th, 2012, 2:01:42pm |
|
|
Maximum Member
Posts: 1110
Posts Per Day: 0.65 |
|
| No, you shouldn't, it's just that we don't have the same tastes, at least about one of your cars |
|
| Logged |
|
|
| |
Reply: 426 - 504 |
|
|
| redgaijin |
| Posted on: Monday, August 6th, 2012, 8:58:44am |
|
|
|
| Then why say anything? Just respect the mans work! |
|
| Logged |
|
|
|
Reply: 427 - 504 |
|
|
| Ricou |
| Posted on: Monday, August 6th, 2012, 9:16:06am |
|
|
Maximum Member
Posts: 1110
Posts Per Day: 0.65 |
|
| Oh don't worry, I respect his work and I would be really happy if I could do 1/10th of what he's done. |
|
| Logged |
|
|
| |
Reply: 428 - 504 |
|
|
| Badger |
Posted on: Monday, September 3rd, 2012, 10:07:31am
Attachment: 100_2508.jpg - 34.92 KB (402 views) |
|
|
|
| So we finally had a bit of Sun, which was good for getting the interior Plastic sorted.....Same colour that will be used on the outside...Metallic Wine Pearl... |
 |
|
| Logged |
|
|
|
Reply: 429 - 504 |
|
|
| Badger |
Posted on: Monday, September 3rd, 2012, 10:08:57am
Attachment: 100_2505.jpg - 24.11 KB (402 views) |
|
|
|
| All the bits WITHOUT grain, were given Gloss Clear over top. |
 |
|
| Logged |
|
|
|
Reply: 430 - 504 |
|
|
| Badger |
Posted on: Monday, September 3rd, 2012, 10:09:49am
Attachment: 100_2511.jpg - 44.72 KB (401 views) |
|
|
|
|
| Logged |
|
|
|
Reply: 431 - 504 |
|
|
| Badger |
Posted on: Monday, September 3rd, 2012, 10:10:25am
Attachment: 100_2512.jpg - 52.82 KB (400 views) |
|
|
|
|
| Logged |
|
|
|
Reply: 432 - 504 |
|
|
| Badger |
Posted on: Monday, September 3rd, 2012, 10:11:37am
Attachment: 100_2506.jpg - 40.21 KB (400 views) |
|
|
|
...this gave it another dimension, though not sure it came out so well in the pics....  |
 |
|
| Logged |
|
|
|
Reply: 433 - 504 |
|
|
| Badger |
Posted on: Monday, September 3rd, 2012, 10:13:01am
Attachment: 100_2517.jpg - 57.47 KB (401 views) |
|
|
|
| ... |
 |
|
| Logged |
|
|
|
Reply: 434 - 504 |
|
|
| Badger |
Posted on: Monday, September 3rd, 2012, 10:13:56am
Attachment: 100_2514.jpg - 13.31 KB (397 views) |
|
|
|
| Gave these bits the Before and After treatment..... |
 |
|
| Logged |
|
|
|
Reply: 435 - 504 |
|
|
| Badger |
Posted on: Monday, September 3rd, 2012, 10:14:30am
Attachment: 100_2515.jpg - 41.41 KB (397 views) |
|
|
|
| Added the Clear........... |
 |
|
| Logged |
|
|
|
Reply: 436 - 504 |
|
|
| Badger |
Posted on: Monday, September 3rd, 2012, 10:15:02am
Attachment: 100_2516.jpg - 17.57 KB (399 views) |
|
|
|
| Much better..... |
 |
|
| Logged |
|
|
|
Reply: 437 - 504 |
|
|
| Badger |
Posted on: Monday, September 3rd, 2012, 10:15:47am
Attachment: 100_2510.jpg - 28.45 KB (392 views) |
|
|
|
| Then onto the Dash |
 |
|
| Logged |
|
|
|
Reply: 438 - 504 |
|
|
| Badger |
Posted on: Monday, September 3rd, 2012, 10:18:18am
Attachment: 100_2509.jpg - 22.99 KB (396 views) |
|
|
|
| Last one for now, have to remove Carpet and seats now to run wiring for Audio Gear, then put it back together. The Seats, Head lining and Door Trims will be getting covered in similar shade soon, just have to decide on the Material Combination.... |
 |
|
| Logged |
|
|
|
Reply: 439 - 504 |
|
|
|
 Cappuccino Owners Club › Gallery › Cappo Related Album › Sneaza 2...The RED One (Moderators: )


 Locked Board