|
|
 Author Author |
 Sneaza 2...The RED One (currently 9664 views) Sneaza 2...The RED One (currently 9664 views) |
| ThePorko |
| Posted on: Monday, September 3rd, 2012, 10:41:12am |
  |
|
|
| This is come a long way since I last seen it... Looking good as always Dave! |
|
 Logged Logged |
|
|
 |
Reply: 440 - 504 |
|
|
| Badger |
Posted on: Monday, September 10th, 2012, 12:57:33am
 Attachment: 100_2519.jpg - 36.92 KB (561 views) Attachment: 100_2519.jpg - 36.92 KB (561 views) |
|
|
|
Thanx Will, getting there slowly..........
After placing the bits back in, had to remove them due to NOT TESTING Audio first. >
Had to rearrange the wiring coz of interference, and relocated the Amp from under Pass. seat as it was catching, not allowing for seat to slide. |
 |
|
| Logged |
|
|
|
Reply: 441 - 504 |
|
|
| Badger |
Posted on: Monday, September 10th, 2012, 12:58:37am
Attachment: 100_2521.jpg - 40.13 KB (560 views) |
|
|
|
Used the spare Pods I had for now with the Nakamichi Splits, Front and Rear, until I finish the Enclosure........  |
 |
Last modified Monday, September 10th, 2012, 1:40:10am by Badger |
|
| Logged |
|
|
|
Reply: 442 - 504 |
|
|
| Badger |
Posted on: Monday, September 10th, 2012, 12:59:17am
Attachment: 100_2523.jpg - 43.29 KB (562 views) |
|
|
|
...  |
 |
|
| Logged |
|
|
|
Reply: 443 - 504 |
|
|
| Badger |
Posted on: Monday, September 10th, 2012, 1:01:12am
Attachment: 100_2520.jpg - 34.50 KB (558 views) |
|
|
|
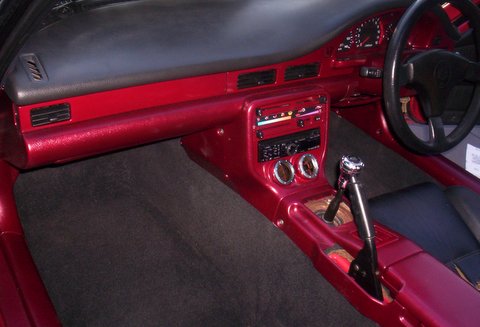
| Overall, very Happy with the result and as you can see, the 'Different Shade' effect on the pieces that were given the Clear coat. |
 |
|
| Logged |
|
|
|
Reply: 444 - 504 |
|
|
| Badger |
Posted on: Monday, September 10th, 2012, 1:04:57am
Attachment: 100_2522.jpg - 47.20 KB (556 views) |
|
|
|
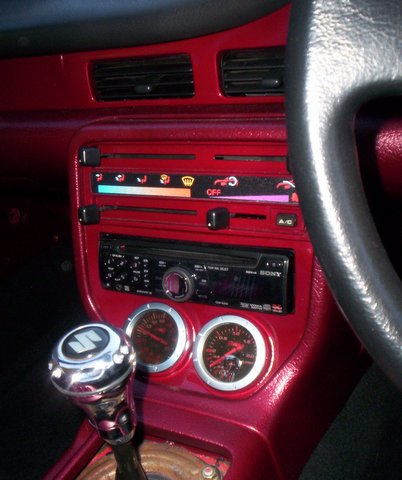
Last one......for now
Head unit from Sneaza, Gauges in place and the NEW sticker on the Heater unit, though when it lights up, is more amber than red, it may have something to do with the small globe having the Blue rubber over it, so I will just have to remove it and paint it red as I did for the Demister one..... |
 |
|
| Logged |
|
|
|
Reply: 445 - 504 |
|
|
| lord |
| Posted on: Monday, September 10th, 2012, 1:18:20am |
|
|
|
That's sick! Serious!
That's looking blingin! |
|
| Logged |
|
|
|
Reply: 446 - 504 |
|
|
| grant4561 |
| Posted on: Monday, September 10th, 2012, 4:39:36am |
|
|
Maximum Member

Posts: 1719
Posts Per Day: 0.98 |
|
| Looks excellant Dave. Gee I really like those rear speaker pods. LOL |
|
| Logged |
|
|
 |
Reply: 447 - 504 |
|
|
| Badger |
| Posted on: Monday, September 10th, 2012, 4:52:41am |
|
|
|
| Thanx boys...yes they do look the part...lol and will be for sale when I get the Enclosure finished, thank god for some sunshine and warm weather...a 3 day weekend also helps...changed shifts at work again, so should be able to get things finished. |
|
| Logged |
|
|
|
Reply: 448 - 504 |
|
|
| ThePorko |
| Posted on: Thursday, September 13th, 2012, 8:05:31am |
|
|
|
| So much red! Loving the rear speaker pods. That is a great idea. |
|
| Logged |
|
|
|
Reply: 449 - 504 |
|
|
| Badger |
| Posted on: Thursday, September 13th, 2012, 8:16:47am |
|
|
|
| Cheers mate.....and it's NOT RED.....Lol |
|
| Logged |
|
|
|
Reply: 450 - 504 |
|
|
| ThePorko |
| Posted on: Thursday, September 13th, 2012, 11:00:55am |
|
|
|
“ |
Quoted from Badger, posted Thursday, September 13th, 2012, 8:16:47am at here |
” |
Cheers mate.....and it's NOT RED.....Lol
|
|
Maybe its my TV....or am going colour blind what colour is it? |
|
| Logged |
|
|
|
Reply: 451 - 504 |
|
|
| Badger |
Posted on: Friday, September 14th, 2012, 3:11:54am
Attachment: brandywine.jpg - 8.71 KB (473 views) |
|
|
|
A Lighter shade of this..... ...My Paint Guy called it 'Wine Pearl'  |
 |
|
| Logged |
|
|
|
Reply: 452 - 504 |
|
|
| ThePorko |
| Posted on: Sunday, September 16th, 2012, 4:07:10am |
|
|
|
|
| Logged |
|
|
|
Reply: 453 - 504 |
|
|
| Badger |
Posted on: Tuesday, September 18th, 2012, 6:21:36am
Attachment: 100_2524.jpg - 23.85 KB (433 views) |
|
|
|
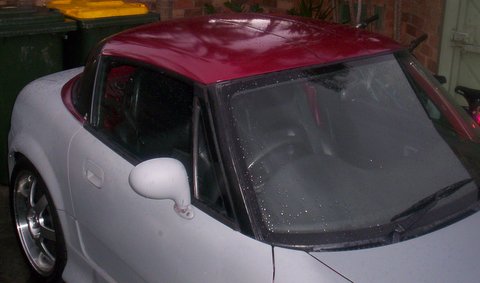
3day weekend, good weather, NO Family members to bug me....got some work done.
Firstly.....Roof Panels Painted and Cleared....  |
 |
|
| Logged |
|
|
|
Reply: 454 - 504 |
|
|
| Badger |
Posted on: Tuesday, September 18th, 2012, 6:23:20am
Attachment: 100_2525.jpg - 22.36 KB (180 views) |
|
|
|
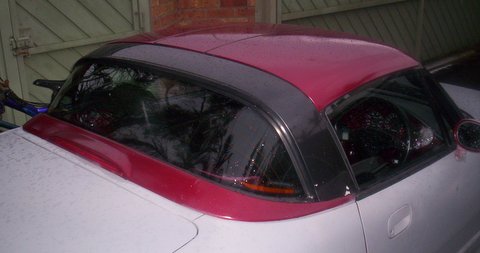
Yes, just after I put them on, after fitting all the trim back on, it rained.......So you cant really notice the Metallic  Just got the Hoop to do, then get the windows tinted, Then wait for the weather again, to Finish the rest off. Just got the Hoop to do, then get the windows tinted, Then wait for the weather again, to Finish the rest off. |
 |
Last modified Tuesday, September 18th, 2012, 6:24:25am by Badger |
|
| Logged |
|
|
|
Reply: 455 - 504 |
|
|
| Badger |
Posted on: Tuesday, September 18th, 2012, 6:25:53am
Attachment: 100_2526.jpg - 25.44 KB (438 views) |
|
|
|
| Damn Flash changes everything. I didn't put the Edge strips back on as I wanted to see how it looks without and I like it....... |
 |
|
| Logged |
|
|
|
Reply: 456 - 504 |
|
|
| Badger |
Posted on: Tuesday, September 18th, 2012, 6:28:23am
Attachment: 100_2527.jpg - 20.59 KB (425 views) |
|
|
|
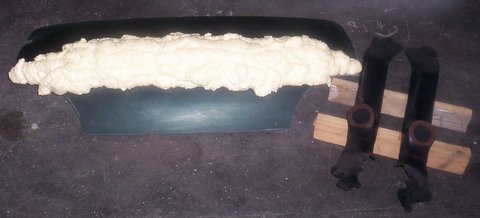
| While I was waiting for these to dry, decided to make a start on another 'Ducktail' Shaping and Glassing to follow.....and A-Pillar Pods so I can put the front Tweets in. |
 |
|
| Logged |
|
|
|
Reply: 457 - 504 |
|
|
| Badger |
Posted on: Tuesday, September 18th, 2012, 6:29:39am
Attachment: 100_2530.jpg - 14.24 KB (425 views) |
|
|
|
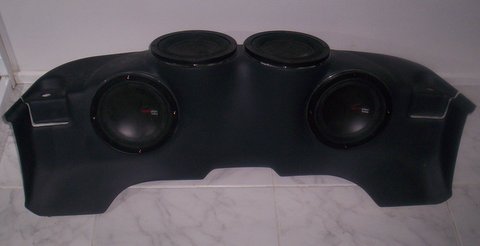
Forgot about these...Enclosure finished and Subs mounted.  |
 |
|
| Logged |
|
|
|
Reply: 458 - 504 |
|
|
| Badger |
Posted on: Tuesday, September 18th, 2012, 6:30:05am
Attachment: 100_2531.jpg - 12.77 KB (426 views) |
|
|
|
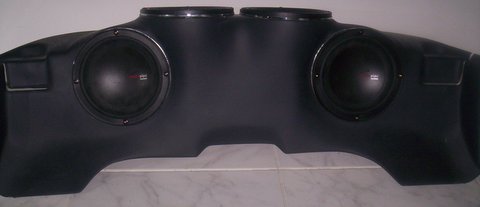
| Front.......... |
 |
|
| Logged |
|
|
|
Reply: 459 - 504 |
|
|
| Badger |
Posted on: Tuesday, September 18th, 2012, 6:30:53am
Attachment: 100_2529.jpg - 12.63 KB (426 views) |
|
|
|
Top / Rear.........  |
 |
|
| Logged |
|
|
|
Reply: 460 - 504 |
|
|
| Badger |
Posted on: Tuesday, September 18th, 2012, 6:35:22am
Attachment: 100_2528.jpg - 21.13 KB (425 views) |
|
|
|
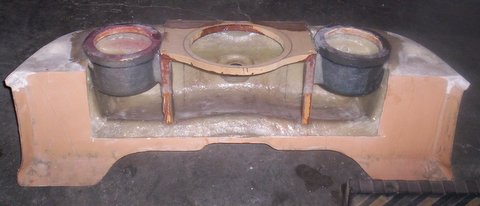
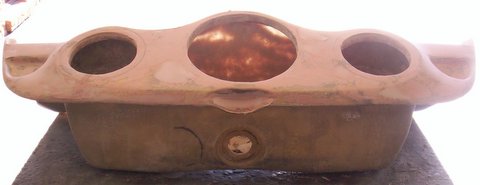
And while that one will end up in Sneaza, This one will end up in this one......Holds 10" Sub, 2 x 6 1/2" Mid Bass and 2 x 3" Tweeters...yet to be molded in.
Everything has it's own enclosure within the Enclosure, just 'Glassing everything before I shape the Front and top... .
That's it for now, work now takes over....  |
 |
|
| Logged |
|
|
|
Reply: 461 - 504 |
|
|
| lord |
| Posted on: Tuesday, September 18th, 2012, 8:05:12am |
|
|
|
| Just amazing. One man production line!!! Your new cappo slogan. |
|
| Logged |
|
|
|
Reply: 462 - 504 |
|
|
| ThePorko |
| Posted on: Tuesday, September 18th, 2012, 11:02:41am |
|
|
|
| The new one for sneaza should pack a punch! |
|
| Logged |
|
|
|
Reply: 463 - 504 |
|
|
| Andy |
| Posted on: Tuesday, September 18th, 2012, 6:52:26pm |
|
|
Official C.O.C Contributor

Gender:  Male Male
Posts: 23604
Posts Per Day: 3.48 |
|
Top job as always Dave!  |
Drop me a PM if you would like to be added to the ClubCappo Member Map. More details can be found here.
We now have an official Facebook group as well as a page! See here |
|
| Logged |
|
|
| |
Reply: 464 - 504 |
|
|
| Badger |
Posted on: Tuesday, October 23rd, 2012, 6:12:52am
Attachment: 100_2534.jpg - 33.42 KB (356 views) |
|
|
|
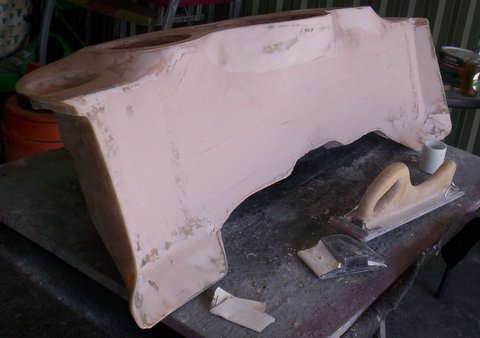
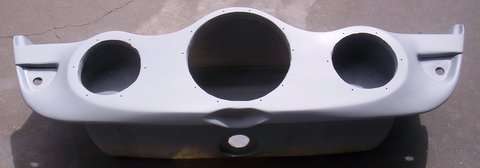
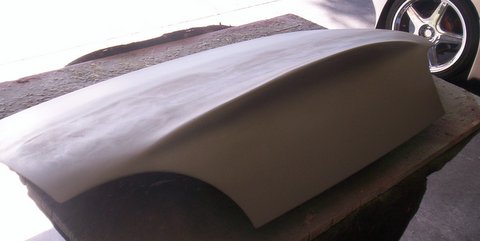
| So.....Having laid it up, Glassed it and Filled, started sanding down..... |
 |
|
| Logged |
|
|
|
Reply: 465 - 504 |
|
|
| Badger |
Posted on: Tuesday, October 23rd, 2012, 6:13:17am
Attachment: 100_2535.jpg - 15.09 KB (357 views) |
|
|
|
| Top........ |
 |
|
| Logged |
|
|
|
Reply: 466 - 504 |
|
|
| Badger |
Posted on: Tuesday, October 23rd, 2012, 6:14:31am
Attachment: 100_2538.jpg - 33.45 KB (353 views) |
|
|
|
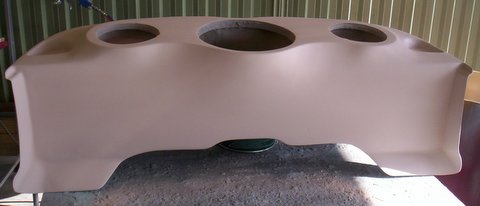
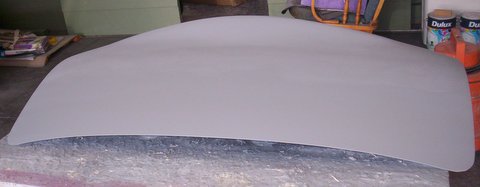
| Primed, Sanded and low bits filled..... |
 |
|
| Logged |
|
|
|
Reply: 467 - 504 |
|
|
| Badger |
Posted on: Tuesday, October 23rd, 2012, 6:14:58am
Attachment: 100_2539.jpg - 19.26 KB (350 views) |
|
|
|
| ....Top |
 |
|
| Logged |
|
|
|
Reply: 468 - 504 |
|
|
| Badger |
Posted on: Tuesday, October 23rd, 2012, 6:15:32am
Attachment: 100_2541.jpg - 16.51 KB (351 views) |
|
|
|
| Highfilled................ |
 |
|
| Logged |
|
|
|
Reply: 469 - 504 |
|
|
| Badger |
Posted on: Tuesday, October 23rd, 2012, 6:17:08am
Attachment: 100_2543.jpg - 14.40 KB (353 views) |
|
|
|
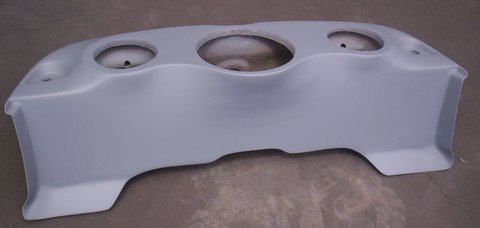
Primed, then it dawned on me....DOH!!! I Hadn't cut out for the Seat Belts...  So, that fixed..... So, that fixed..... |
 |
|
| Logged |
|
|
|
Reply: 470 - 504 |
|
|
| Badger |
Posted on: Tuesday, October 23rd, 2012, 6:17:37am
Attachment: 100_2542.jpg - 13.96 KB (350 views) |
|
|
|
| ...Top |
 |
|
| Logged |
|
|
|
Reply: 471 - 504 |
|
|
| Badger |
Posted on: Tuesday, October 23rd, 2012, 6:18:20am
Attachment: 100_2545.jpg - 21.72 KB (349 views) |
|
|
|
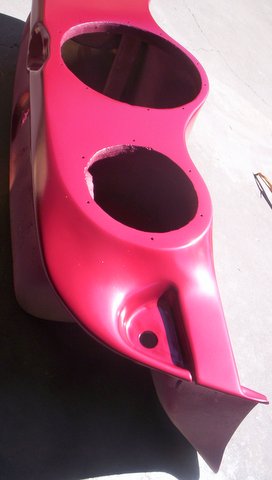
| Wet Rubbed and Base Coat applied. |
 |
|
| Logged |
|
|
|
Reply: 472 - 504 |
|
|
| Badger |
Posted on: Tuesday, October 23rd, 2012, 6:19:11am
Attachment: 100_2549.jpg - 19.89 KB (349 views) |
|
|
|
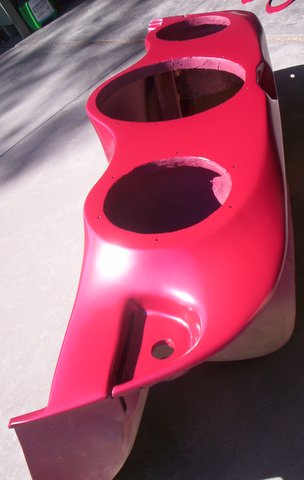
| Top RHS........... |
 |
|
| Logged |
|
|
|
Reply: 473 - 504 |
|
|
| Badger |
Posted on: Tuesday, October 23rd, 2012, 6:19:42am
Attachment: 100_2550.jpg - 28.80 KB (347 views) |
|
|
|
| Top LHS.......... |
 |
|
| Logged |
|
|
|
Reply: 474 - 504 |
|
|
| Badger |
Posted on: Tuesday, October 23rd, 2012, 6:20:23am
Attachment: 100_2547.jpg - 16.77 KB (346 views) |
|
|
|
| and almost forgot to do underneath..... |
 |
|
| Logged |
|
|
|
Reply: 475 - 504 |
|
|
| Badger |
Posted on: Tuesday, October 23rd, 2012, 6:21:38am
Attachment: 100_2548.jpg - 31.10 KB (345 views) |
|
|
|
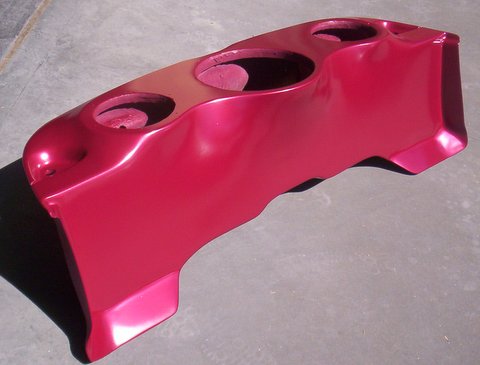
| Then out in the sun to dry for a while.....Clear coat to come when I pick up a new gun, cos I broke it...... |
 |
|
| Logged |
|
|
|
Reply: 476 - 504 |
|
|
| Badger |
Posted on: Tuesday, October 23rd, 2012, 6:23:15am
Attachment: 100_2537.jpg - 18.22 KB (345 views) |
|
|
|
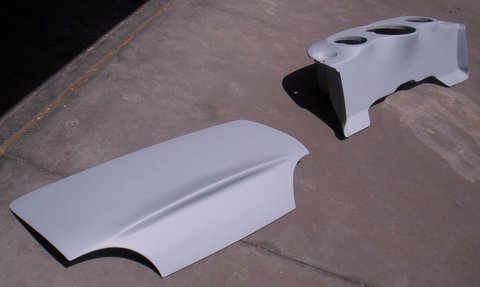
| Didn't bother with the BEFORE...pics, cos you have seen how it's done when I shape the foam, but, I finished of the Boot Lid also..... |
 |
|
| Logged |
|
|
|
Reply: 477 - 504 |
|
|
| Badger |
Posted on: Tuesday, October 23rd, 2012, 6:23:59am
Attachment: 100_2536.jpg - 15.28 KB (344 views) |
|
|
|
| Top..... |
 |
|
| Logged |
|
|
|
Reply: 478 - 504 |
|
|
| Badger |
Posted on: Tuesday, October 23rd, 2012, 6:24:40am
Attachment: 100_2544.jpg - 19.25 KB (341 views) |
|
|
|
| Out to dry with the Speaker Enclosure...... |
 |
|
| Logged |
|
|
|
Reply: 479 - 504 |
|
|
|
 Cappuccino Owners Club › Gallery › Cappo Related Album › Sneaza 2...The RED One (Moderators: )


 Locked Board