|
|
 Author Author |
 Fibre Glass Parcel Shelf Enclosure (currently 7425 views) Fibre Glass Parcel Shelf Enclosure (currently 7425 views) |
| Badger |
Posted on: Tuesday, July 29th, 2008, 12:32:26pm
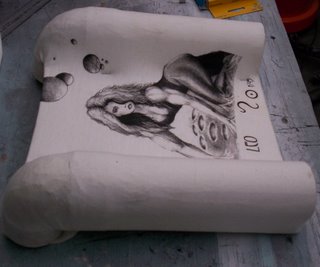
 Attachment: 100_1363.jpg - 10.47 KB (689 views) Attachment: 100_1363.jpg - 10.47 KB (689 views) |
  |
|
|
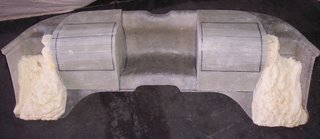
drop them back in place to get a good idea.....I must admit at this point, I'm treading water so if I stuff up the next bit I'll have to start ALL OVER AGAIN......You won't see this coming...I didn't but it's the only way I see it happening......  |
 |
|
 Logged Logged |
|
|
 |
Reply: 360 - 446 |
|
|
| Olyfan |
| Posted on: Tuesday, July 29th, 2008, 2:27:03pm |
|
|
|
is there an Aussie phrase for"f'ing gob-smacked" Sneaza - 'cos I is!  |
|
| Logged |
|
|
|
Reply: 361 - 446 |
|
|
| capgun |
| Posted on: Tuesday, July 29th, 2008, 5:28:41pm |
|
|
|
| Looks great Sneaza I can't quite see from that photo but there will be enough clearance for the seats won't there? |
|
| Logged |
|
|
|
Reply: 362 - 446 |
|
|
| crisp |
| Posted on: Tuesday, July 29th, 2008, 6:43:38pm |
|
|
|

“ |
Quoted from capgun, posted Tuesday, July 29th, 2008, 5:28:41pm at here |
” |
will be enough clearance for the seats won't there?
|
|
Not something someone of "normal" height like myself needs worry unduly about  it's just those abnormal lanky b#ggers that'll be of concern, lol it's just those abnormal lanky b#ggers that'll be of concern, lol  |
Last modified Tuesday, July 29th, 2008, 10:18:59pm by crisp |
|
| Logged |
|
|
|
Reply: 363 - 446 |
|
|
| capgun |
| Posted on: Wednesday, July 30th, 2008, 4:34:20am |
|
|
|
| You don't have any in the uk? pffft |
|
| Logged |
|
|
|
Reply: 364 - 446 |
|
|
| Badger |
| Posted on: Wednesday, July 30th, 2008, 7:51:55am |
|
|
|
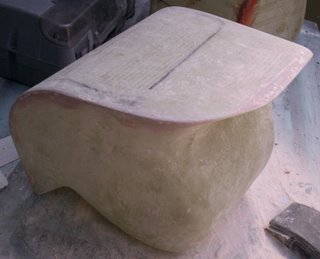
Not that I've checked....as I have to dismantle mine first, and that won't happen until I'm almost ready to finish, but, the whole thing doesn't protrude any further than the Original Parcel Shelf.....with the exception of the Sub Pod, which, if you can remember mine and Crisps' sketches....a few pages back, sits above the Rear Window Release Handle and has 2 x 50mm Tubes...1 either side, which shouldn't interfere with anything.....I hope.........
It has more room than my Speaker Enclosure No.2......'cos it doesn't have speakers all over it...
...Thanx once again for the interest and supportive comments guys.....appreciated. |
Last modified Wednesday, July 30th, 2008, 7:53:08am by Badger |
|
| Logged |
|
|
|
Reply: 365 - 446 |
|
|
| Badger |
Posted on: Monday, August 4th, 2008, 8:01:20am
Attachment: 100_1364.jpg - 16.34 KB (643 views) |
|
|
|
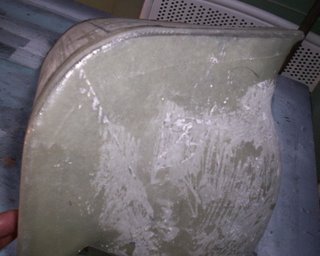
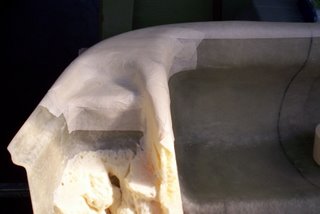
Okay, Work out of the way until Wednesday, we continue. What I feared happened.....  Applied a Fine weave trim piece around the edges to temporarily 'Fill The Gaps', but the Air bubbles got the better of me.......... > Applied a Fine weave trim piece around the edges to temporarily 'Fill The Gaps', but the Air bubbles got the better of me.......... > |
 |
|
| Logged |
|
|
|
Reply: 366 - 446 |
|
|
| Badger |
Posted on: Monday, August 4th, 2008, 8:03:21am
Attachment: 100_1365.jpg - 14.05 KB (641 views) |
|
|
|
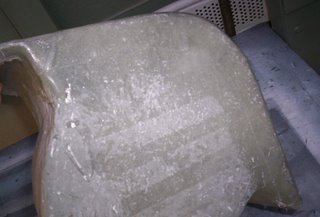
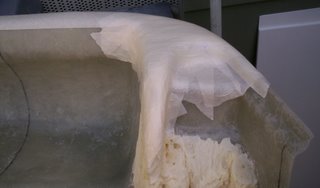
| ....and because this is a 'Strip' 50mm wide, it doesn't like being applied over edges.....which is the cause of the Bubbles.Some bits were okay, but most wasn't. |
 |
|
| Logged |
|
|
|
Reply: 367 - 446 |
|
|
| Badger |
Posted on: Monday, August 4th, 2008, 8:05:16am
Attachment: 100_1371.jpg - 25.51 KB (638 views) |
|
|
|
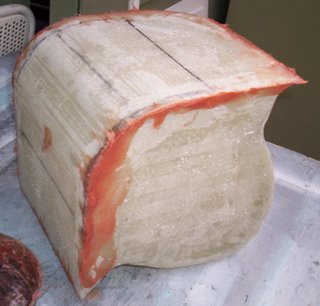
| So, rather than waiting a week to continue, I did what I was going to do initially and fill all the edges with FibreGlass reinforced Body Filler......Great stuff this |
 |
|
| Logged |
|
|
|
Reply: 368 - 446 |
|
|
| Badger |
Posted on: Monday, August 4th, 2008, 8:06:43am
Attachment: 100_1372.jpg - 14.27 KB (636 views) |
|
|
|
| Applied more Hardener to make it 'GO OFF' quicker, out in the Sun for a bit, then Sand it down.... |
 |
|
| Logged |
|
|
|
Reply: 369 - 446 |
|
|
| Badger |
Posted on: Monday, August 4th, 2008, 8:11:58am
Attachment: 100_1366.jpg - 10.83 KB (636 views) |
|
|
|
| At this point, you need to Sand down this area on both sides...getting as smooth as possible...... |
 |
Last modified Monday, August 4th, 2008, 8:12:20am by Badger |
|
| Logged |
|
|
|
Reply: 370 - 446 |
|
|
| Badger |
Posted on: Monday, August 4th, 2008, 8:14:07am
Attachment: 100_1367.jpg - 13.82 KB (634 views) |
|
|
|
| and around the back a bit also....up to the Marking Pen line. |
 |
|
| Logged |
|
|
|
Reply: 371 - 446 |
|
|
| Badger |
Posted on: Monday, August 4th, 2008, 8:16:00am
Attachment: 100_1368.jpg - 11.73 KB (633 views) |
|
|
|
| Then, turn it over and Drill out the Black circle you marked earlier....For Seat Belt Bolts. |
 |
|
| Logged |
|
|
|
Reply: 372 - 446 |
|
|
| Badger |
Posted on: Monday, August 4th, 2008, 8:16:52am
Attachment: 100_1369.jpg - 10.98 KB (633 views) |
|
|
|
| Now, Mask off this area...... |
 |
|
| Logged |
|
|
|
Reply: 373 - 446 |
|
|
| Badger |
Posted on: Monday, August 4th, 2008, 8:17:51am
Attachment: 100_1370.jpg - 9.62 KB (627 views) |
|
|
|
| ...Both sides........ |
 |
|
| Logged |
|
|
|
Reply: 374 - 446 |
|
|
| Badger |
Posted on: Monday, August 4th, 2008, 8:18:46am
Attachment: 100_1373.jpg - 15.37 KB (631 views) |
|
|
|
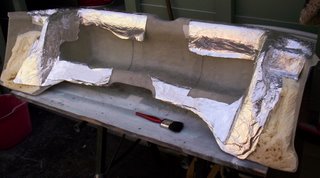
| Use the Spray Adhesive and apply the Alfoil..... |
 |
|
| Logged |
|
|
|
Reply: 375 - 446 |
|
|
| Badger |
Posted on: Monday, August 4th, 2008, 8:19:26am
Attachment: 100_1374.jpg - 16.20 KB (627 views) |
|
|
|
| from behind..... |
 |
|
| Logged |
|
|
|
Reply: 376 - 446 |
|
|
| Badger |
Posted on: Monday, August 4th, 2008, 8:20:46am
Attachment: 100_1375.jpg - 21.70 KB (627 views) |
|
|
|
| Now cut strips of the Fibreglass Matting and apply into these areas on Both sides...... |
 |
Last modified Monday, September 1st, 2008, 8:13:12am by Badger |
|
| Logged |
|
|
|
Reply: 377 - 446 |
|
|
| Badger |
Posted on: Monday, August 4th, 2008, 8:22:38am
Attachment: 100_1376.jpg - 15.16 KB (626 views) |
|
|
|
| And Now.......The bit you won't see coming.... Place the Pod into position...... |
 |
|
| Logged |
|
|
|
Reply: 378 - 446 |
|
|
| Badger |
Posted on: Monday, August 4th, 2008, 8:31:24am
Attachment: 100_1377.jpg - 17.11 KB (626 views) |
|
|
|
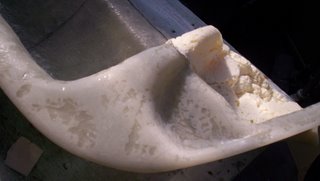
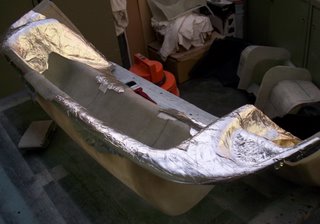
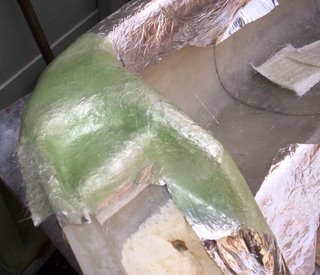
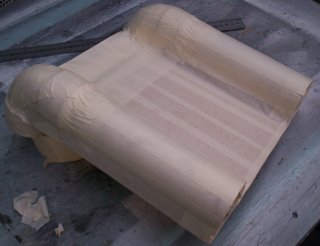
And while this is still wet, apply a Layer of Matt over the entire Pod, Top and Front and 'Wet Area'..........Squeezing out Air Bubbles as you go to get a tight fit..........
I should've stated cutting enough Matting to cover this earlier, but that would've given it away. As I mentioned a few pages ago...???, How I was going to attach all these together, after a lot of Headbanging......due to the music on my IPod....lol, Came up with this.
To incorporate it into the overall Aesthetics of the build, while still able to be remove if needed...albeit, by undoing the Seat Belt Tower Bolt, but it won't move and that was part of my plan for a 'Stealth' finish.....well, it sounds good...lol |
 |
|
| Logged |
|
|
|
Reply: 379 - 446 |
|
|
| Badger |
Posted on: Monday, August 4th, 2008, 8:32:28am
Attachment: 100_1378.jpg - 13.62 KB (625 views) |
|
|
|
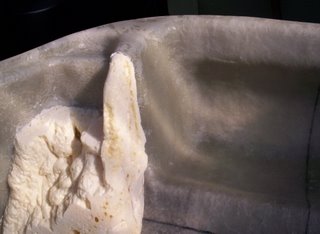
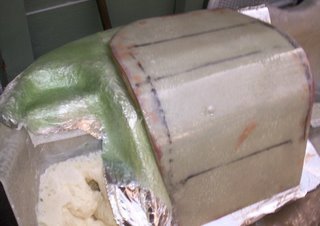
| Both in place and 'Glassed..... |
 |
|
| Logged |
|
|
|
Reply: 380 - 446 |
|
|
| Badger |
| Posted on: Monday, August 4th, 2008, 8:36:37am |
|
|
|
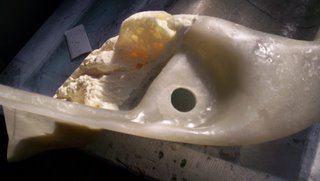
from the Top.....
Now, before you ask, yes it will be strong enough....I haven't finished with it yet, You'll see........well, you will if you keep checking in to see how far along it's getting...lol. That's it until tomorrow, when I can remove them and proceed.... |
|
| Logged |
|
|
|
Reply: 381 - 446 |
|
|
| Badger |
Posted on: Monday, August 4th, 2008, 8:39:25am
Attachment: 100_1379.jpg - 18.60 KB (621 views) |
|
|
|
Don't know why it didn't attach to the one above...???  |
 |
|
| Logged |
|
|
|
Reply: 382 - 446 |
|
|
| Badger |
Posted on: Tuesday, August 5th, 2008, 8:42:21am
Attachment: 100_1381.jpg - 25.88 KB (610 views) |
|
|
|
| So, Sun was out.....just thought I'd rub it in...... |
 |
|
| Logged |
|
|
|
Reply: 383 - 446 |
|
|
| Badger |
Posted on: Tuesday, August 5th, 2008, 8:44:30am
Attachment: 100_1380.jpg - 11.53 KB (611 views) |
|
|
|
| Decided to fill in the Low spots with the reinforced Filler and into Sun for a while........ |
 |
|
| Logged |
|
|
|
Reply: 384 - 446 |
|
|
| Badger |
Posted on: Tuesday, August 5th, 2008, 8:45:54am
Attachment: 100_1382.jpg - 26.12 KB (611 views) |
|
|
|
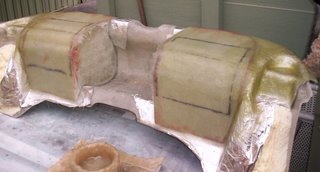
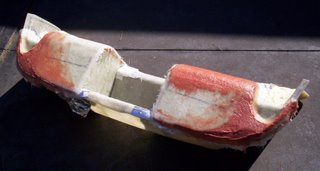
| While waiting, added a third layer to the Sub Pod, then started on the Front of it. |
 |
|
| Logged |
|
|
|
Reply: 385 - 446 |
|
|
| Badger |
Posted on: Tuesday, August 5th, 2008, 8:47:16am
Attachment: 100_1383.jpg - 16.57 KB (609 views) |
|
|
|
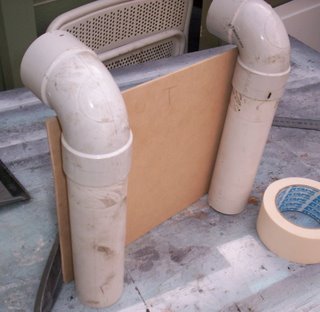
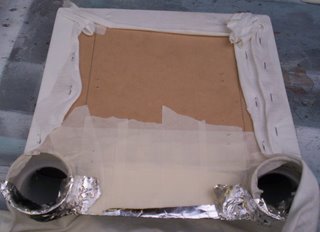
| 3mm MDF cut to size, Tubes riveted into place........... |
 |
|
| Logged |
|
|
|
Reply: 386 - 446 |
|
|
| Badger |
Posted on: Tuesday, August 5th, 2008, 8:48:08am
Attachment: 100_1385.jpg - 12.95 KB (608 views) |
|
|
|
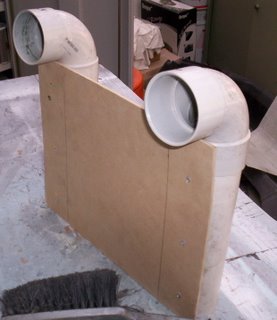
| Applied the Masking Tape.... |
 |
Last modified Tuesday, August 5th, 2008, 8:49:03am by Badger |
|
| Logged |
|
|
|
Reply: 387 - 446 |
|
|
| Badger |
Posted on: Tuesday, August 5th, 2008, 8:50:06am
Attachment: 100_1386.jpg - 17.27 KB (605 views) |
|
|
|
| Spray Glued and Foiled..... , Flash didn't work.... |
 |
Last modified Saturday, August 9th, 2008, 7:26:54am by Badger |
|
| Logged |
|
|
|
Reply: 388 - 446 |
|
|
| Badger |
Posted on: Tuesday, August 5th, 2008, 8:51:12am
Attachment: 100_1387.jpg - 14.02 KB (602 views) |
|
|
|
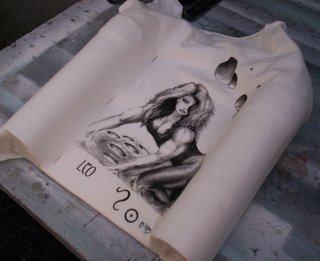
| Cut up an old T-Shirt.....and lay in place. |
 |
|
| Logged |
|
|
|
Reply: 389 - 446 |
|
|
| Badger |
Posted on: Tuesday, August 5th, 2008, 8:53:50am
Attachment: 100_1388.jpg - 13.66 KB (603 views) |
|
|
|
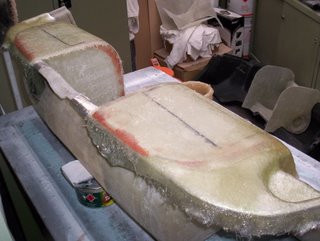
| and starting at 1 side, stapled on the backside....pulled over the front, stapled close to the tubes, stretched, stapled other side, stretched over other Tube and stapled to backside.... |
 |
Last modified Tuesday, August 5th, 2008, 8:58:03am by Badger |
|
| Logged |
|
|
|
Reply: 390 - 446 |
|
|
| Badger |
Posted on: Tuesday, August 5th, 2008, 8:56:10am
Attachment: 100_1389.jpg - 15.69 KB (601 views) |
|
|
|
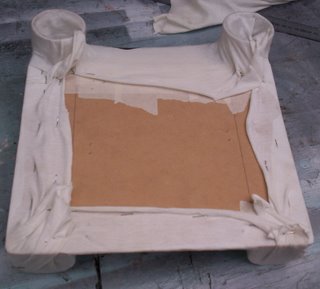
As you can see above, a second row on the RHS, as I stretched more to remove as many wrinkles as poss.
This shows staples close to tubes....only there to hold shape in place until resin goes hard. |
 |
Last modified Tuesday, August 5th, 2008, 8:58:56am by Badger |
|
| Logged |
|
|
|
Reply: 391 - 446 |
|
|
| Badger |
Posted on: Tuesday, August 5th, 2008, 8:57:16am
Attachment: 100_1390.jpg - 15.49 KB (599 views) |
|
|
|
| Pulled and stretched until I was reasonably happy..... |
 |
|
| Logged |
|
|
|
Reply: 392 - 446 |
|
|
| Badger |
Posted on: Tuesday, August 5th, 2008, 9:00:14am
Attachment: 100_1391.jpg - 14.99 KB (597 views) |
|
|
|
| Just double checking the wrinkles before the Resin..... |
 |
|
| Logged |
|
|
|
Reply: 393 - 446 |
|
|
| Badger |
Posted on: Tuesday, August 5th, 2008, 9:01:29am
Attachment: 100_1392.jpg - 17.76 KB (598 views) |
|
|
|
| 1 layer applied....now we wait again..... |
 |
|
| Logged |
|
|
|
Reply: 394 - 446 |
|
|
| Badger |
Posted on: Tuesday, August 5th, 2008, 9:05:39am
Attachment: 100_1384.jpg - 16.13 KB (594 views) |
|
|
|
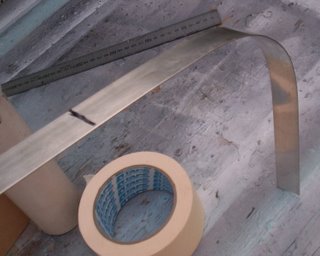
...so while that happens, I decided to bend up the door stops, which will be cut to size and installed once I'm happy with the shape of the pods...after they get cleaned up, sanded, smoothed...then I can CUT THE DOOR and continue......
|
 |
|
| Logged |
|
|
|
Reply: 395 - 446 |
|
|
| Olyfan |
| Posted on: Tuesday, August 5th, 2008, 11:37:35am |
|
|
|
This is like Blue Peter for adults!!! FANTASTIC stuff Sneaza - you just amaze me every time you post the next batch of pics on here.... genius. Imagine if you and CG collaborated more!!
 |
|
| Logged |
|
|
|
Reply: 396 - 446 |
|
|
| Badger |
| Posted on: Tuesday, August 5th, 2008, 12:44:00pm |
|
|
|
| LOL.....Cheers mate, there'd be no end....... . |
|
| Logged |
|
|
|
Reply: 397 - 446 |
|
|
| capgun |
| Posted on: Friday, August 8th, 2008, 2:47:09pm |
|
|
|
|
| Logged |
|
|
|
Reply: 398 - 446 |
|
|
| crisp |
| Posted on: Friday, August 8th, 2008, 11:41:36pm |
|
|
|
OMG!
I go away and hide in a tinternet-less tent for a week and look at what you have achieved!
OMG! this goes from GOOD to just DAMN Good!
(Unlike McDs) "I'm loving it!"
Too damn right, Oly, I couldn't agree more!
|
Last modified Friday, August 8th, 2008, 11:42:31pm by crisp |
|
| Logged |
|
|
|
Reply: 399 - 446 |
|
|
|
 Cappuccino Owners Club › FAQ › How to... › Fibre Glass Parcel Shelf Enclosure (Moderators: )


 Locked Board